This article was published on the "Sohu Technology Products" public account How to Enable iOS Push Notifications to Play Voice
iOS Push Notifications to Play Voice#
1. Background#
The demand research for iOS push notifications to play voice involves playing the content of the push notification upon receipt, where the content is not fixed. This is similar to the voice notifications for payment receipts in Alipay and WeChat.
- Only devices with iOS 10 and above support audio playback in the background/lock screen state after the app is awakened by a push notification. Therefore, devices below iOS 10 can only set a fixed ringtone for local push notifications upon receiving a VoIP Push, which is why only "WeChat payment receipt" is available on iOS 10 and below.
- Before iOS 12.0, there were no restrictions on background audio playback, and the system-provided AVSpeechSynthesizer could be used directly with the Notification Service Extension (supported after iOS 10.0).
- After iOS 12.0, the background audio playback feature of the Notification Service Extension was restricted, making playback implementation more difficult.
- If you want to publish to the App Store, you can only play fixed audio or fixed concatenated audio by setting the notification sound or sending local notifications to set the local notification sound.
- If you do not need to publish to the App Store, you can manually enable background playback for the Notification Service Extension.
2. Development Process#
a. Notification Service Extension#

The logic after adding the Notification Service Extension to the project differs from before. As shown in the figure below:
After adding it, when a push notification is received, it will trigger the method in the Notification Service Extension, where you can modify the title, content, and sound of the push notification. Then, the modified push notification is displayed.
The lifecycle of the notification bar:
- From the moment the notification is displayed (trigger code: self.contentHandler(self.bestAttemptContent);) until the notification is dismissed (controlled by the system), there is approximately 6 seconds.
- If the notification is received but the notification bar is not called out, the system will call the self.contentHandler(self.bestAttemptContent) in the serviceExtensionTimeWillExpire method after a maximum of 30 seconds to call out the notification bar.
It is important to note that the Notification Service Extension and the main project are not the same target, so the files of the main project and this target are not shared.
- When creating new files, be sure to check the target to which they will be added.
- For example, when adding a class for playing voice notifications, it needs to be checked under the Notification Service Extension Target;
- When copying third-party SDKs for voice playback, it needs to be checked under the Notification Service Extension Target;
- When creating a new application on the third-party platform, the bundle ID to fill in should also correspond to the bundle ID of the Notification Service Extension Target. This point is especially important because the Baidu test account can only add the offline SDK once. If you make a mistake, you will need to register with a new account, a painful lesson, 😂.
- The bundle directory access is also not the same, but data can be shared through App Groups.
- When enabling background playback, it should actually be the background playback under the Notification Service Extension Target, which will be explained in detail later.
The creation steps are as follows:
-
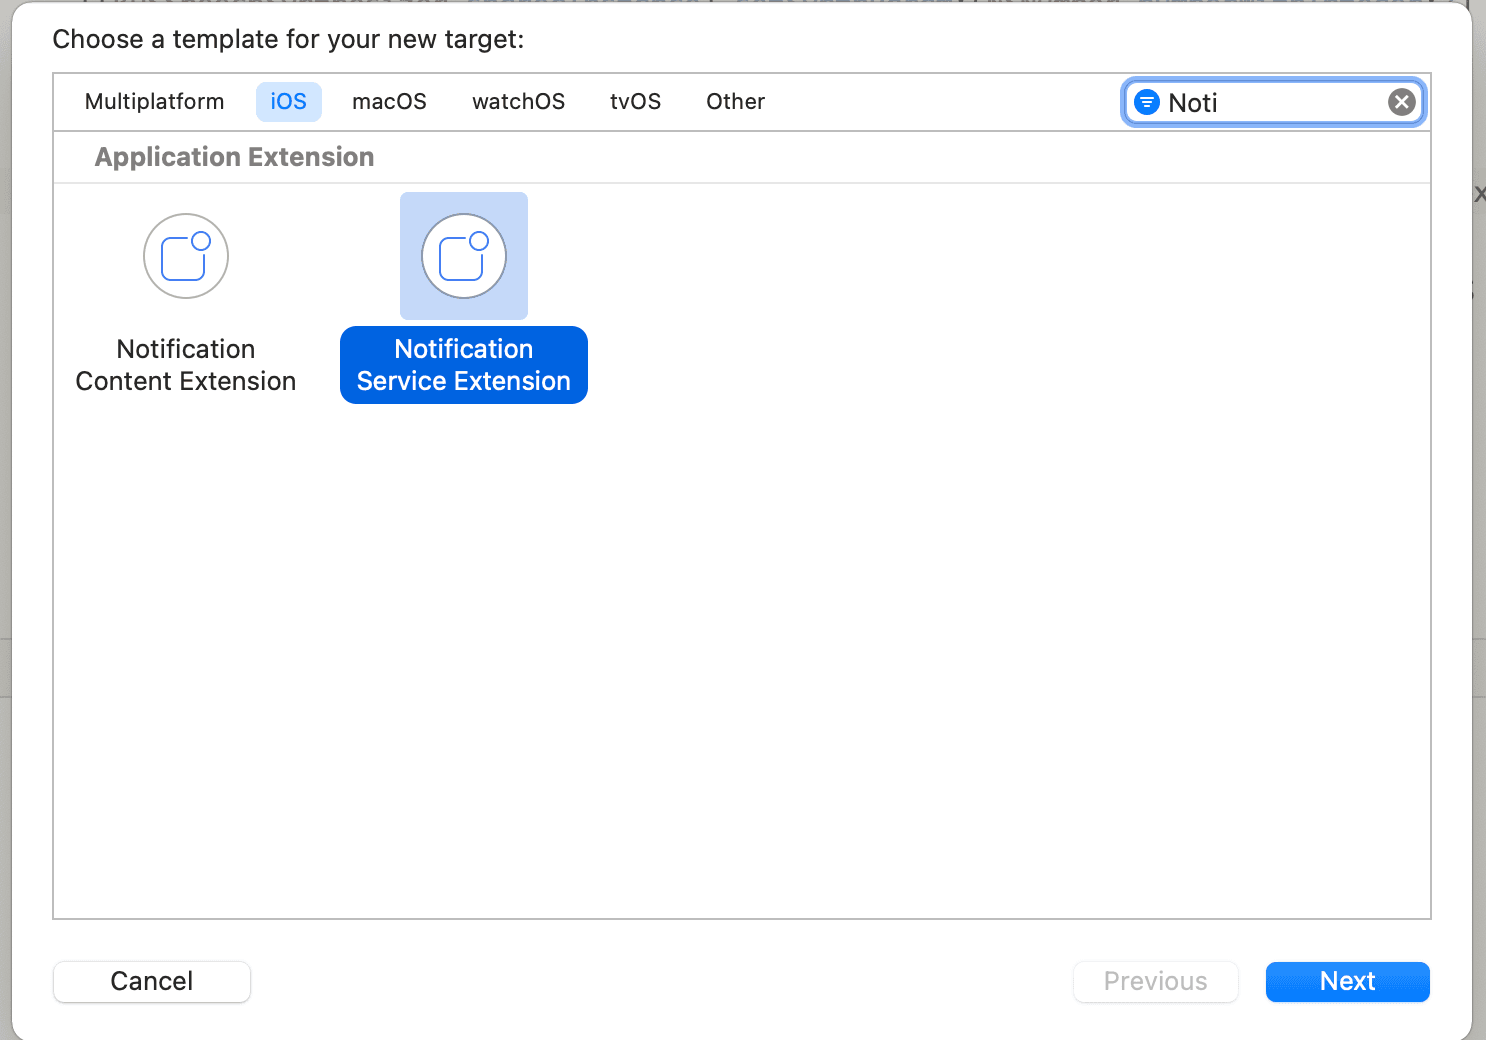
Create a Notification Service Extension Target, select the Xcode project, click File -> New -> Target, and select Notification Service Extension Target. There are two very similar options, so be careful to choose the right one, as shown below:
-
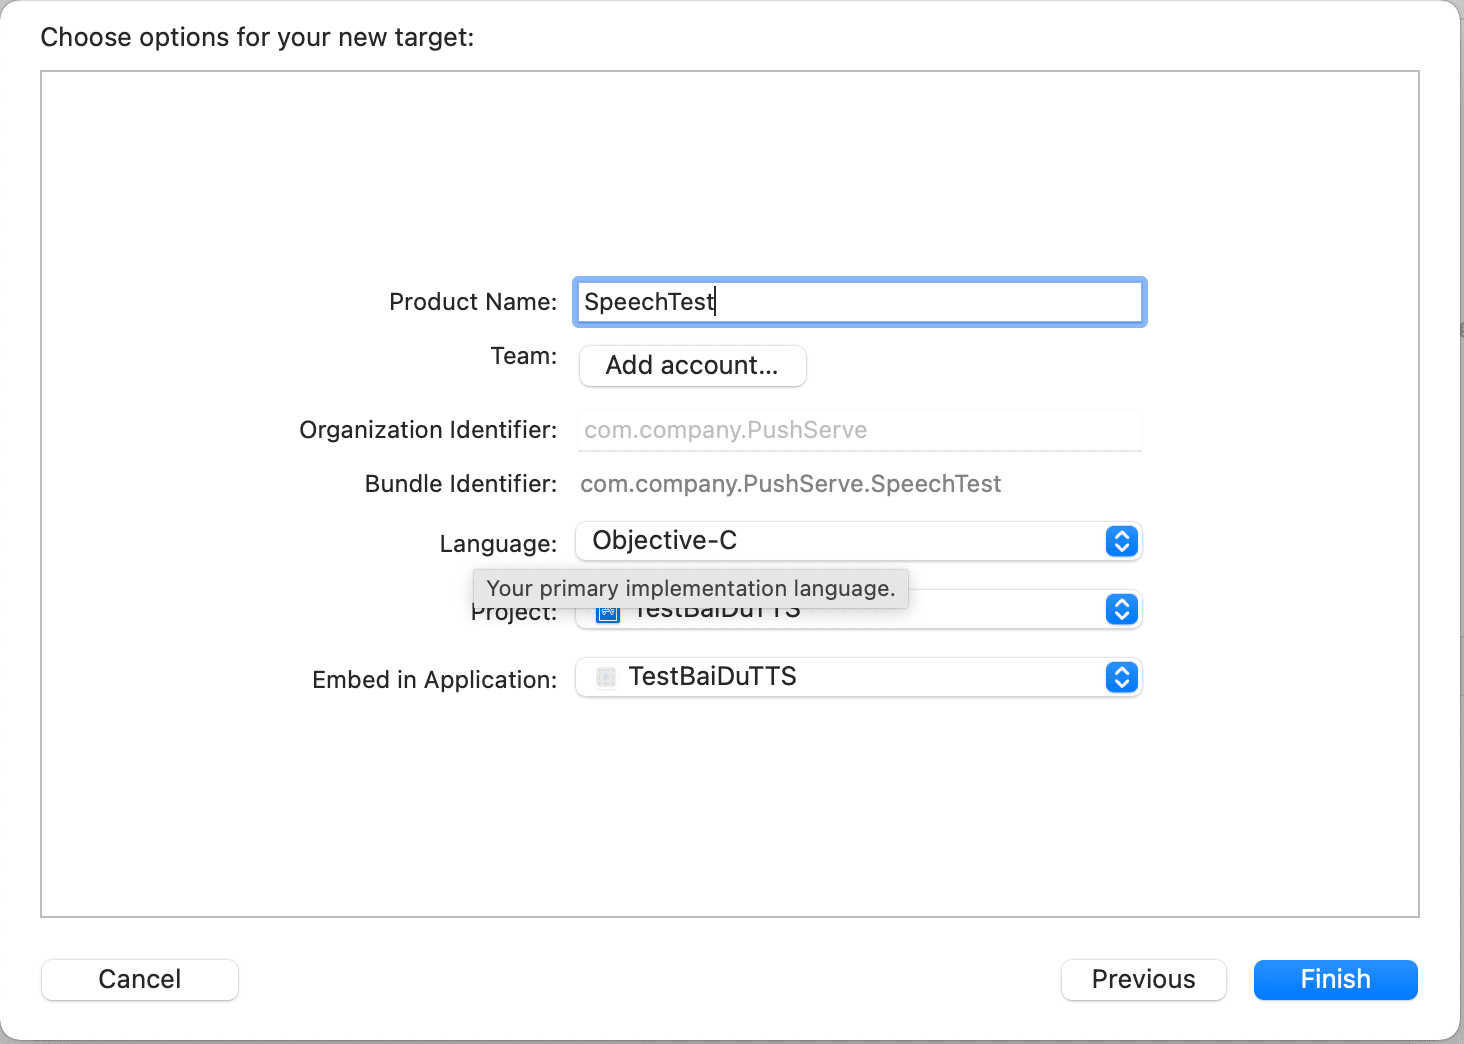
Click Next, enter the Product Name
-
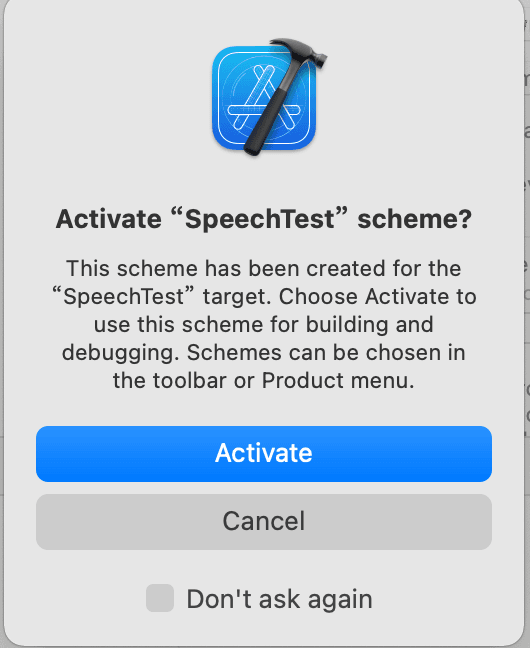
Click Finish, then click Activate
-
Open the NotificationService.m file, which is the class automatically created after adding the Notification Service Extension. After adding it, all processing for received pushes can be modified in this location.
- In the didReceiveNotificationRequest:withContentHandler: method, the userInfo in bestAttemptContent contains the detailed information of the push notification. If you want to modify the displayed title and content or the voice of the push, all operations should be done before the final callback of this method.
- When modifying the push notification sound, note that:
- Supported audio file types for custom ringtones include aiff, wav, and wav format, and the length of the ringtone must be less than 30 seconds; otherwise, the system will play the default ringtone. More info here.
- The directory for storing audio files and the priority for reading them are in the Library/Sounds folder of the main application, in the Library/Sounds folder of the AppGroups shared directory, and in the main bundle.
- For handling multiple push notifications, call self.contentHandler(self.bestAttemptContent); in the didReceiveNotificationRequest:withContentHandler: method to display the corresponding notification. If this method is not called, the system will automatically call this method after a maximum of 30 seconds. If 10 notifications come in at once, you will find that the notifications do not pop up 10 times and are not displayed in order. Therefore, if multiple pushes are not handled, there will be issues when playing the voice.
- In the delegate method of the AVSpeechSynthesizer class, there is a completion callback speechSynthesizer:didFinishSpeechUtterance:. Move the code to call self.contentHandler(self.bestAttemptContent) from the didReceiveNotificationRequest:withContentHandler: method to the completion callback method to ensure that the voices are displayed in order. (Alternatively, add them to an array or an OperationQueue to continue playing the next one after completion.)
- When modifying the push notification sound, note that:
- In the didReceiveNotificationRequest:withContentHandler: method, the userInfo in bestAttemptContent contains the detailed information of the push notification. If you want to modify the displayed title and content or the voice of the push, all operations should be done before the final callback of this method.
@interface NotificationService ()

@property (nonatomic, strong) void (^contentHandler)(UNNotificationContent *contentToDeliver);
@property (nonatomic, strong) UNMutableNotificationContent *bestAttemptContent;

@end

@implementation NotificationService

- (void)didReceiveNotificationRequest:(UNNotificationRequest *)request withContentHandler:(void (^)(UNNotificationContent * _Nonnull))contentHandler {
    self.contentHandler = contentHandler;
    self.bestAttemptContent = [request.content mutableCopy];

    // Modify the notification content here...
    // Modify the push notification title
    //    self.bestAttemptContent.title = [NSString stringWithFormat:@"%@ [modified]", self.bestAttemptContent.title];

    // Modify the push notification sound; supported audio formats for custom ringtones include aiff, wav, and wav format, and the length of the ringtone must be less than 30 seconds; otherwise, the system will play the default ringtone.
    //    self.bestAttemptContent.sound = [UNNotificationSound soundNamed:@"a.wav"];

    // Playback handling
    [self playVoiceWithInfo:self.bestAttemptContent.userInfo];

    self.contentHandler(self.bestAttemptContent);
}

- (void)serviceExtensionTimeWillExpire {
    // Called just before the extension will be terminated by the system.
    // Use this as an opportunity to deliver your "best attempt" at modified content; otherwise, the original push payload will be used.
    self.contentHandler(self.bestAttemptContent);
}

- (void)playVoiceWithInfo:(NSDictionary *)userInfo {
    NSLog(@"NotificationExtension content : %@",userInfo);

    NSString *title = userInfo[@"aps"][@"alert"][@"title"];
    NSString *subTitle = userInfo[@"aps"][@"alert"][@"subtitle"];
    NSString *subMessage = userInfo[@"aps"][@"alert"][@"body"];
    NSString *isRead = userInfo[@"isRead"];
    NSString *isUseBaiDu = userInfo[@"isBaiDu"];

    [[AVAudioSession sharedInstance] setCategory:AVAudioSessionCategoryPlayback
                                     withOptions:AVAudioSessionCategoryOptionDuckOthers error:nil];
    [[AVAudioSession sharedInstance] setActive:YES
                                   withOptions:AVAudioSessionSetActiveOptionNotifyOthersOnDeactivation
                                         error:nil];

    // Ps: The following code example does not handle multiple plays, please pay attention.

    if ([isRead isEqual:@"1"]) {
        // Play voice
        if ([isUseBaiDu isEqual:@"1"]) {
            // Use Baidu offline voice playback
            [[BaiDuTtsUtils shared] playBaiDuTTSVoiceWithContent:title];
        }
        else {
            // Use system voice playback
            [[AppleTtsUtils shared] playAppleTTSVoiceWithContent:title];
        }
    }
    else {
        // No need to play voice
    }

}

@end
The implementation in AppleTtsUtils is as follows, which essentially uses AVSpeechSynthesizer for direct playback, setting volume and speech rate. It is important to note:
- Volume settings
- It will not play when muted.
- The actual playback volume = set volume * system volume. So even if the volume is set high, if the system volume is low, the playback sound will also be low. For example, if the system volume is 0.5 and the AVAudioPlayer volume is 0.6, the final volume will be 0.5*0.6 =0.3. The solution is: The final solution borrowed from the scheme of automatically adjusting screen brightness when entering the payment display QR code: If the screen brightness does not reach the threshold, increase the screen brightness to the threshold, and when leaving the page, set the brightness back to the original brightness. Similarly, when playing the prompt sound, if the user's system volume is less than the threshold, adjust it to the threshold. After the prompt sound finishes playing, return the prompt sound to the original volume, which roughly means:
- Number handling
- For number-to-speech, using the zh-CN voice, the playback method for numbers is in the form of thousands, hundreds, tens, etc. You can handle this by appending a space after the number; iterate through each string in the content, and if it is a number, append a space to the end, so that when played, the numbers will be read out one by one.
#import "AppleTtsUtils.h"
#import <AVFoundation/AVFoundation.h>
#import <AVKit/AVKit.h>

@interface AppleTtsUtils ()<AVSpeechSynthesizerDelegate>

@property (nonatomic, strong) AVSpeechSynthesizer *speechSynthesizer;
@property (nonatomic, strong) AVSpeechSynthesisVoice *speechSynthesisVoice;

@end

@implementation AppleTtsUtils

+ (instancetype)shared {
    static id instance = nil;
    static dispatch_once_t onceToken;
    dispatch_once(&onceToken, ^{
        instance = [[self class] new];
    });

    return instance;
}

- (BOOL)isNumber:(NSString *)str
{
   if (str.length == 0) {
        return NO;
    }
    NSString *regex = @"[0-9]*";
    NSPredicate *pred = [NSPredicate predicateWithFormat:@"SELF MATCHES %@",regex];
    if ([pred evaluateWithObject:str]) {
        return YES;
    }
    return NO;
}

- (void)playAppleTtsVoiceWithContent:(NSString *)content {

    if ((content == nil) || (content.length <= 0)) {
        return;
    }
    // Number-to-speech, using the zh-CN voice, the playback method for numbers is in the form of thousands, hundreds, tens, etc., so append a space after the number; iterate through each string in the content, and if it is a number, append a space to the end, so that when played, the numbers will be read out one by one.
    NSString *newResult = @"";
    for (int i = 0; i < content.length; i++) {
        NSString *tempStr = [content substringWithRange:NSMakeRange(i, 1)];
        newResult = [newResult stringByAppendingString:tempStr];
        if ([self isNumber:tempStr]) {
            newResult = [newResult stringByAppendingString:@" "];
        }
    }
    // Todo: English to speech

    AVSpeechUtterance *utterance = [AVSpeechUtterance speechUtteranceWithString:newResult];
    utterance.rate = AVSpeechUtteranceDefaultSpeechRate;
    utterance.voice = self.speechSynthesisVoice;
    utterance.volume = 1.0;
    utterance.rate = AVSpeechUtteranceDefaultSpeechRate;
    [self.speechSynthesizer speakUtterance:utterance];
}

- (AVSpeechSynthesizer *)speechSynthesizer {
    if (!_speechSynthesizer) {
        _speechSynthesizer = [[AVSpeechSynthesizer alloc] init];
        _speechSynthesizer.delegate = self;
    }
    return _speechSynthesizer;
}

- (AVSpeechSynthesisVoice *)speechSynthesisVoice {
    if (!_speechSynthesisVoice) {
        _speechSynthesisVoice = [AVSpeechSynthesisVoice voiceWithLanguage:@"zh-CN"];
    }
    return _speechSynthesisVoice;
}


- (void)speechSynthesizer:(AVSpeechSynthesizer *)synthesizer didStartSpeechUtterance:(AVSpeechUtterance *)utterance {
    NSLog(@"didStartSpeechUtterance");
}

- (void)speechSynthesizer:(AVSpeechSynthesizer *)synthesizer didCancelSpeechUtterance:(AVSpeechUtterance *)utterance {
    NSLog(@"didCancelSpeechUtterance");
}

- (void)speechSynthesizer:(AVSpeechSynthesizer *)synthesizer didPauseSpeechUtterance:(AVSpeechUtterance *)utterance {
    NSLog(@"didPauseSpeechUtterance");
}

- (void)speechSynthesizer:(AVSpeechSynthesizer *)synthesizer didFinishSpeechUtterance:(AVSpeechUtterance *)utterance {
    NSLog(@"didFinishSpeechUtterance");
    [self.speechSynthesizer stopSpeakingAtBoundary:AVSpeechBoundaryWord];

//    // After each voice playback is completed, we call this code to bring up the notification bar
// This can be exposed to the upper layer through a block callback
//    self.contentHandler(self.bestAttemptContent);
}
b. Adding Baidu TTS Offline SDK#
-
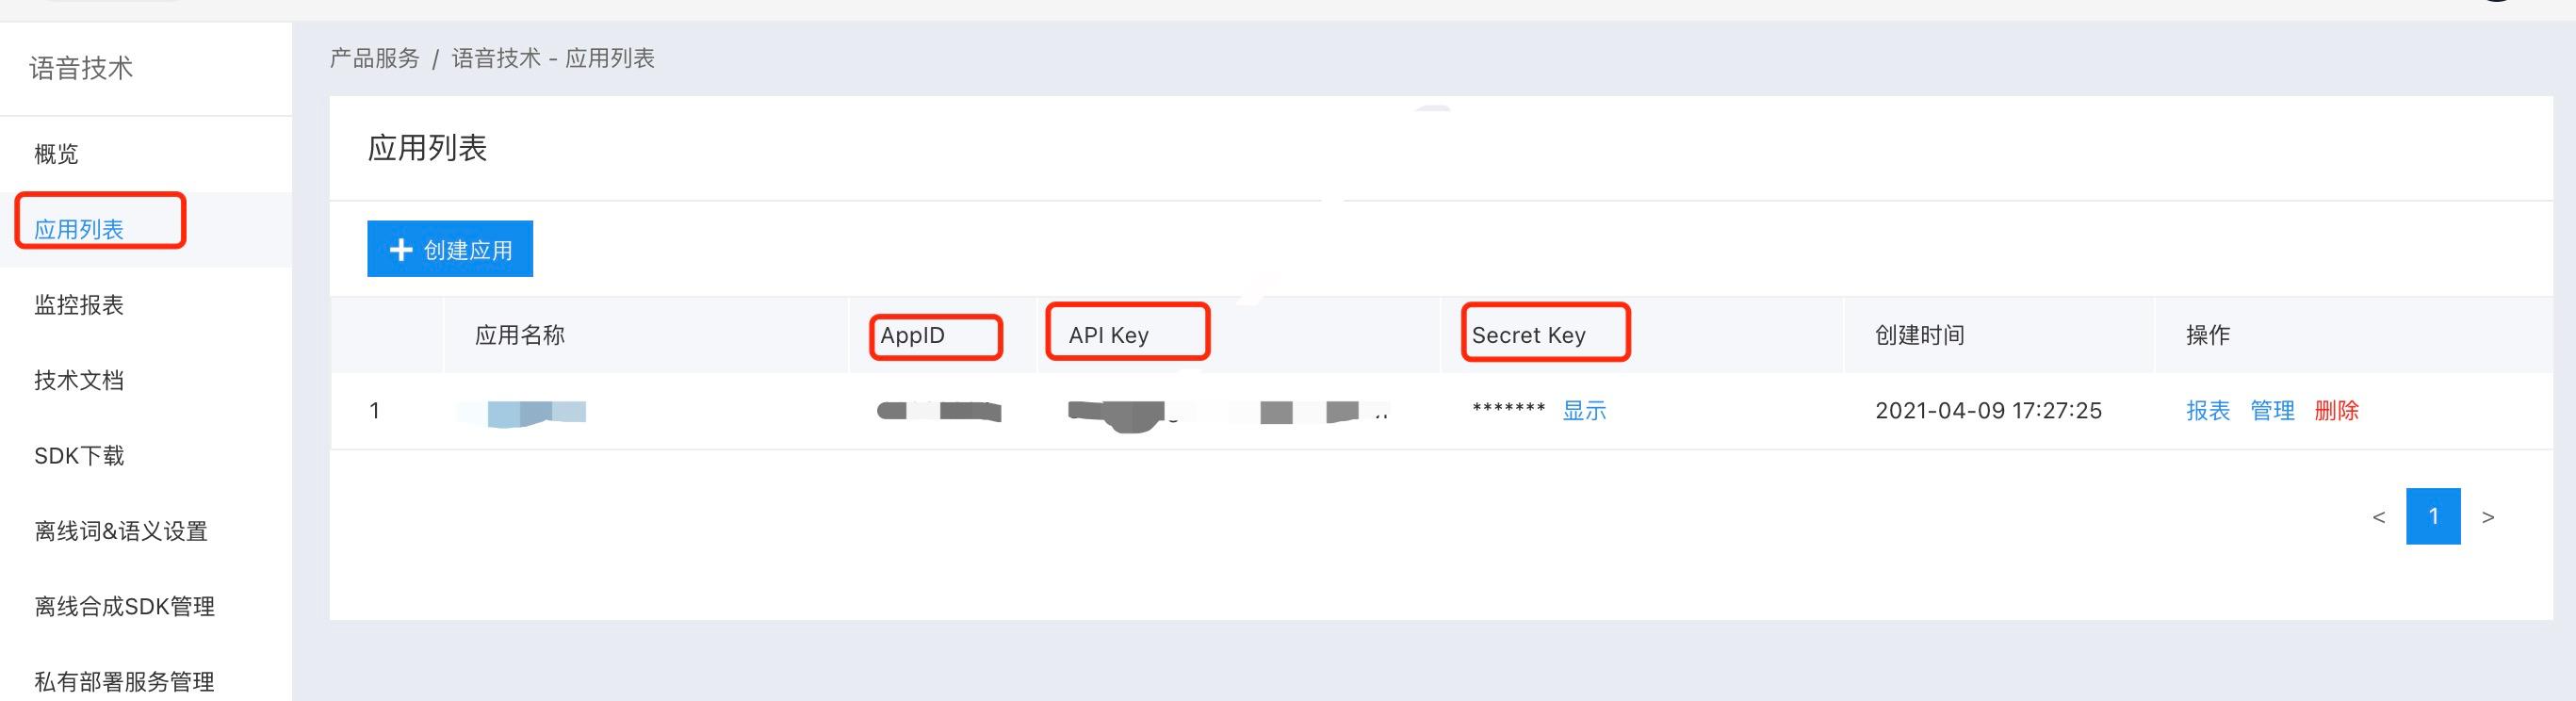
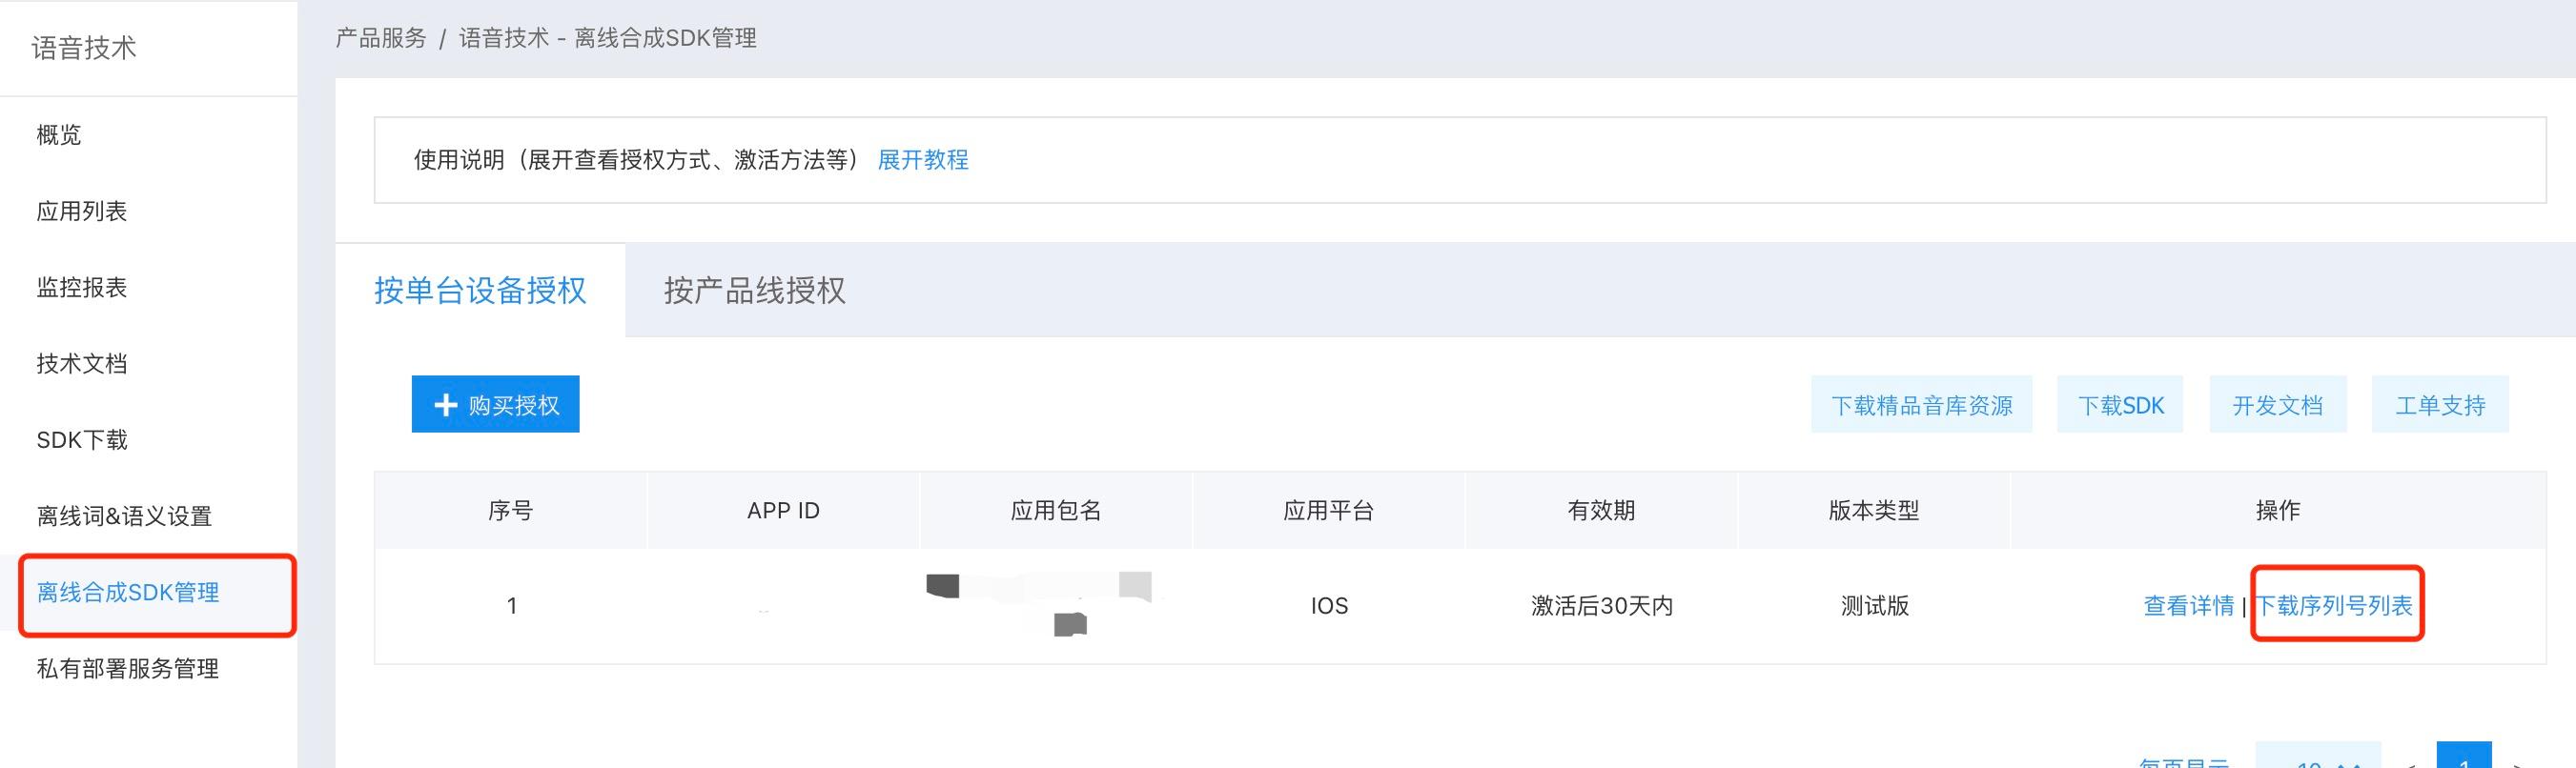
Open the Baidu Intelligent Console, select the application list, and create a new application for testing. After creation, there will be an application ID. Here, the bundle ID must be written as the corresponding bundle ID of the Notification Service Extension created, not the main project bundle ID. Be very careful!!! As shown in the figure below.
-
On the left, select Offline SDK Management, click Add, then select the application just created, click Finish, and then download the serial number list. Store the AppId, AppKey, SecretKey, and serial number for initializing the offline SDK. As shown in the figure below.
-
When selecting Offline SDK Management on the left, click the right side to download the SDK and refer to the development documentation. According to the SDK's instructions:
Integration Guide: It is strongly recommended that users first run the Demo project in the SDK package, which details the usage of speech synthesis and provides complete examples. Generally, you only need to refer to the demo project to complete all integration and configuration work.
-
Therefore, after downloading the SDK, open the BDSClientSample project, then change the APP_ID, API_KEY, SECRET_KEY, and SN in the TTSViewController.mm file to those just applied for, and run the test to see if the voice can be played normally. If playback is successful, it indicates that the application is fine, and you can continue integrating it into the project. Otherwise, if you find it does not play after integration, you may suspect it is an SDK issue. 😂, as debugging after integration can indeed make one question life.
-
Drag the BDSClientHeaders, BDSClientLib, and BDSClientResource folders extracted from the SDK to the Notification Service Extension target, making sure to check the copy option. Then delete the .gitignore file in the BDSClientLib folder; otherwise, the compilation will fail. Seriously, no joke, 😂, a guide to avoid pitfalls.

-
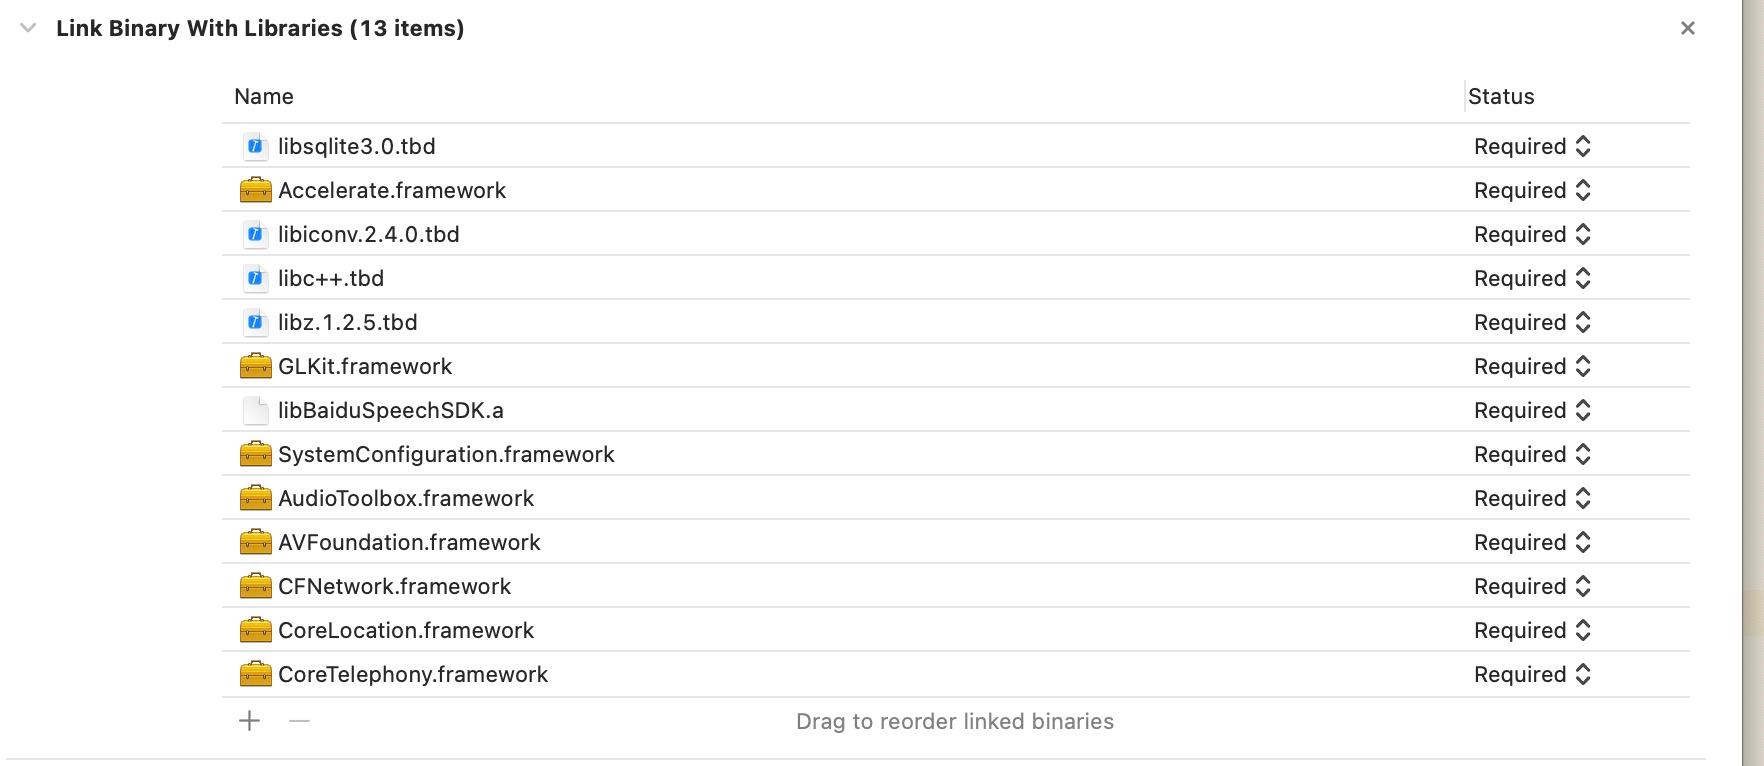
Add the required system libraries, referring to the dependencies in the BDSClientSample project, and make sure to add them to the Notification Service Extension target, as shown in the figure below:
-
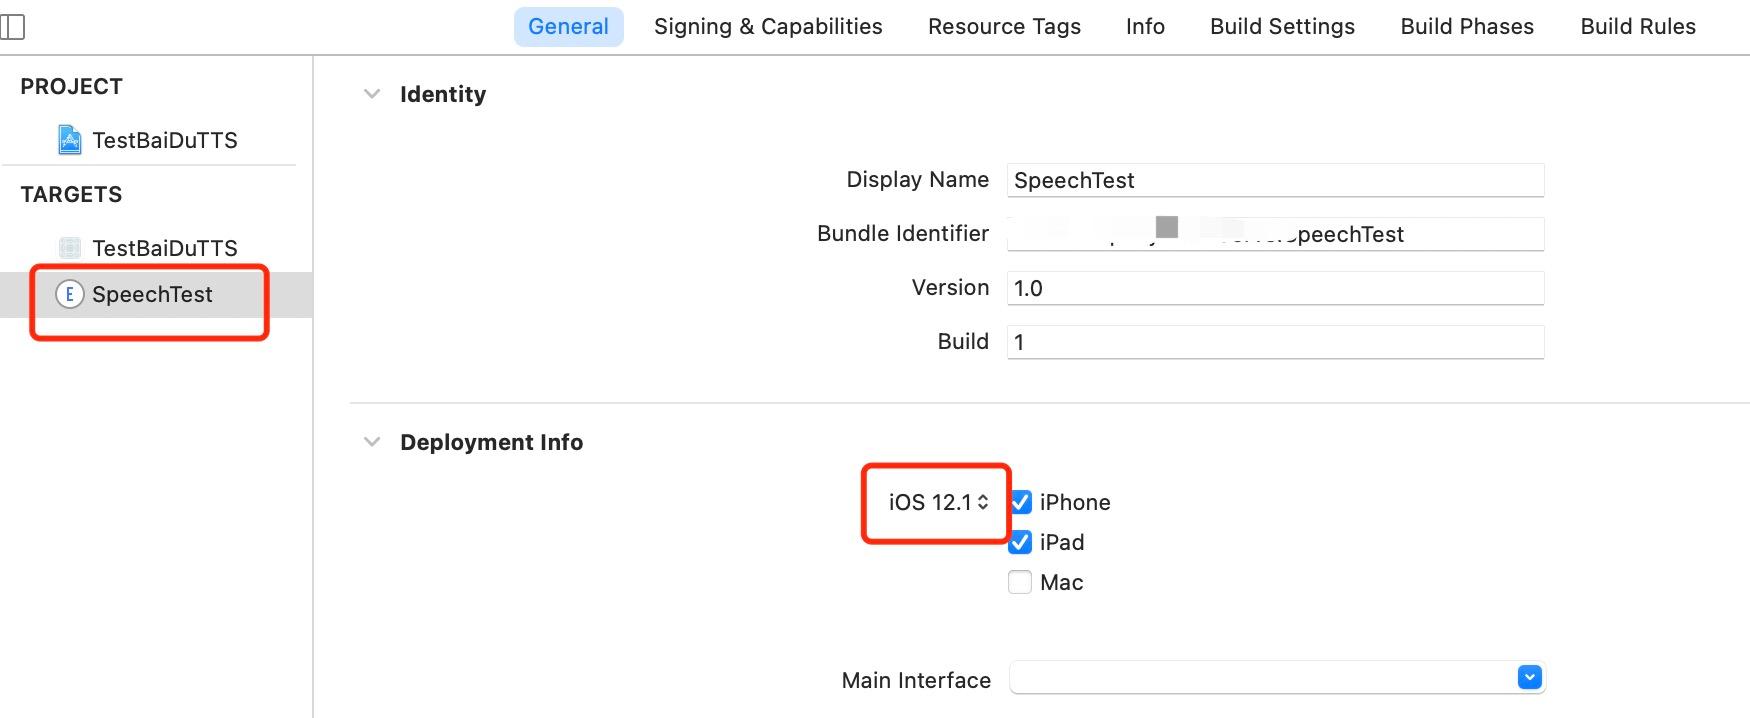
Done, compile the Notification Service Extension target, ensuring the correct target is selected. Oh, there is another issue here; the newly created target is based on the version of Xcode, so you also need to modify the minimum target compatibility of this target; otherwise, it may default to 14.4. Then, when running and debugging, it does not report errors and runs normally, but the breakpoints do not hit. Surprised? 😂.
-
Add the Baidu voice processing code to the Notification Service Extension target, as written above. The code for BaiDuTtsUtils is as follows:
- Here, it is important to note that in the configureOfflineTTS method, the loading of offlineSpeechData and offlineTextData resources should be consistent with what is written in the Demo. In fact, it is the content in the TTS folder of the BDSClientResource folder. If you have downloaded other voice files, load your downloaded voice files here.
#import "BaiDuTtsUtils.h"
#import "BDSSpeechSynthesizer.h"

// Baidu TTS
NSString* BaiDuTTSAPP_ID = @"Your_APP_ID";
NSString* BaiDuTTSAPI_KEY = @"Your_APP_KEY";
NSString* BaiDuTTSSECRET_KEY = @"Your_SECRET_KEY";
NSString* BaiDuTTSSN = @"Your_SN";

@interface BaiDuTtsUtils ()<BDSSpeechSynthesizerDelegate>

@end

@implementation BaiDuTtsUtils

+ (instancetype)shared {
    static id instance = nil;
    static dispatch_once_t onceToken;
    dispatch_once(&onceToken, ^{
        instance = [[self class] new];
    });

    return instance;
}

#pragma mark - Baidu TTS

-(void)configureOfflineTTS{

    NSError *err = nil;
    NSString* offlineSpeechData = [[NSBundle mainBundle] pathForResource:@"bd_etts_common_speech_m15_mand_eng_high_am-mgc_v3.6.0_20190117" ofType:@"dat"];
    NSString* offlineTextData = [[NSBundle mainBundle] pathForResource:@"bd_etts_common_text_txt_all_mand_eng_middle_big_v3.4.2_20210319" ofType:@"dat"];
//    #error "set offline engine license"
    if (offlineSpeechData == nil || offlineTextData == nil) {
        NSLog(@"Offline synthesis resource files are empty!");
        return;
    }

    err = [[BDSSpeechSynthesizer sharedInstance] loadOfflineEngine:offlineTextData speechDataPath:offlineSpeechData licenseFilePath:nil withAppCode:BaiDuTTSAPP_ID withSn:BaiDuTTSSN];
    if(err){
        NSLog(@"Offline TTS init failed");
        return;
    }
}

- (void)playBaiDuTTSVoiceWithContent:(NSString *)voiceText {
    NSLog(@"TTS version info: %@", [BDSSpeechSynthesizer version]);

    [BDSSpeechSynthesizer setLogLevel:BDS_PUBLIC_LOG_VERBOSE];
    // Set delegate object
    [[BDSSpeechSynthesizer sharedInstance] setSynthesizerDelegate:self];


    [self configureOfflineTTS];

    [[BDSSpeechSynthesizer sharedInstance] setPlayerVolume:10];
    [[BDSSpeechSynthesizer sharedInstance] setSynthParam:[NSNumber numberWithInteger:5] forKey:BDS_SYNTHESIZER_PARAM_SPEED];

    // Start synthesis and playback
    NSError* speakError = nil;
    NSInteger sentenceID = [[BDSSpeechSynthesizer sharedInstance] speakSentence:voiceText withError:&speakError];
    if (speakError) {
        NSLog(@"Error: %ld, %@", (long)speakError.code, speakError.localizedDescription);
    }
}

- (void)synthesizerStartWorkingSentence:(NSInteger)SynthesizeSentence
{
    NSLog(@"Began synthesizing sentence %ld", (long)SynthesizeSentence);
}

- (void)synthesizerFinishWorkingSentence:(NSInteger)SynthesizeSentence
{
    NSLog(@"Finished synthesizing sentence %ld", (long)SynthesizeSentence);
}

- (void)synthesizerSpeechStartSentence:(NSInteger)SpeakSentence
{
    NSLog(@"Began playing sentence %ld", (long)SpeakSentence);
}

- (void)synthesizerSpeechEndSentence:(NSInteger)SpeakSentence
{
    NSLog(@"Finished playing sentence %ld", (long)SpeakSentence);
}


@end
c. Debugging#
The exciting part comes now. Everything compiled without issues, and using push debugging, first run the main project, then select the Notification Service Extension Target to run, add breakpoints in the didReceiveNotificationRequest:withContentHandler: method, and send yourself a push message. You will find that the breakpoint hits here, indicating that the target was created correctly.
Then control the push parameters, isRead and isBaiDu, which determine whether the voice from the push notification will use Baidu's voice playback. Oh, speaking of push parameters, you also need to add the "mutable-content = 1" field in the payload push parameters, e.g.:
{
  "aps": {
  "alert": {
      "title":"Title",
      "subtitle": "Subtitle",
      "body": "Content"
  },
  "badge": 1,
  "sound": "default",
  "mutable-content": "1",
  }
}
During push debugging, you will find that it runs normally, but the voice does not play, whether it is the system's or Baidu's, haha, isn't that frustrating? Upon closely examining the console, you will find the following error:
Ps: After iOS 12.0, calling the system playback AVSpeechSynthesizer in the Notification Service Extension results in the following error.
[AXTTSCommon] Failure starting audio queue alp!
[AXTTSCommon] _BeginSpeaking: couldn't begin playback
Ps: After iOS 12.0, calling Baidu's SDK for direct playback in the Notification Service Extension results in the following error.
[ERROR][AudioBufPlayer.mm:1088]AudioQueue start errored error: 561015905 (!pla)
[ERROR][AudioBufPlayer.mm:1099]Can't begin playback while in background!
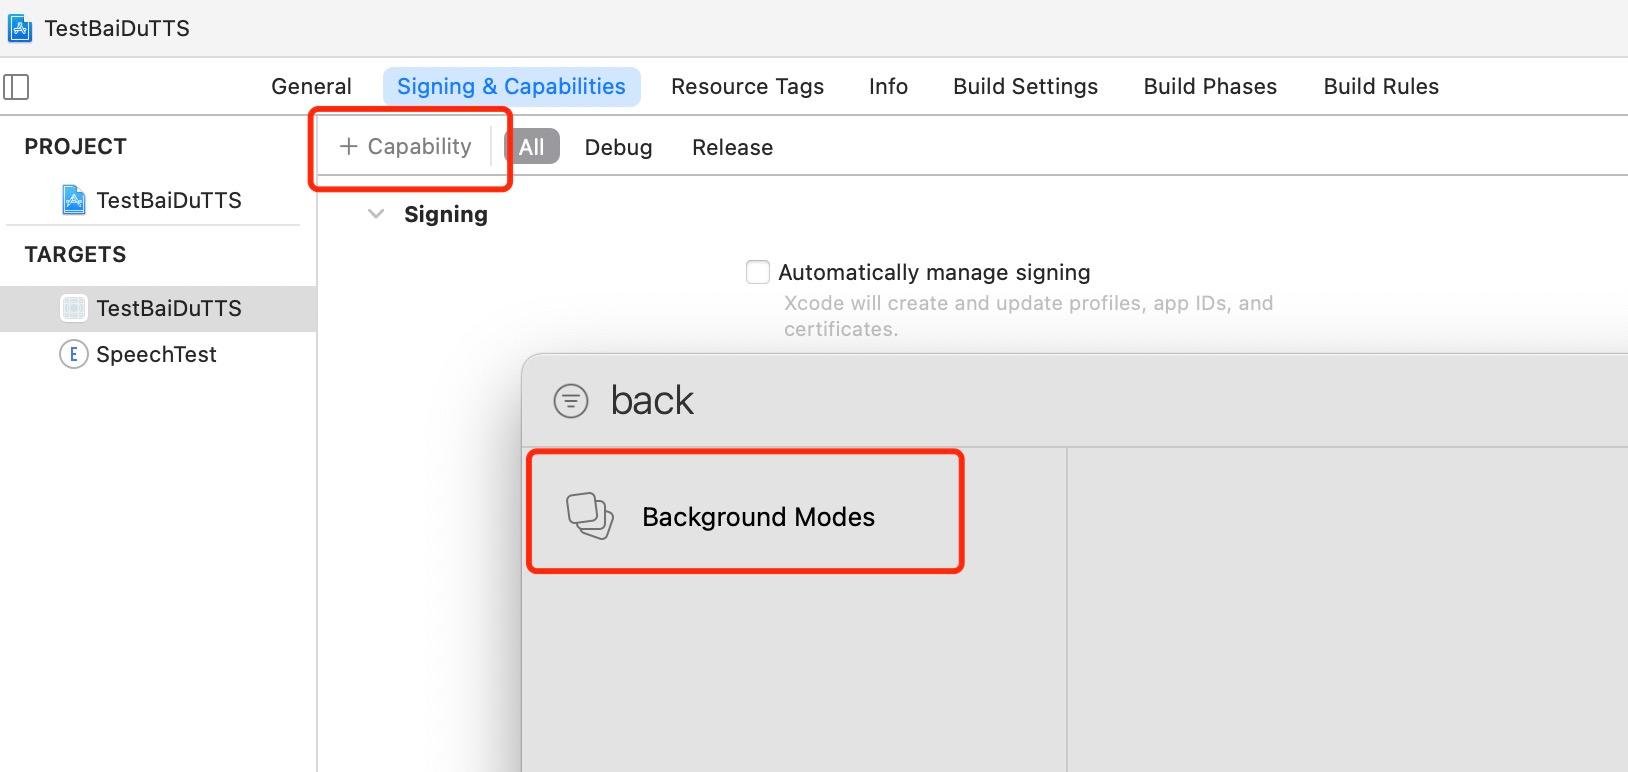
Both errors indicate that audio playback cannot occur in the background. How to solve this? Of course, by adding the backgroundMode field. Open the main project’s Signing & Capabilities, add background modes, and check Audio, Airplay, and Picture in Picture, as shown in the figure below.
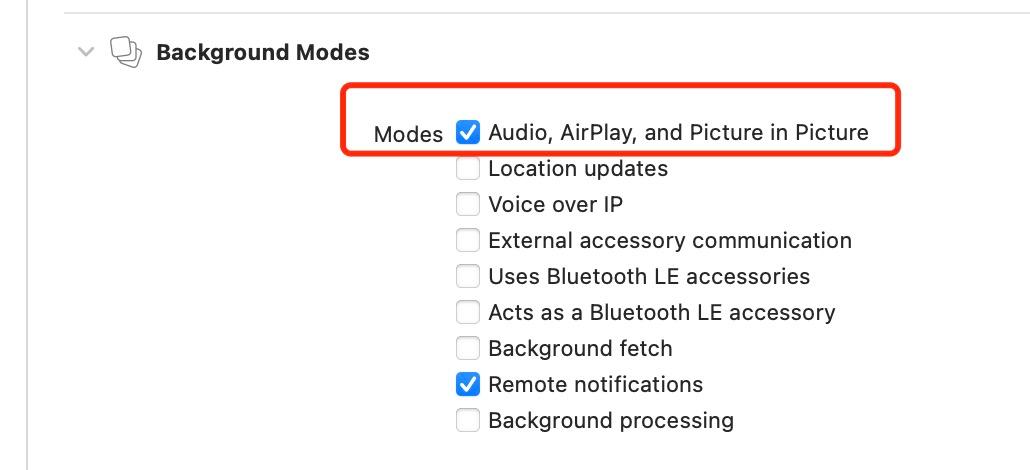
OK, try again! After pushing again, you will find — still not working, with the same error, haha, despair, right? Sorry, let me calm down. Actually, the addition was correct, but it is important to note:
- After configuring the Notification Service Extension, if you find that the sound still does not play after receiving a notification, open the plist under this Extension's Target, add the Required background modes field, and write "App plays audio or streams audio/video using AirPlay" in item0. After debugging again, you will find that Baidu's voice can be played.
- This method may not pass the review because this Extension's target does not have backgroundMode settings. As can be seen from Signing & Capabilities, directly adding backgroundMode is not available. Therefore, if it is not going to be published to the Apple Store but only distributed internally within the company, this method can be used.
After adding it, when pushing again, you will find that Baidu's voice can be played, and the playback of numbers, English, and Chinese is perfect, except for the price being a bit shocking; everything else is fine.
However, if the system's voice is pushed first, you will find that it cannot play, still with the same error. But if Baidu's voice is pushed first, and after Baidu plays, when the system's voice is pushed, you will find that the system's voice can also be played. However, the system's playback of English and numbers may have issues, so remember to handle it. You can listen to the pronunciation of the English letter E, which is quite something... The solution — none yet found, it is recommended to use third-party synthesized voices.
Since the project does not need to be published to the store, this is where it ends. However, for applications that need to be published to the store, this handling method is not feasible. Applications published to the store can only use fixed format audio for playback, which means replacing the sound of the push notification. Use fixed format audio or fixed format synthesized audio to replace the sound of the push notification, or use remote push to mute and send multiple local notifications, replacing the sound of each local notification. These insights were gained from the references at the end.
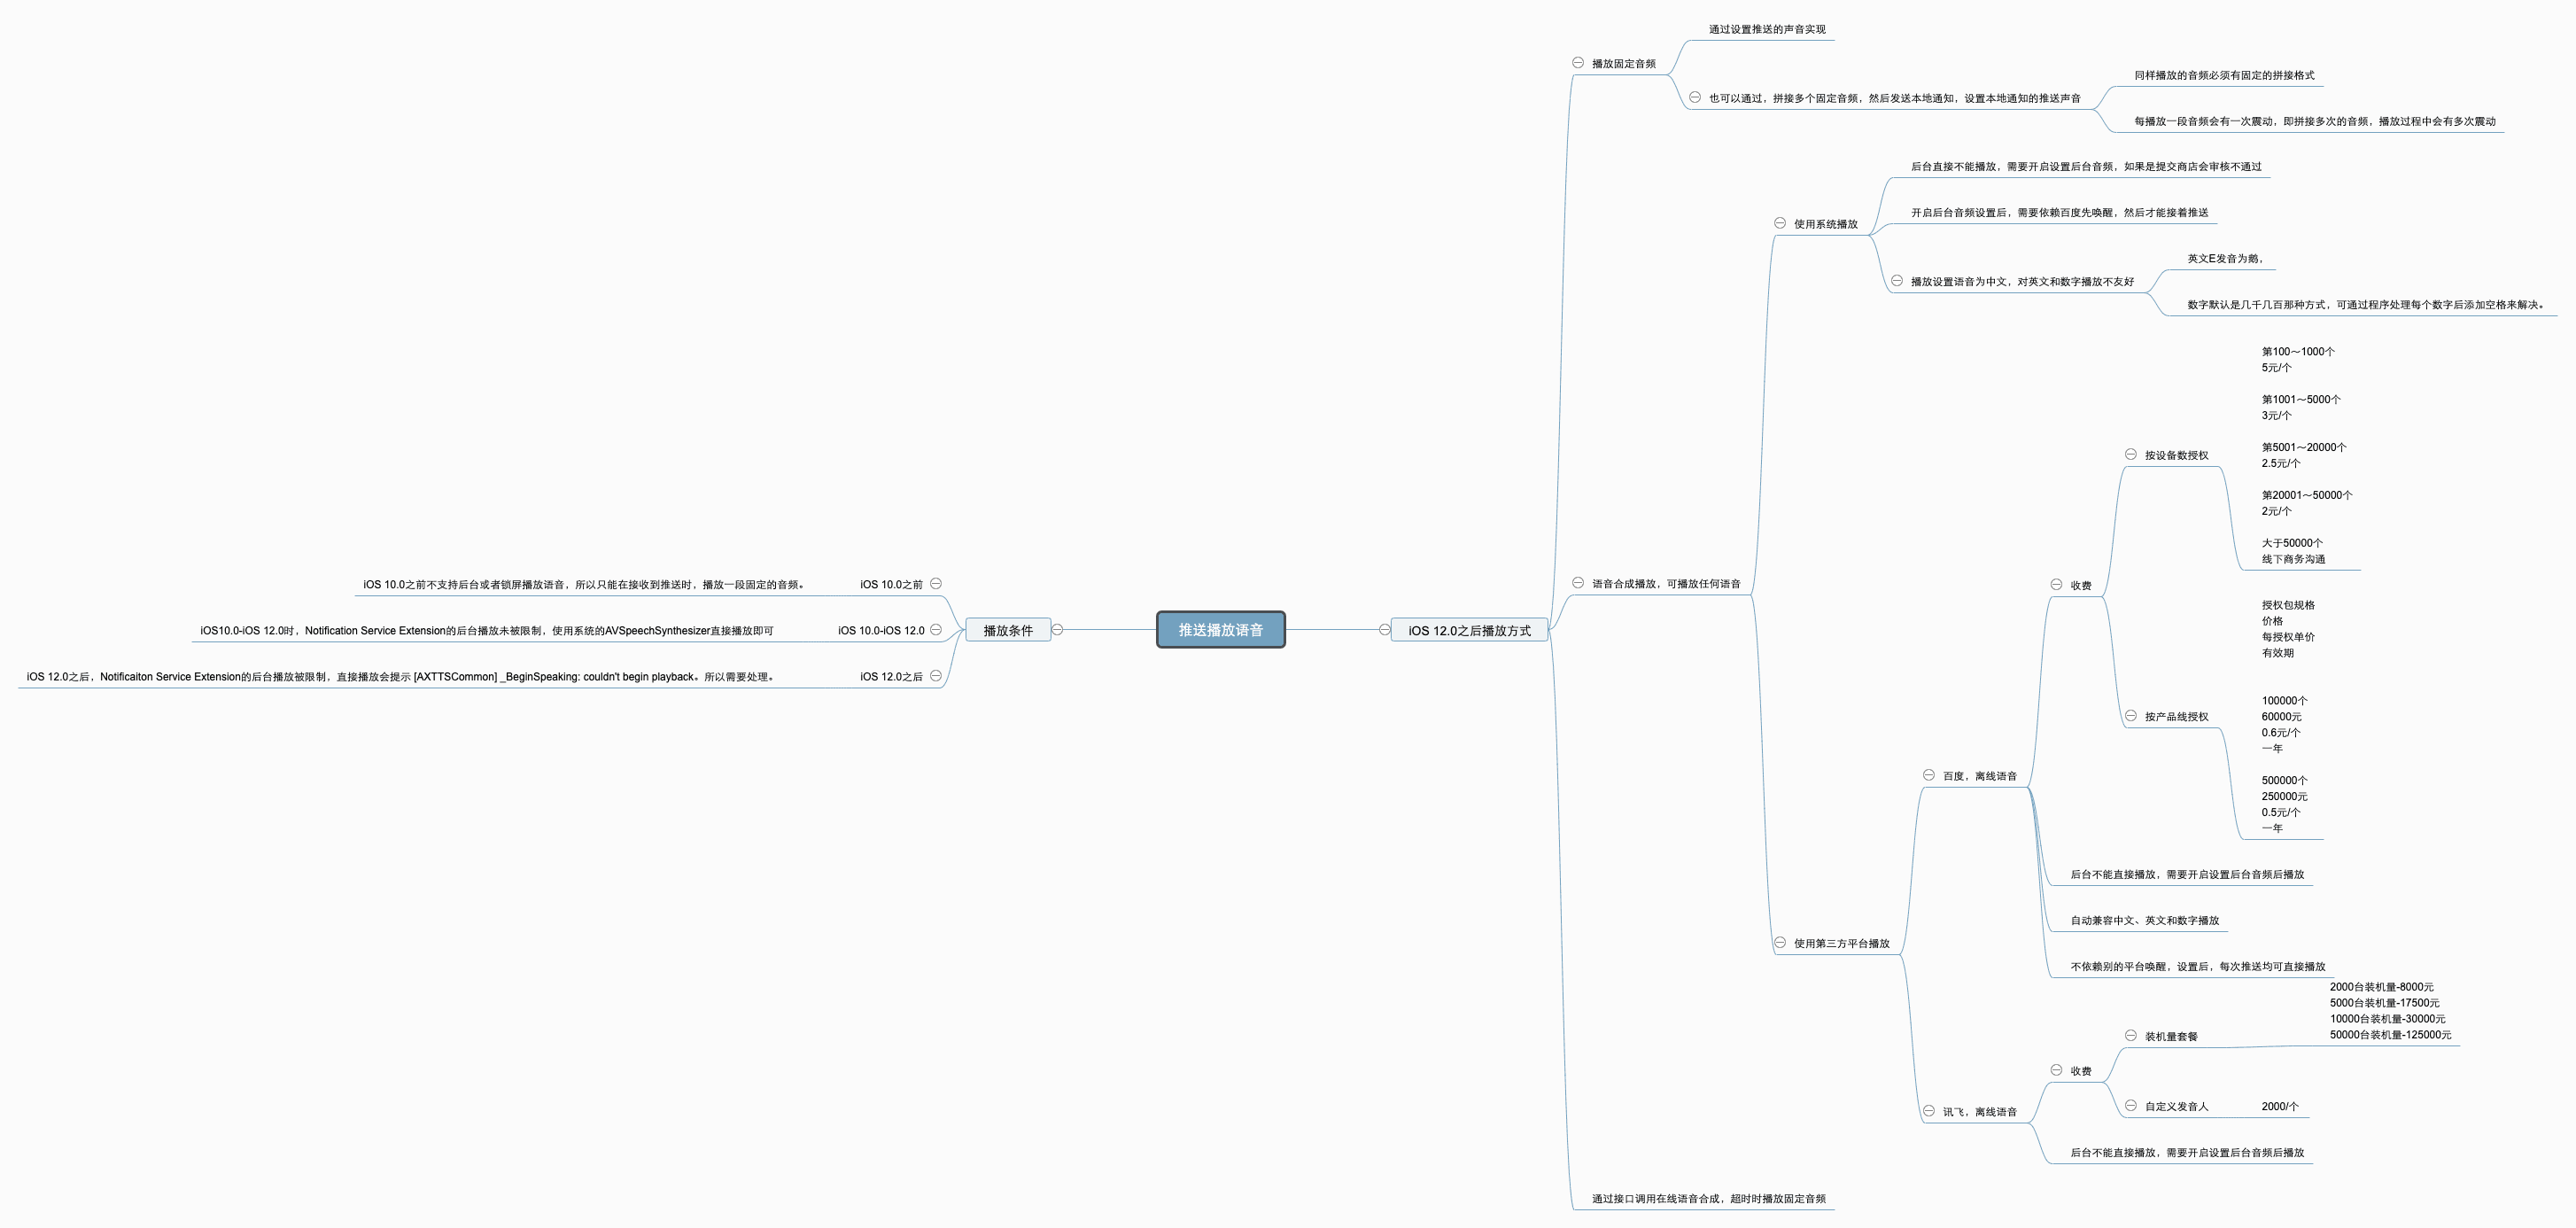
3. Conclusion#
Directly presenting the organized mind map as follows, most of the more complex processing logic is actually related to handling after iOS 12.0.
References#
- iOS Voice Playback Solution (Implementing Alipay/WeChat Voice Payment Notification Function)
- iOS JPush + Voice Playback (Alipay Payment Notification)
- Baidu Offline Synthesis iOS-SDK Integration Documentation
- Baidu Intelligent Console
- iOS12.1 Voice Playback Issue Resolution and Exploration of Notification Service Extension
- iOS12.1 Unable to Playback Baidu Voice
- WeChat iOS Payment Receipt Voice Reminder Development Summary
- iOS13 WeChat Payment Receipt Voice Reminder Development Summary