ウィジェット 2 の作成方法#
前回のiOS Widgetに続き、ここでは WidgetBundle の使い方と、支付宝に似たウィジェットの作成方法について説明します。前回はWidgetBundleをWidgetGroupと書いてしまったのは私のミスです。
WidgetBundle の使い方#
再度、WidgetBundleを使用する状況を振り返ります。前回はsupportedFamiliesを紹介しましたが、これによりウィジェットの異なるサイズを設定できます。例えば、Small、Medium、Largeなどですが、同じサイズのウィジェットを複数作成したい場合、例えばSmallサイズのウィジェットを 2 つ作成したい場合、以下のような東方財富ウィジェットの効果を得るためにはWidgetBundleを使用して複数のWidgetを設定する必要があります。
WidgetBundleの使用は難しくありません。以下を見ていきましょう。前回の最後のコード(https://github.com/mokong/WidgetAllInOne からダウンロードして、Tutorial2 を開くことができます)は、1 つの Medium サイズのウィジェットのみを表示していました。ここでは `WidgetBundle` を使用して 2 つの Medium サイズのウィジェットを表示するように変更します。
新しい SwiftUIView を作成し、WidgetBundleDemoと名付けます。手順は以下の通りです。
- WidgetKit をインポート
- main エントリを WidgetBundleDemo に変更
- WidgetBundleDemo のタイプを WidgetBundle に変更
- body のタイプを Widget に変更
コードは以下の通りです:
import SwiftUI
import WidgetKit

@main
struct WidgetBundleDemo: WidgetBundle {
    @WidgetBundleBuilder
    var body: some Widget {
        DemoWidget()
        DemoWidget()
    }
}
次にコンパイルして実行しますが、失敗し、エラーはxxx... error: 'main' attribute can only apply to one type in a moduleです。これは、1 つのモジュールに@mainが 1 つだけ存在する必要があることを意味します。したがって、余分な@mainを削除する必要があります。どこにあるかというと、DemoWidget.swift 内です。以前の main エントリは DemoWidget でしたが、現在の main エントリは上で新しく作成した WidgetBundleDemo です。したがって、DemoWidget 内の @main を削除する必要があります。削除後、再度実行して効果を確認すると、ウィジェットのプレビューに 2 つの全く同じ Medium サイズのウィジェットが表示されることがわかります。
待ってください、前回言ったように、異なるウィジェットを左右にスワイプすると、上のタイトルと説明も一緒にスライドしますが、なぜここでは一緒にスライドしないのでしょうか?
確かに、うん、タイトルと内容が同じ理由だと思います。一緒に確認してみましょう。まず、DemoWidget に title と desc の属性を追加します。以下のように:
struct DemoWidget: Widget {
    let kind: String = "DemoWidget"

    var title: String = "私のウィジェット"
    var desc: String = "これは例のウィジェットです。"

    var body: some WidgetConfiguration {
        StaticConfiguration(kind: kind, provider: Provider()) { entry in
            DemoWidgetEntryView(entry: entry)
        }
        .configurationDisplayName(title) // ウィジェットプレビューでのタイトル表示を制御
        .description(desc) // ウィジェットプレビューでの説明表示を制御
        .supportedFamilies([WidgetFamily.systemMedium])
    }
}
次に、DemoWidget を参照している場所、つまり WidgetBundleDemo クラス内を変更し、異なるタイトルと説明を渡します。以下のように:
import SwiftUI
import WidgetKit

@main
struct WidgetBundleDemo: WidgetBundle {
    @WidgetBundleBuilder
    var body: some Widget {
        DemoWidget(title: "同期アシスタント", desc: "これはQQ同期アシスタントウィジェットです")
        DemoWidget(title: "支付宝", desc: "これは支付宝ウィジェットです")
    }
}
再度実行して効果を確認すると、タイトルと説明も移動していることがわかります。効果は以下の通りです:
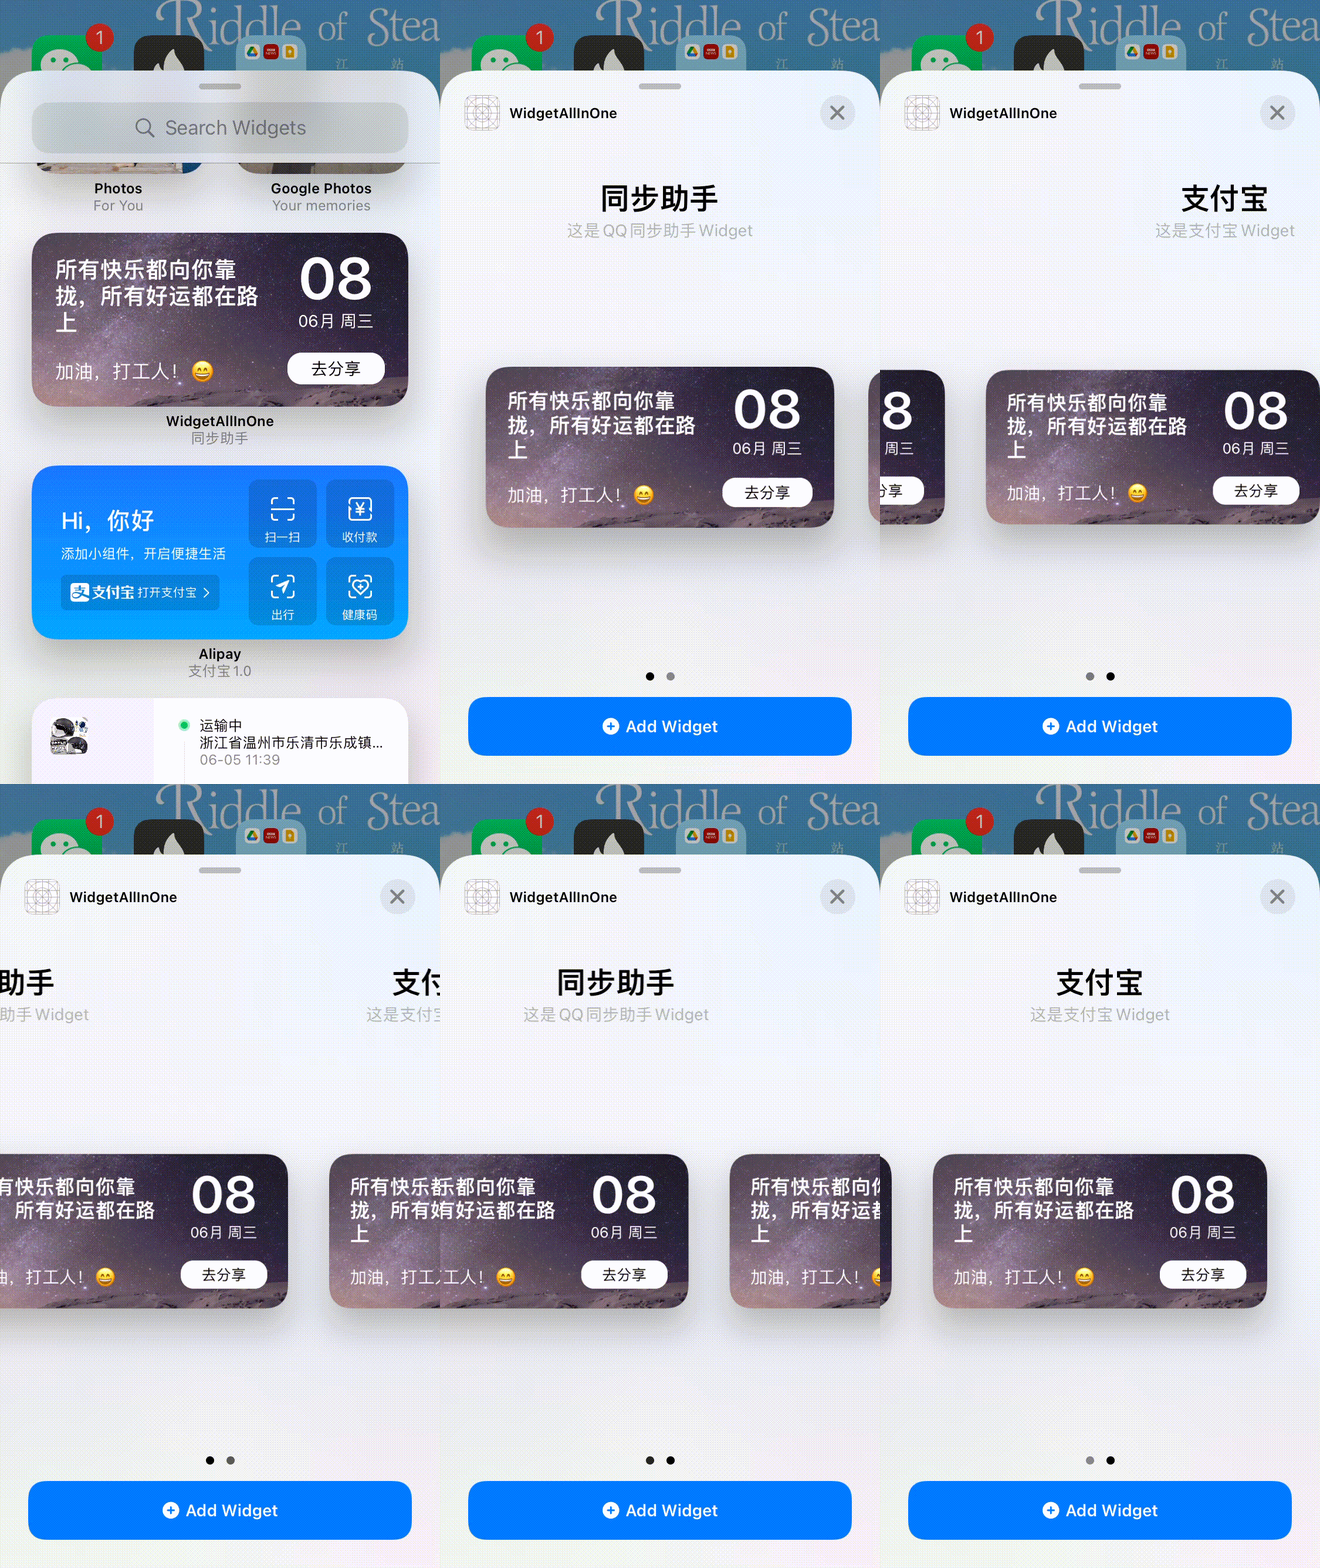
非常に簡単ですね。WidgetBundleの使用は上記の通りですが、ここで 1 つ注意点があります。WidgetBundleに含まれるのはすべてWidgetであり、各WidgetにはそれぞれのEntryとProviderがあります。つまり、WidgetBundle内の各Widgetは、DemoWidgetのようなメソッドと内容を実装する必要があります。
支付宝ウィジェットのコンポーネントを作成する#
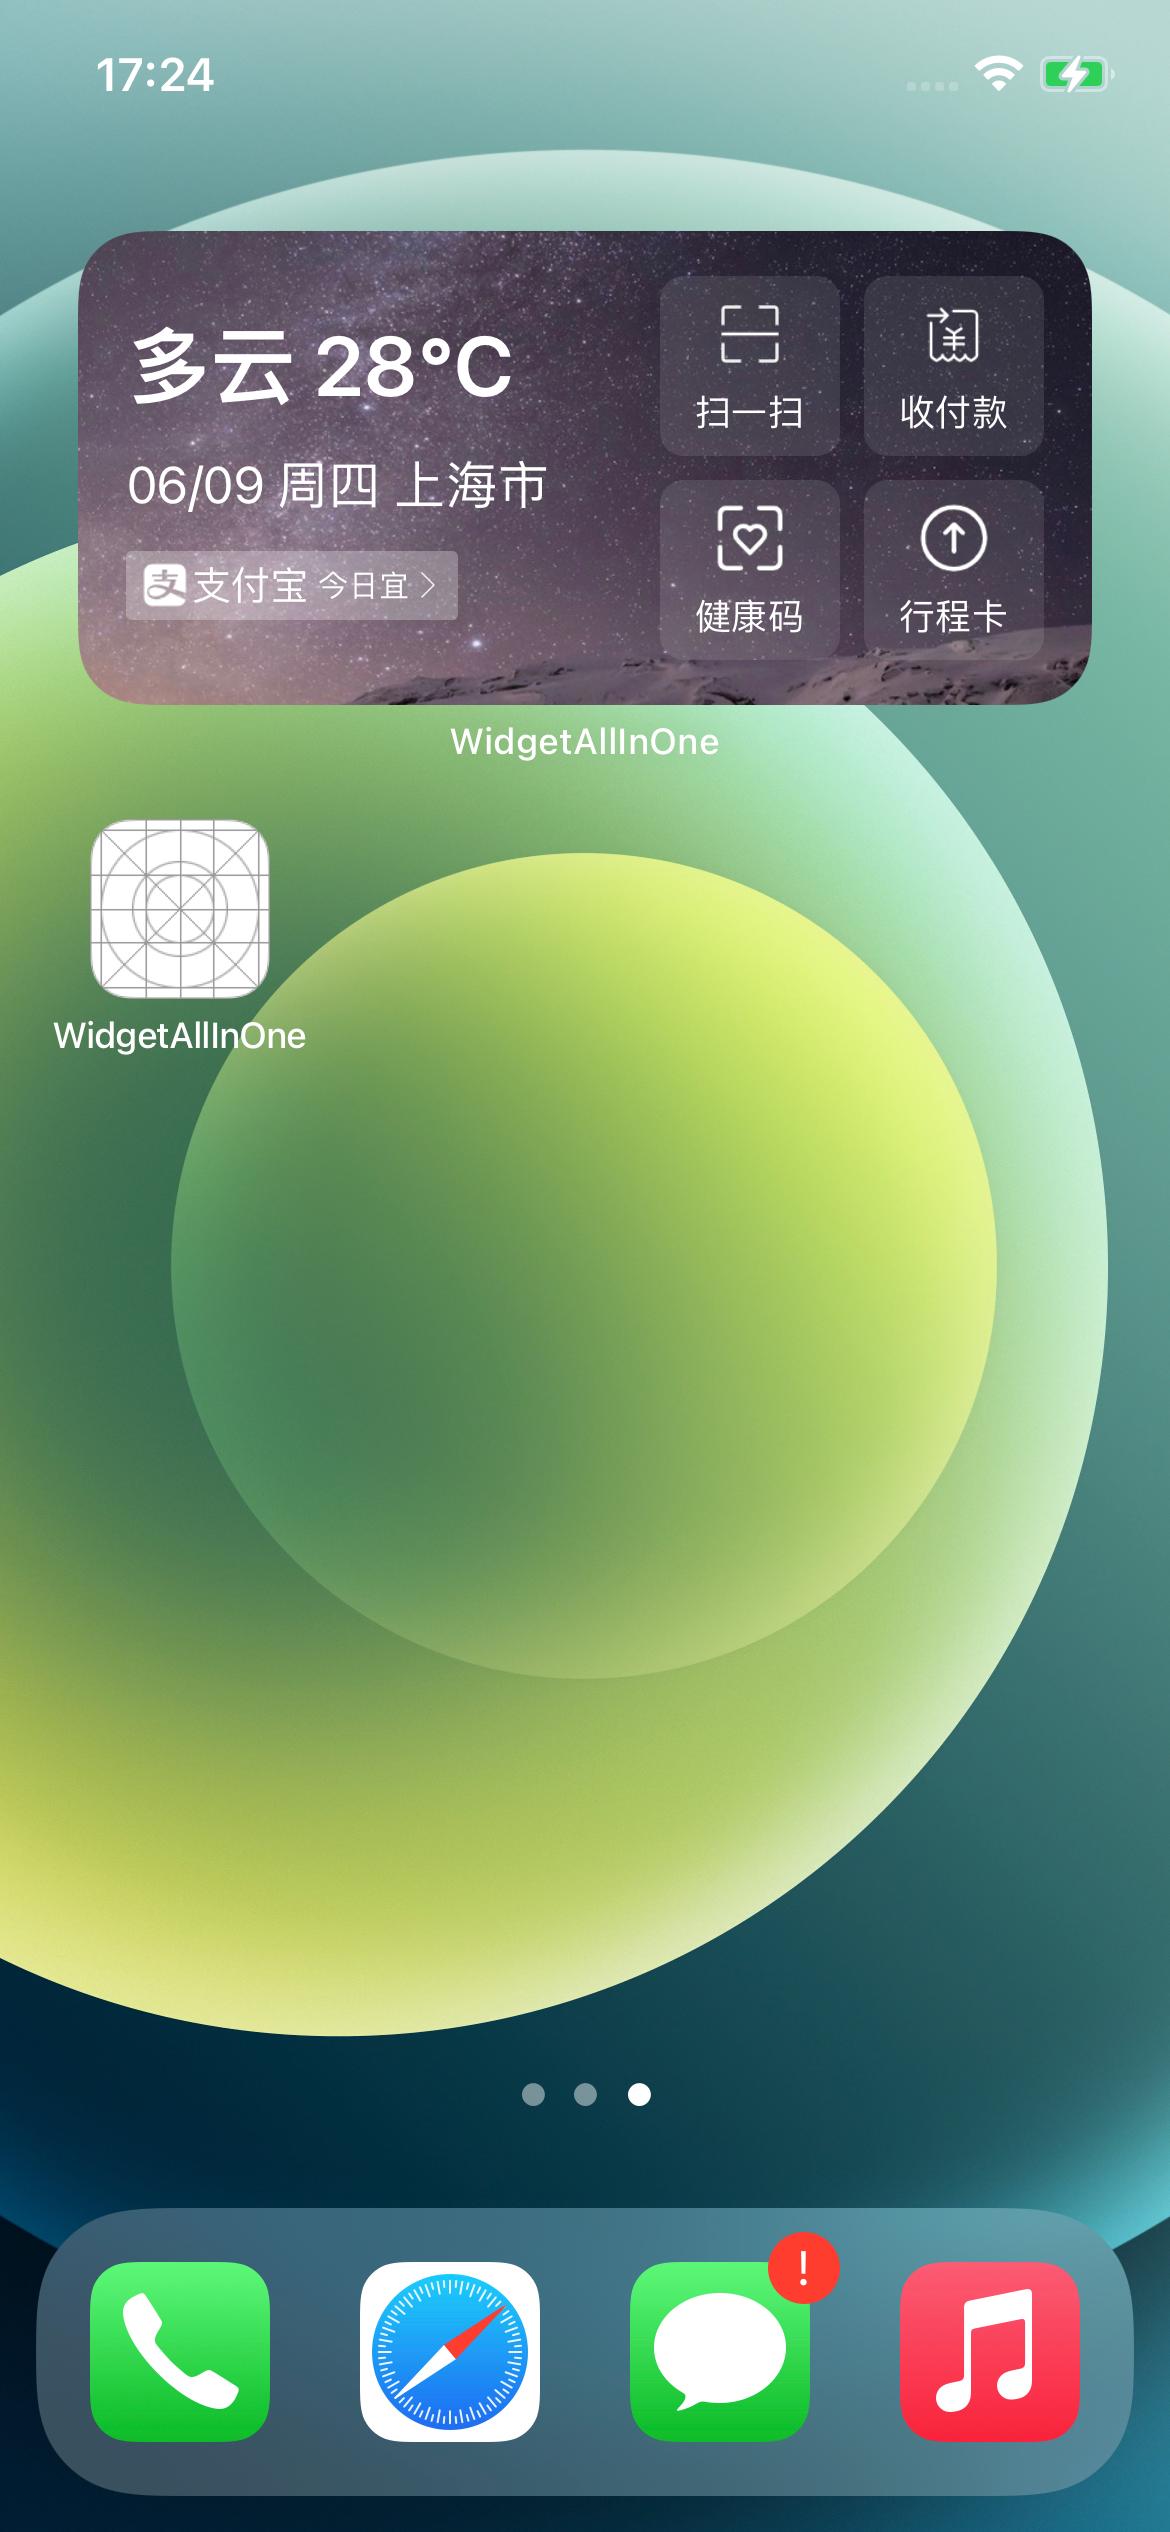
次に、以下の支付宝の小コンポーネントの効果を実現します:
UI 実装#
最初の画像から始めて、構造を分解し、左右 2 つのビューに分けます。左側のビューはカレンダー + 天気、右側は 4 つの機能入口で、全体で Medium サイズです。次に実装します:
左側のビューのコードは以下の通りです:
次に右側の 4 つの機能入口を見ていきます。入口を作成する前に、入口に対応するアイテムを考えます。このアイテムにはどのようなフィールドが必要ですか?表示には画像とタイトルが必要で、クリック後にリンクにジャンプする必要があります。また、SwiftUI の forEach で反復するには id が必要です。
次に支付宝ウィジェットを見てみましょう。長押し -> 小コンポーネントを編集 -> 機能を選択すると、すべての選択可能な機能が表示されます。したがって、ここではすべての機能を列挙するためのタイプを定義する必要があります。ここでは 8 つの機能を例として示します。リソースファイルはAlipayWidgetImagesフォルダに配置します。
したがって、機能入口に対応する単一アイテムの全体的な定義は以下の通りです:
import Foundation

public enum ButtonType: String {
    case Scan = "スキャン"
    case pay = "支払い"
    case healthCode = "健康コード"
    case travelCode = "旅行カード"
    case trip = "旅行"
    case stuck = "カードパッケージ"
    case memberpoints = "会員ポイント"
    case yuebao = "余額宝"
}

extension ButtonType: Identifiable {
    public var id: String {
        return rawValue
    }

    public var displayName: String {
        return rawValue
    }

    public var urlStr: String {
        let imageUrl: (image: String, url: String) = imageAndUrl(from: self)
        return imageUrl.url
    }

    public var imageName: String {
        let imageUrl: (image: String, url: String) = imageAndUrl(from: self)
        return imageUrl.image
    }

    /// return (image, url)
    func imageAndUrl(from type: ButtonType) -> (String, String) {
        switch self {
        case .Scan:
            return ("widget_scan", "https://www.baidu.com/")
        case .pay:
            return ("widget_pay", "https://www.baidu.com/")
        case .healthCode:
            return ("widget_healthCode", "https://www.baidu.com/")
        case .travelCode:
            return ("widget_travelCode", "https://www.baidu.com/")
        case .trip:
            return ("widget_trip", "https://www.baidu.com/")
        case .stuck:
            return ("widget_stuck", "https://www.baidu.com/")
        case .memberpoints:
            return ("widget_memberpoints", "https://www.baidu.com/")
        case .yuebao:
            return ("widget_yuebao", "https://www.baidu.com/")
        }
    }
}

struct AlipayWidgetButtonItem {
    var title: String
    var imageName: String
    var urlStr: String
    var id: String {
        return title
    }

    static func generateWidgetBtnItem(from originalItem: AlipayWidgetButtonItem) -> AlipayWidgetButtonItem {
        let newItem = AlipayWidgetButtonItem(title: originalItem.title,
                                             imageName: originalItem.imageName,
                                             urlStr: originalItem.urlStr)
        return newItem
    }
}
次に右半分のボタングループの実装を見ていきます。AlipayWidgetGroupButtons.swiftを作成し、4 つのボタンを表示するビューをカプセル化します。コードは以下の通りです:
import SwiftUI

struct AlipayWidgetGroupButtons: View {
    var buttonList: [[AlipayWidgetButtonItem]]

    var body: some View {
        VStack() {
            ForEach(0..<buttonList.count, id: \.self) { index in
                HStack {
                    ForEach(buttonList[index], id: \.id) { buttonItem in
                        AlipayWidgetButton(buttonItem: buttonItem)
                    }
                }
            }
        }
    }
}
次に左半分のビューを作成します。天気、日付、そしてヒントバーの 3 つの部分に分かれています。ヒントバーは別にカプセル化します。コードは以下の通りです:
ヒントバーのビュー:
import SwiftUI

struct AlipayWidgetLunarView: View {
    var body: some View {
        ZStack(alignment: .leading) {

            ZStack {
                AliPayLunarSubview()
                    .hidden()
            }
            .background(.white)
            .opacity(0.27)
            .cornerRadius(2.0)

            AliPayLunarSubview()
        }
    }
}

struct AliPayLunarSubview: View {
    var body: some View {
        HStack {
            Image("alipay")
                .resizable()
                .frame(width: 16.0, height: 16.0)
                .padding(EdgeInsets(top: 0, leading: 5, bottom: 0, trailing: 0))

            Text("支付宝")
                .font(Font.custom("Montserrat-Bold", size: 13.0))
                .minimumScaleFactor(0.5)
                .foregroundColor(.white)
                .padding(EdgeInsets(top: 4.0, leading: -7.0, bottom: 4.0, trailing: 0.0))

            Text("今日宜")
                .font(Font.system(size: 10.0))
                .minimumScaleFactor(0.5)
                .foregroundColor(.white)
                .padding(EdgeInsets(top: 0.0, leading: -5.0, bottom: 0.0, trailing: 0.0))

            Image("right_Arrow")
                .resizable()
                .frame(width: 10, height: 10)
                .padding(EdgeInsets(top: 0.0, leading: -7.0, bottom: 0.0, trailing: 5.0))
        }
    }
}
左半分のビュー全体:
import SwiftUI

struct AlipayWidgetWeatherDateView: View {
    var body: some View {
        VStack(alignment: .leading) {
            Spacer()

            Text("多雲 28℃")
                .font(.title)
                .foregroundColor(.white)
                .fontWeight(.semibold)
                .minimumScaleFactor(0.5)
                .padding(EdgeInsets(top: 0.0, leading: 0.0, bottom: 4.0, trailing: 0.0))

            Text("06/09 木曜日 上海市")
                .lineLimit(1)
                .font(.body)
                .foregroundColor(.white)
                .minimumScaleFactor(0.5)
                .padding(EdgeInsets(top: 0.0, leading: 0.0, bottom: 4.0, trailing: 0.0))

            AlipayWidgetLunarView()

            Spacer()
        }
    }
}
最後に左半分のビューと右半分のボタングループを組み合わせます。コードは以下の通りです:
struct AlipayWidgetMeidumView: View {
    @ObservedObject var mediumItem: AliPayWidgetMediumItem

    var body: some View {
        ZStack {
            // 背景画像
            Image("widget_background_test")
                .resizable()
            HStack {
                AlipayWidgetWeatherDateView()

                Spacer()

                AlipayWidgetGroupButtons(buttonList: mediumItem.dataButtonList())
            }
            .padding()
        }
    }
}
ここで定義された AliPayWidgetMediumItem は、VM のように、モデルをビューに必要なデータに変換します。コードは以下の通りです:
class AliPayWidgetMediumItem: ObservableObject {
    @Published private var groupButtons: [[AlipayWidgetButtonItem]] = [[]]

    init() {
        self.groupButtons = AliPayWidgetMediumItem.createMeidumWidgetGroupButtons()
    }

    init(with widgetGroupButtons: [AlipayWidgetButtonItem]?) {
        guard let items = widgetGroupButtons else {
            self.groupButtons = AliPayWidgetMediumItem.createMeidumWidgetGroupButtons()
            return
        }

        var list: [[AlipayWidgetButtonItem]] = [[]]
        var rowList: [AlipayWidgetButtonItem] = []
        for i in 0..<items.count {
            let originalItem = items[i]
            let newItem = AlipayWidgetButtonItem.generateWidgetBtnItem(from: originalItem)
            if i != 0 && i % 2 == 0 {
                list.append(rowList)
                rowList = []
            }
            rowList.append(newItem)
        }

        if rowList.count > 0 {
            list.append(rowList)
        }
        self.groupButtons = list
    }

    private static func createMeidumWidgetGroupButtons() -> [[AlipayWidgetButtonItem]] {
        let scanType = ButtonType.Scan
        let scanItem = AlipayWidgetButtonItem(title: scanType.rawValue,
                                              imageName: scanType.imageName,
                                              urlStr: scanType.urlStr)

        let payType = ButtonType.pay
        let payItem = AlipayWidgetButtonItem(title: payType.rawValue,
                                             imageName: payType.imageName,
                                             urlStr: payType.urlStr)

        let healthCodeType = ButtonType.healthCode
        let healthCodeItem = AlipayWidgetButtonItem(title: healthCodeType.rawValue,
                                                    imageName: healthCodeType.imageName,
                                                    urlStr: healthCodeType.urlStr)

        let travelCodeType = ButtonType.travelCode
        let travelCodeItem = AlipayWidgetButtonItem(title: travelCodeType.rawValue,
                                                    imageName: travelCodeType.imageName,
                                                    urlStr: travelCodeType.urlStr)
        return [[scanItem, payItem], [healthCodeItem, travelCodeItem]]
    }

    func dataButtonList() -> [[AlipayWidgetButtonItem]] {
        return groupButtons
    }
}
次にエントリとプロバイダーを作成します。コードは以下の通りです:
import WidgetKit
import SwiftUI

struct AlipayWidgetProvider: TimelineProvider {
    typealias Entry = AlipayWidgetEntry

    func placeholder(in context: Context) -> AlipayWidgetEntry {
        AlipayWidgetEntry(date: Date())
    }

    func getSnapshot(in context: Context, completion: @escaping (AlipayWidgetEntry) -> Void) {
        let entry = AlipayWidgetEntry(date: Date())
        completion(entry)
    }

    func getTimeline(in context: Context, completion: @escaping (Timeline<AlipayWidgetEntry>) -> Void) {
        let entry = AlipayWidgetEntry(date: Date())
        // 2時間ごとにデータを更新
        let expireDate = Calendar.current.date(byAdding: .hour, value: 2, to: Date()) ?? Date()
        let timeline = Timeline(entries: [entry], policy: .after(expireDate))
        completion(timeline)
    }
}

struct AlipayWidgetEntry: TimelineEntry {
    let date: Date


}

struct AlipayWidgetEntryView: View {
    var entry: AlipayWidgetProvider.Entry
    let mediumItem = AliPayWidgetMediumItem()

    var body: some View {
        AlipayWidgetMeidumView(mediumItem: mediumItem)
    }
}

struct AlipayWidget: Widget {
    let kind: String = "AlipayWidget"

    var title: String = "支付宝ウィジェット"
    var desc: String = "支付宝ウィジェットの説明"

    var body: some WidgetConfiguration {
        StaticConfiguration(kind: kind, provider: AlipayWidgetProvider()) { entry in
            AlipayWidgetEntryView(entry: entry)
        }
        .configurationDisplayName(title)
        .description(desc)
        .supportedFamilies([.systemMedium])
    }
}
最後に WidgetBundle で使用します。以下のように:
import SwiftUI
import WidgetKit

@main
struct WidgetBundleDemo: WidgetBundle {
    @WidgetBundleBuilder
    var body: some Widget {
        AlipayWidget(title: "支付宝", desc: "これは支付宝ウィジェットです")
    }
}
最終的な表示効果は以下の通りです:
Widget Intent の使用#
Static Intent Configuration#
上記を続けて見ていくと、支付宝ウィジェットと比較すると、支付宝ウィジェットは長押し後に小コンポーネントを編集のエントリが表示されますが、上記の実装にはそれがありません。次に、これを実現する方法を見ていきましょう。
小コンポーネントを編集のエントリを表示するには、Intent を作成する必要があります。次にCMD+Nで新規作成し、intentを検索します。以下の図のように、次へをクリックします。
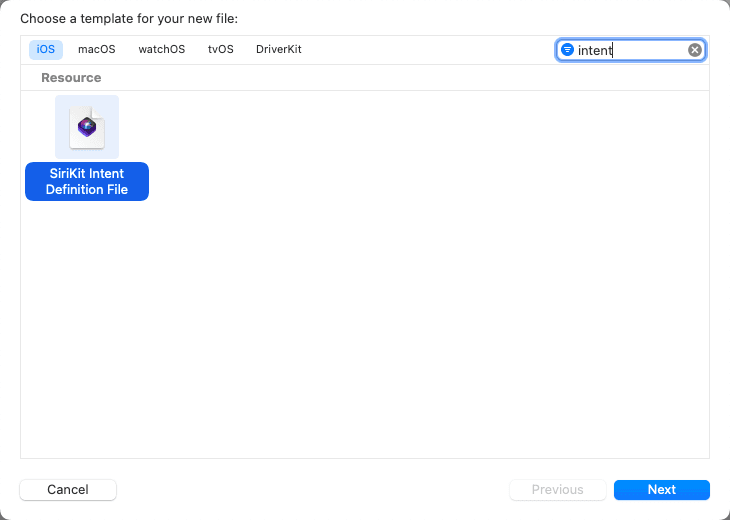
次に名前を入力します。ここで注意が必要なのは、ターゲットに主ターゲットとウィジェットターゲットの両方をチェックする必要があることです。作成をクリックします。
新しく作成した WidgetIntents を開くと、現在は空白です。左下の+をクリックします。以下の図のように。
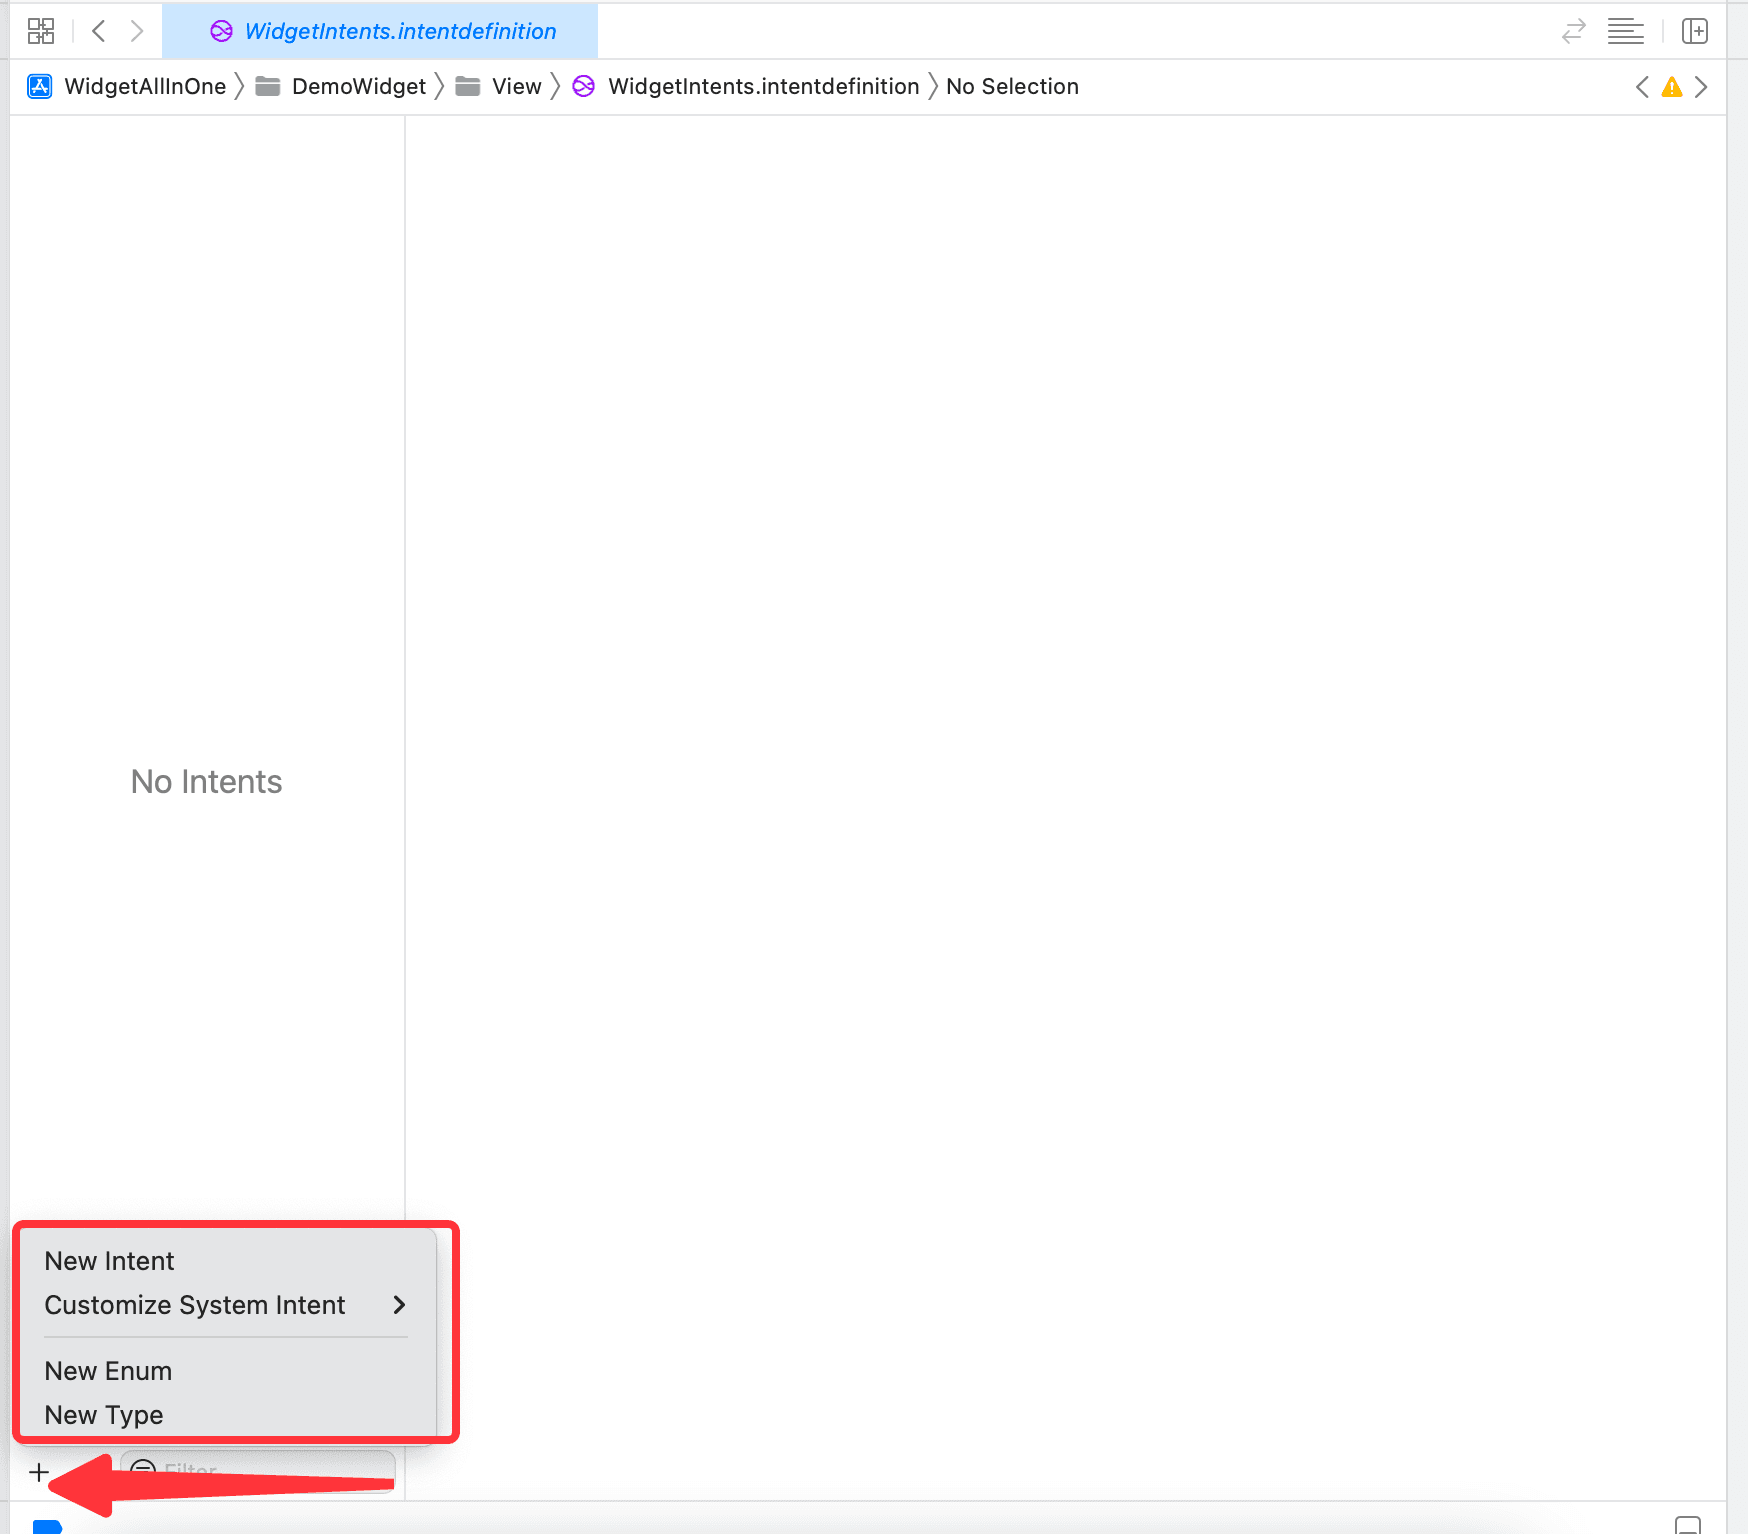
4 つのボタンが選択可能で、それぞれ新しいIntent、システムIntentをカスタマイズ、新しい列挙型、新しいタイプです。ここでは新しいIntentを選択します。
Ps: いくつかのエントリの中で
システムIntentをカスタマイズはあまり使用されず、新しいIntentはほぼ必ず追加する必要があります。新しい列挙型は新しい列挙型を作成しますが、この列挙型の名前はコード内の列挙型名と同じであってはならないため、使用時に変換する必要があります。新しいタイプはクラスを新規作成します。後で例を示します。
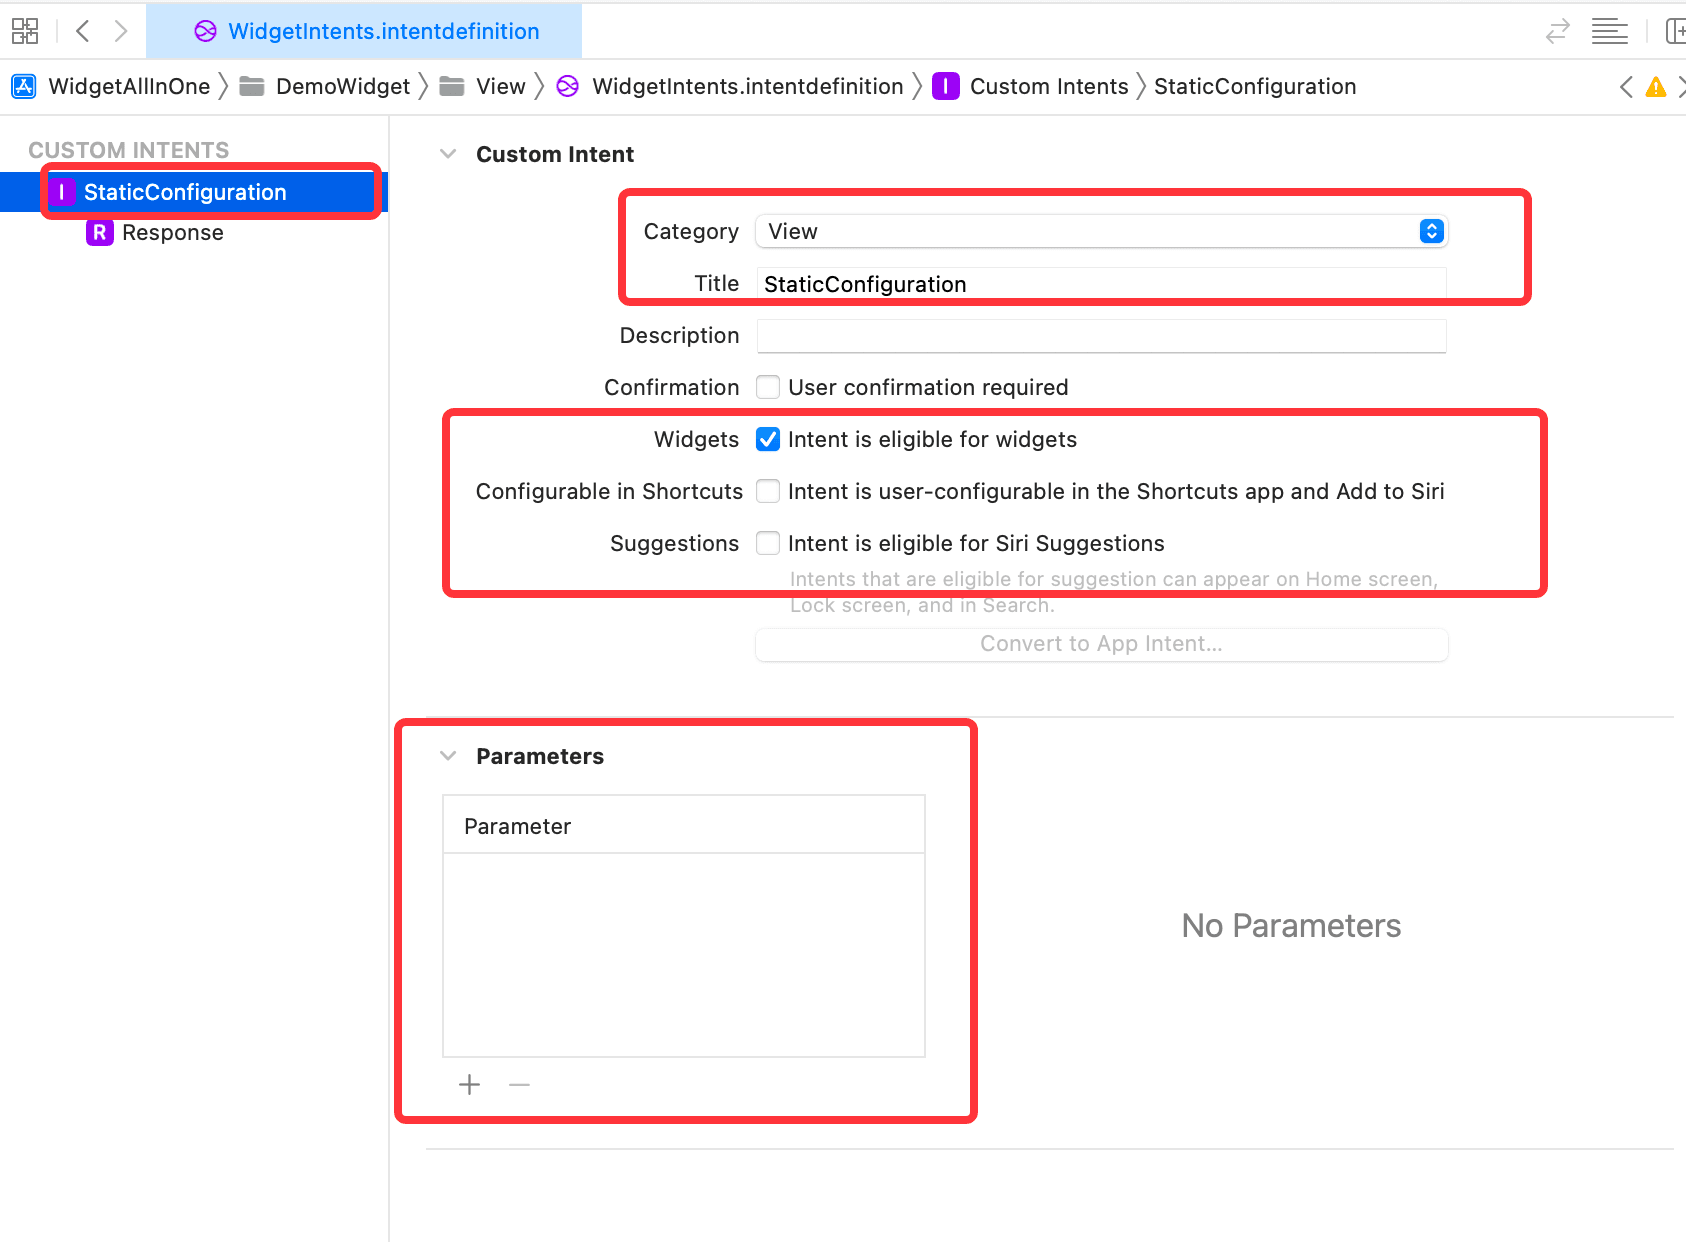
新しいIntentをクリックすると、いくつかの点に注意が必要です:
- Intent の名前を変更する必要があります。デフォルトは
Intentですが、プロジェクト内には複数のIntentファイルがある可能性があるため、名前を変更する必要があります。名前を変更する際には、プロジェクト内で使用する際に自動的に変更した名前の後にIntentが追加されることに注意してください。例えば、XXXに変更した場合、プロジェクト内で使用する際の名前はXXXIntentになりますので、重複しないように注意してください。 - 次に Intent の
カテゴリを変更します。ここではViewに変更します。他のいくつかのタイプについては、興味があれば一つ一つ試してみてください。以下のタイトルもファイル名に変更します。 - 次に、下の内容のチェックを外します。デフォルトでは
ショートカットで設定可能と提案がチェックされていますが、ここではこれらのチェックを外し、ウィジェットにチェックを入れます。意味は明白です。チェックが多いほど設定する項目が増えるため、最初はウィジェットにチェックを入れるだけで十分です。後で慣れてきたら、Siriの提案やショートカットを設定したい場合は、他の 2 つにチェックを入れ、試してみてください。
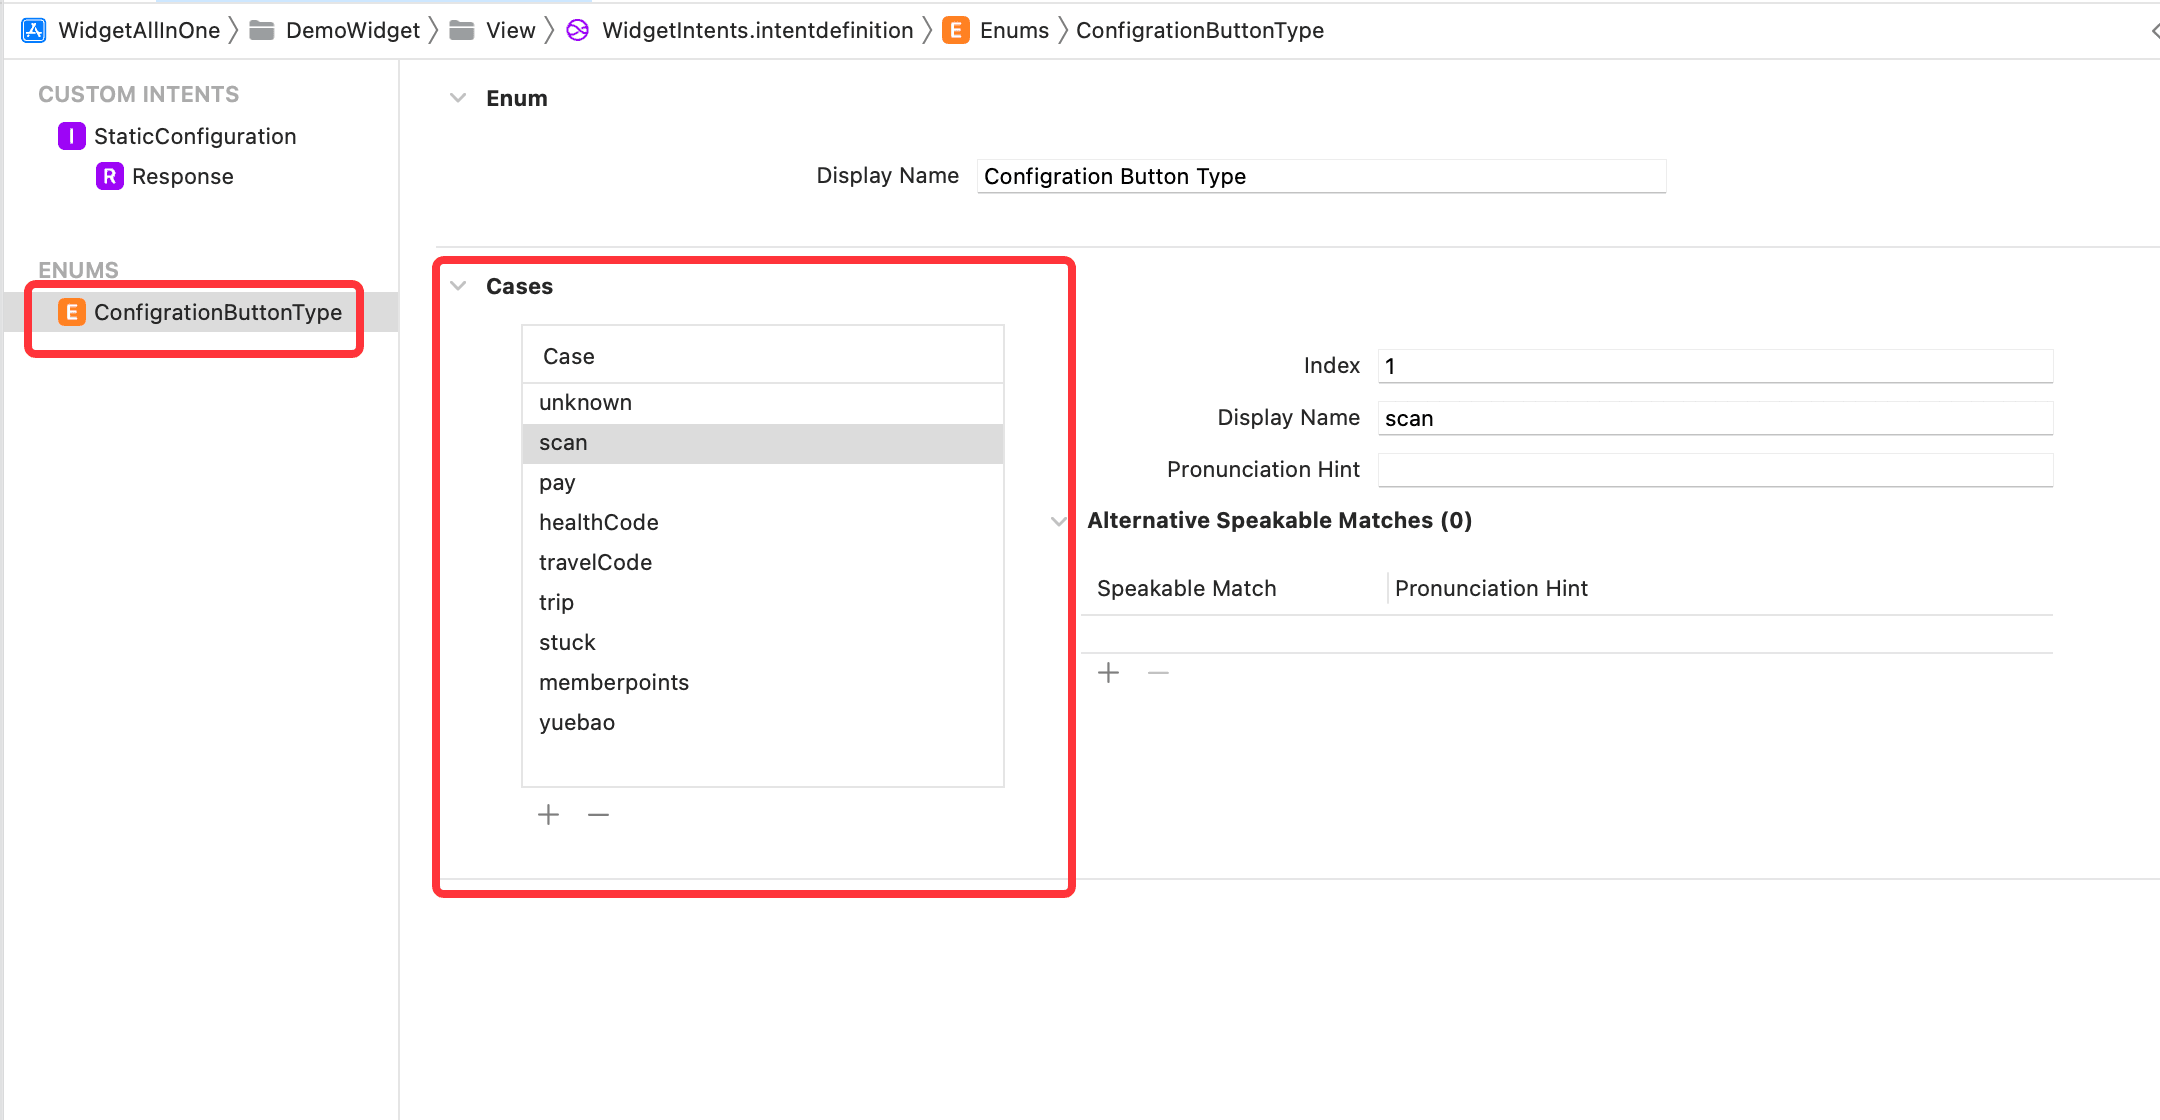
次に左下の+をクリックし、新しい列挙型を追加します。ここで注意が必要なのは、列挙型のクラス名がプロジェクト内の列挙型名と同じであってはならないことです。列挙型は選択するためのものであり、小コンポーネントを編集した後に選択されるため、列挙型の内容は実際に基づいて定義する必要があります。追加する case の displayName は日本語にすることができます。ここではプロジェクト内のButtonTypeの内容と一致させます。以下の図のように。
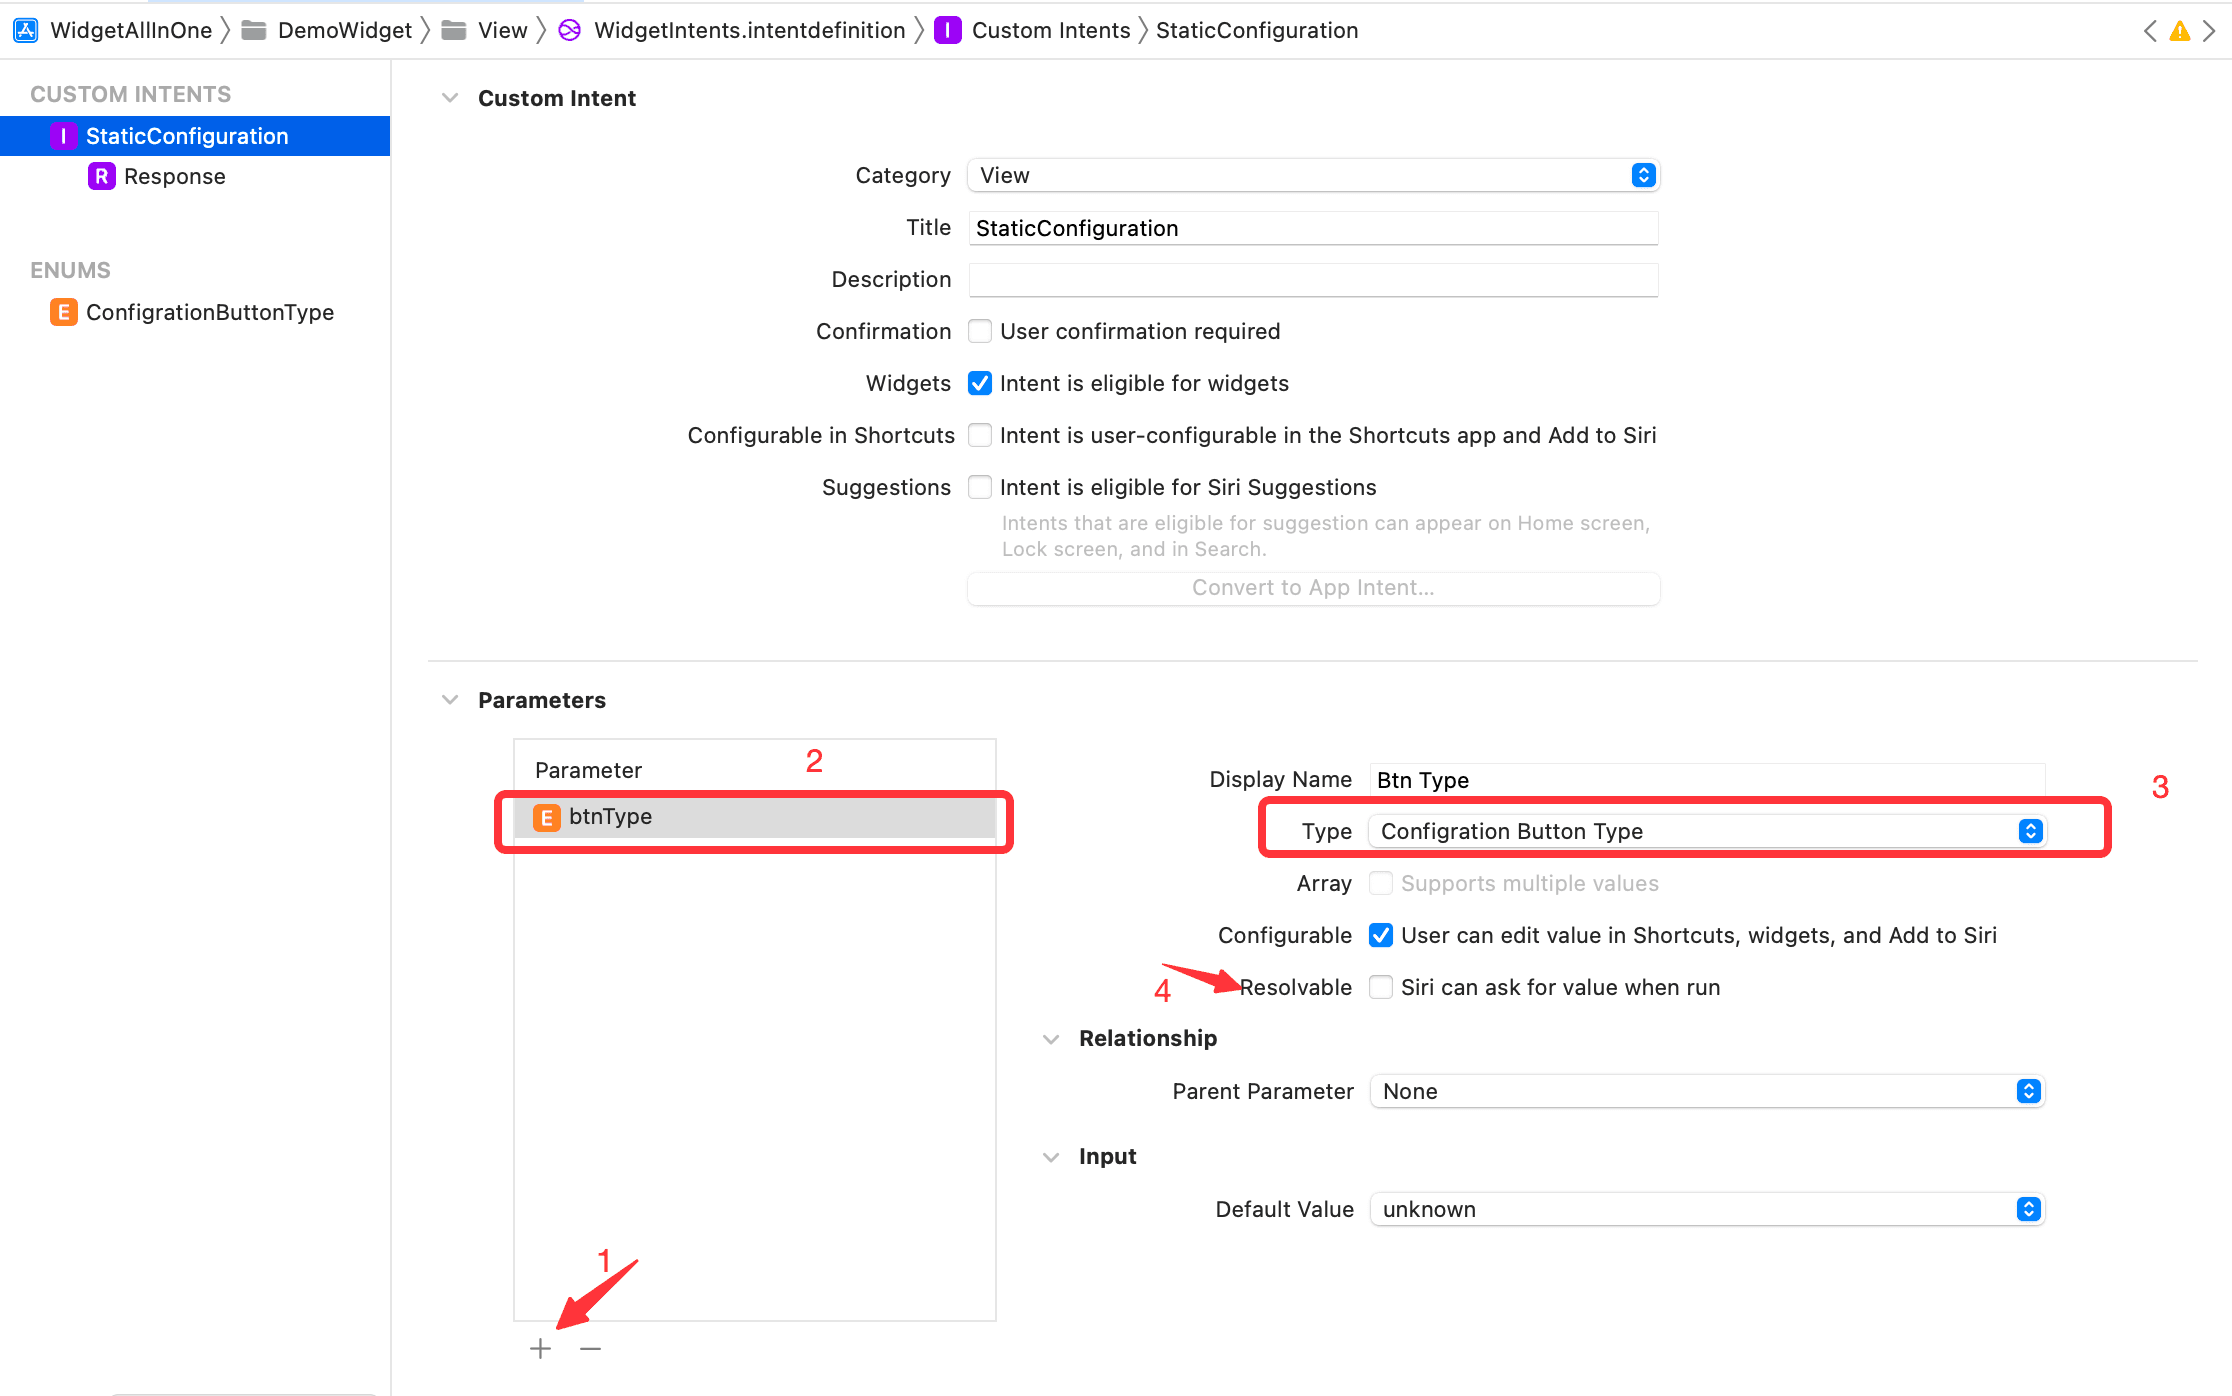
列挙型が追加されたら、次に作成したStaticConfigurationをクリックし、パラメータ部分で新しいものを追加します。btnTypeと名付け、タイプを作成した列挙型に変更し、解決可能のチェックを外します。以下のように:
これで Intent の追加が完了しました。実行して効果を確認すると、依然として小コンポーネントを編集のエントリが表示されません。なぜでしょうか?
Intent を作成しましたが、Intent を使用するウィジェットがないためです。したがって、Intent を使用する新しいウィジェットを追加する必要があります。手順は以下の通りです:
StaticIntentWidgetProviderクラスを新規作成し、コードは以下の通りです:
import Foundation
import WidgetKit
import SwiftUI

struct StaticIntentWidgetProvider: IntentTimelineProvider {

    typealias Entry = StaticIntentWidgetEntry
    typealias Intent = StaticConfigurationIntent

    // Intentで定義されたボタンタイプをウィジェットで使用するボタンタイプに変換します
    func buttonType(from configuration: Intent) -> ButtonType {
        switch configuration.btnType {
        case .scan:
            return .scan
        case .pay:
            return .pay
        case .healthCode:
            return .healthCode
        case .travelCode:
            return .travelCode
        case .trip:
            return .trip
        case .stuck:
            return .stuck
        case .memberpoints:
            return .memberpoints
        case .yuebao:
            return .yuebao
        case .unknown:
            return .unknown
        }
    }

    func placeholder(in context: Context) -> StaticIntentWidgetEntry {
        StaticIntentWidgetEntry(date: Date())
    }

    func getSnapshot(for configuration: StaticConfigurationIntent, in context: Context, completion: @escaping (StaticIntentWidgetEntry) -> Void) {
        let buttonType = buttonType(from: configuration)

        let entry = StaticIntentWidgetEntry(date: Date())
        completion(entry)
    }

    func getTimeline(for configuration: StaticConfigurationIntent, in context: Context, completion: @escaping (Timeline<StaticIntentWidgetEntry>) -> Void) {
        let entry = StaticIntentWidgetEntry(date: Date())
        // 2時間ごとにデータを更新
        let expireDate = Calendar.current.date(byAdding: .hour, value: 2, to: Date()) ?? Date()
        let timeline = Timeline(entries: [entry], policy: .after(expireDate))
        completion(timeline)
    }
}

struct StaticIntentWidgetEntry: TimelineEntry {
    let date: Date

}

struct StaticIntentWidgetEntryView: View {
    var entry: StaticIntentWidgetProvider.Entry
    let mediumItem = AliPayWidgetMediumItem()

    var body: some View {
        AlipayWidgetMeidumView(mediumItem: mediumItem)
    }
}

struct StaticIntentWidget: Widget {

    let kind: String = "StaticIntentWidget"

    var title: String = "StaticIntentWidget"
    var desc: String = "StaticIntentWidgetの説明"

    var body: some WidgetConfiguration {
        IntentConfiguration(kind: kind,
                            intent: StaticConfigurationIntent.self,
                            provider: StaticIntentWidgetProvider()) { entry in
            StaticIntentWidgetEntryView(entry: entry)
        }
        .configurationDisplayName(title)
        .description(desc)
        .supportedFamilies([.systemMedium])
    }
}
WidgetBundleに表示を追加します。以下のように:
import SwiftUI
import WidgetKit

@main
struct WidgetBundleDemo: WidgetBundle {
    @WidgetBundleBuilder
    var body: some Widget {
        StaticIntentWidget()
    }
}
実行して効果を確認すると、以下のようになります:
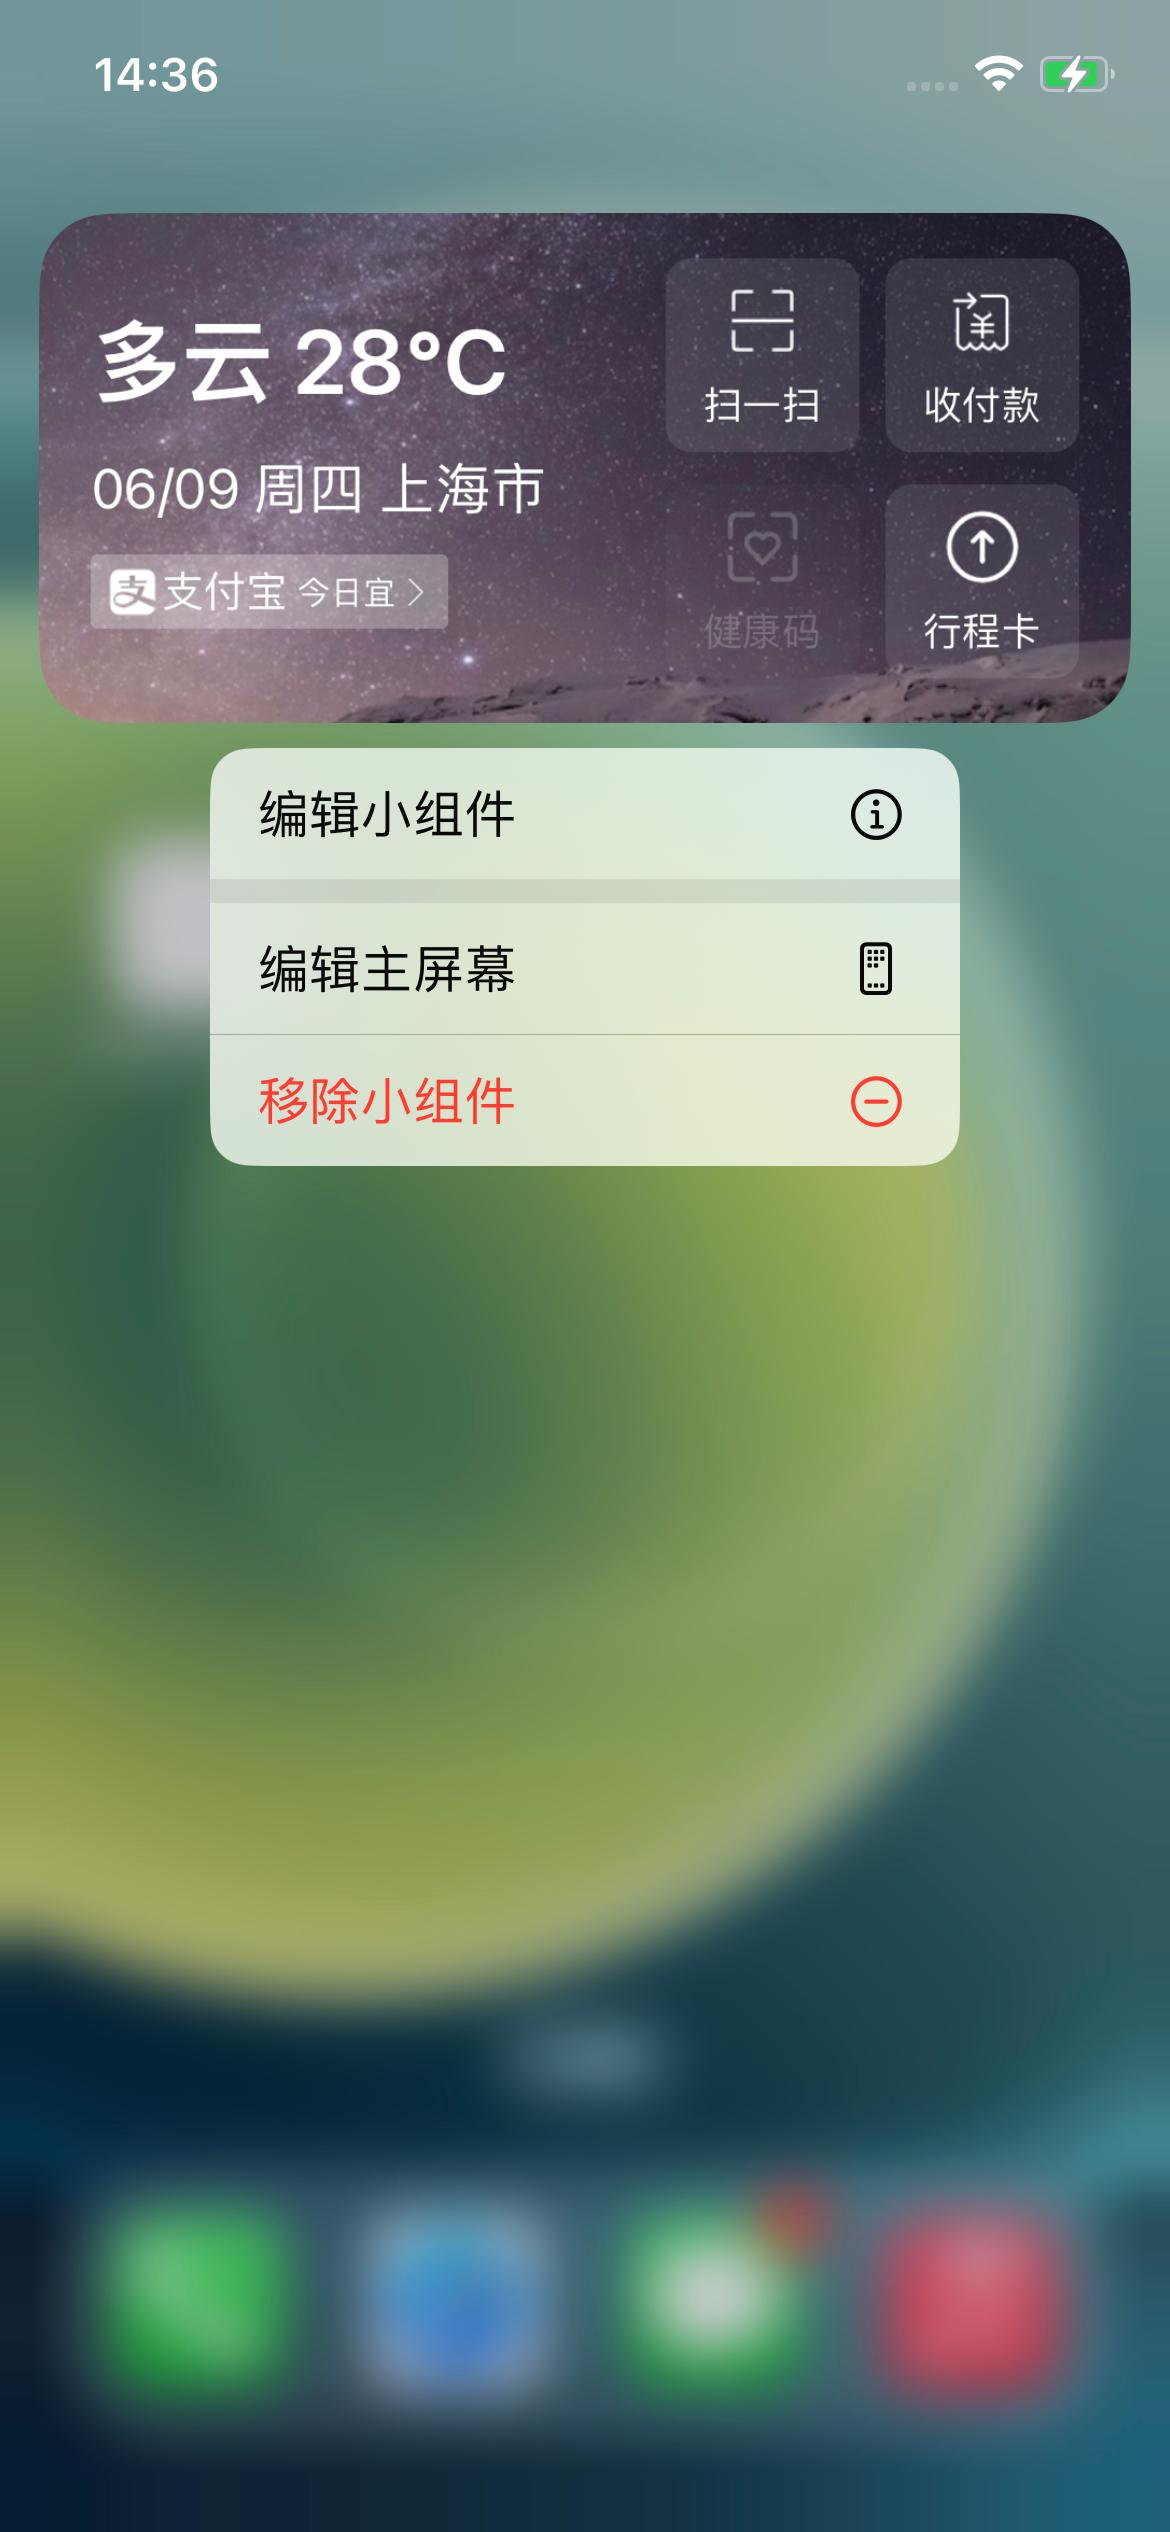
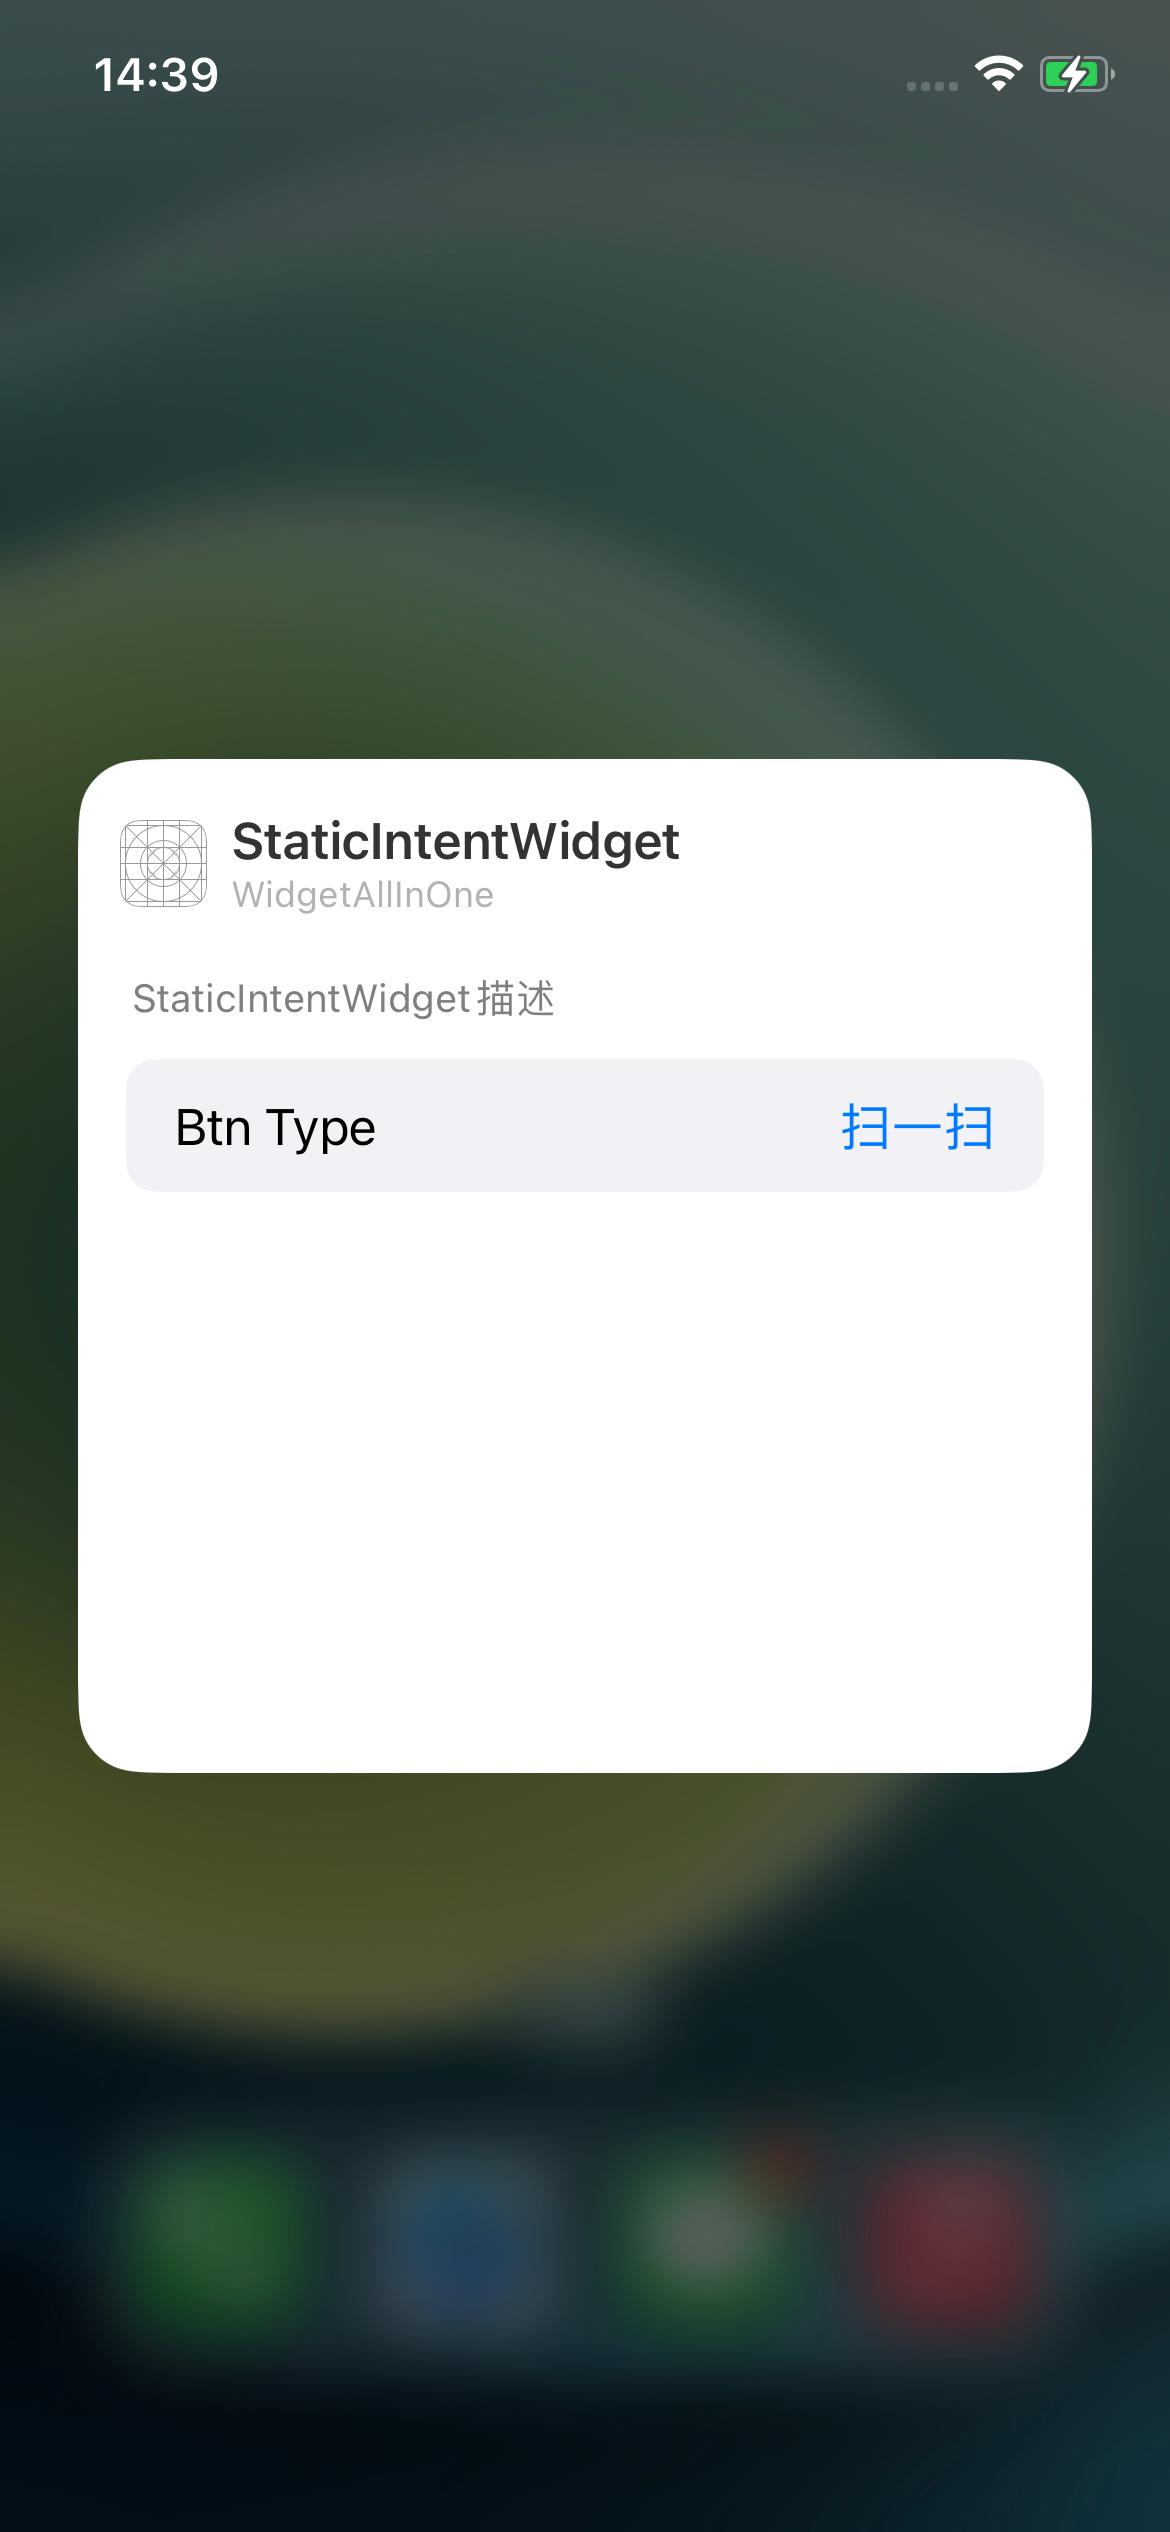
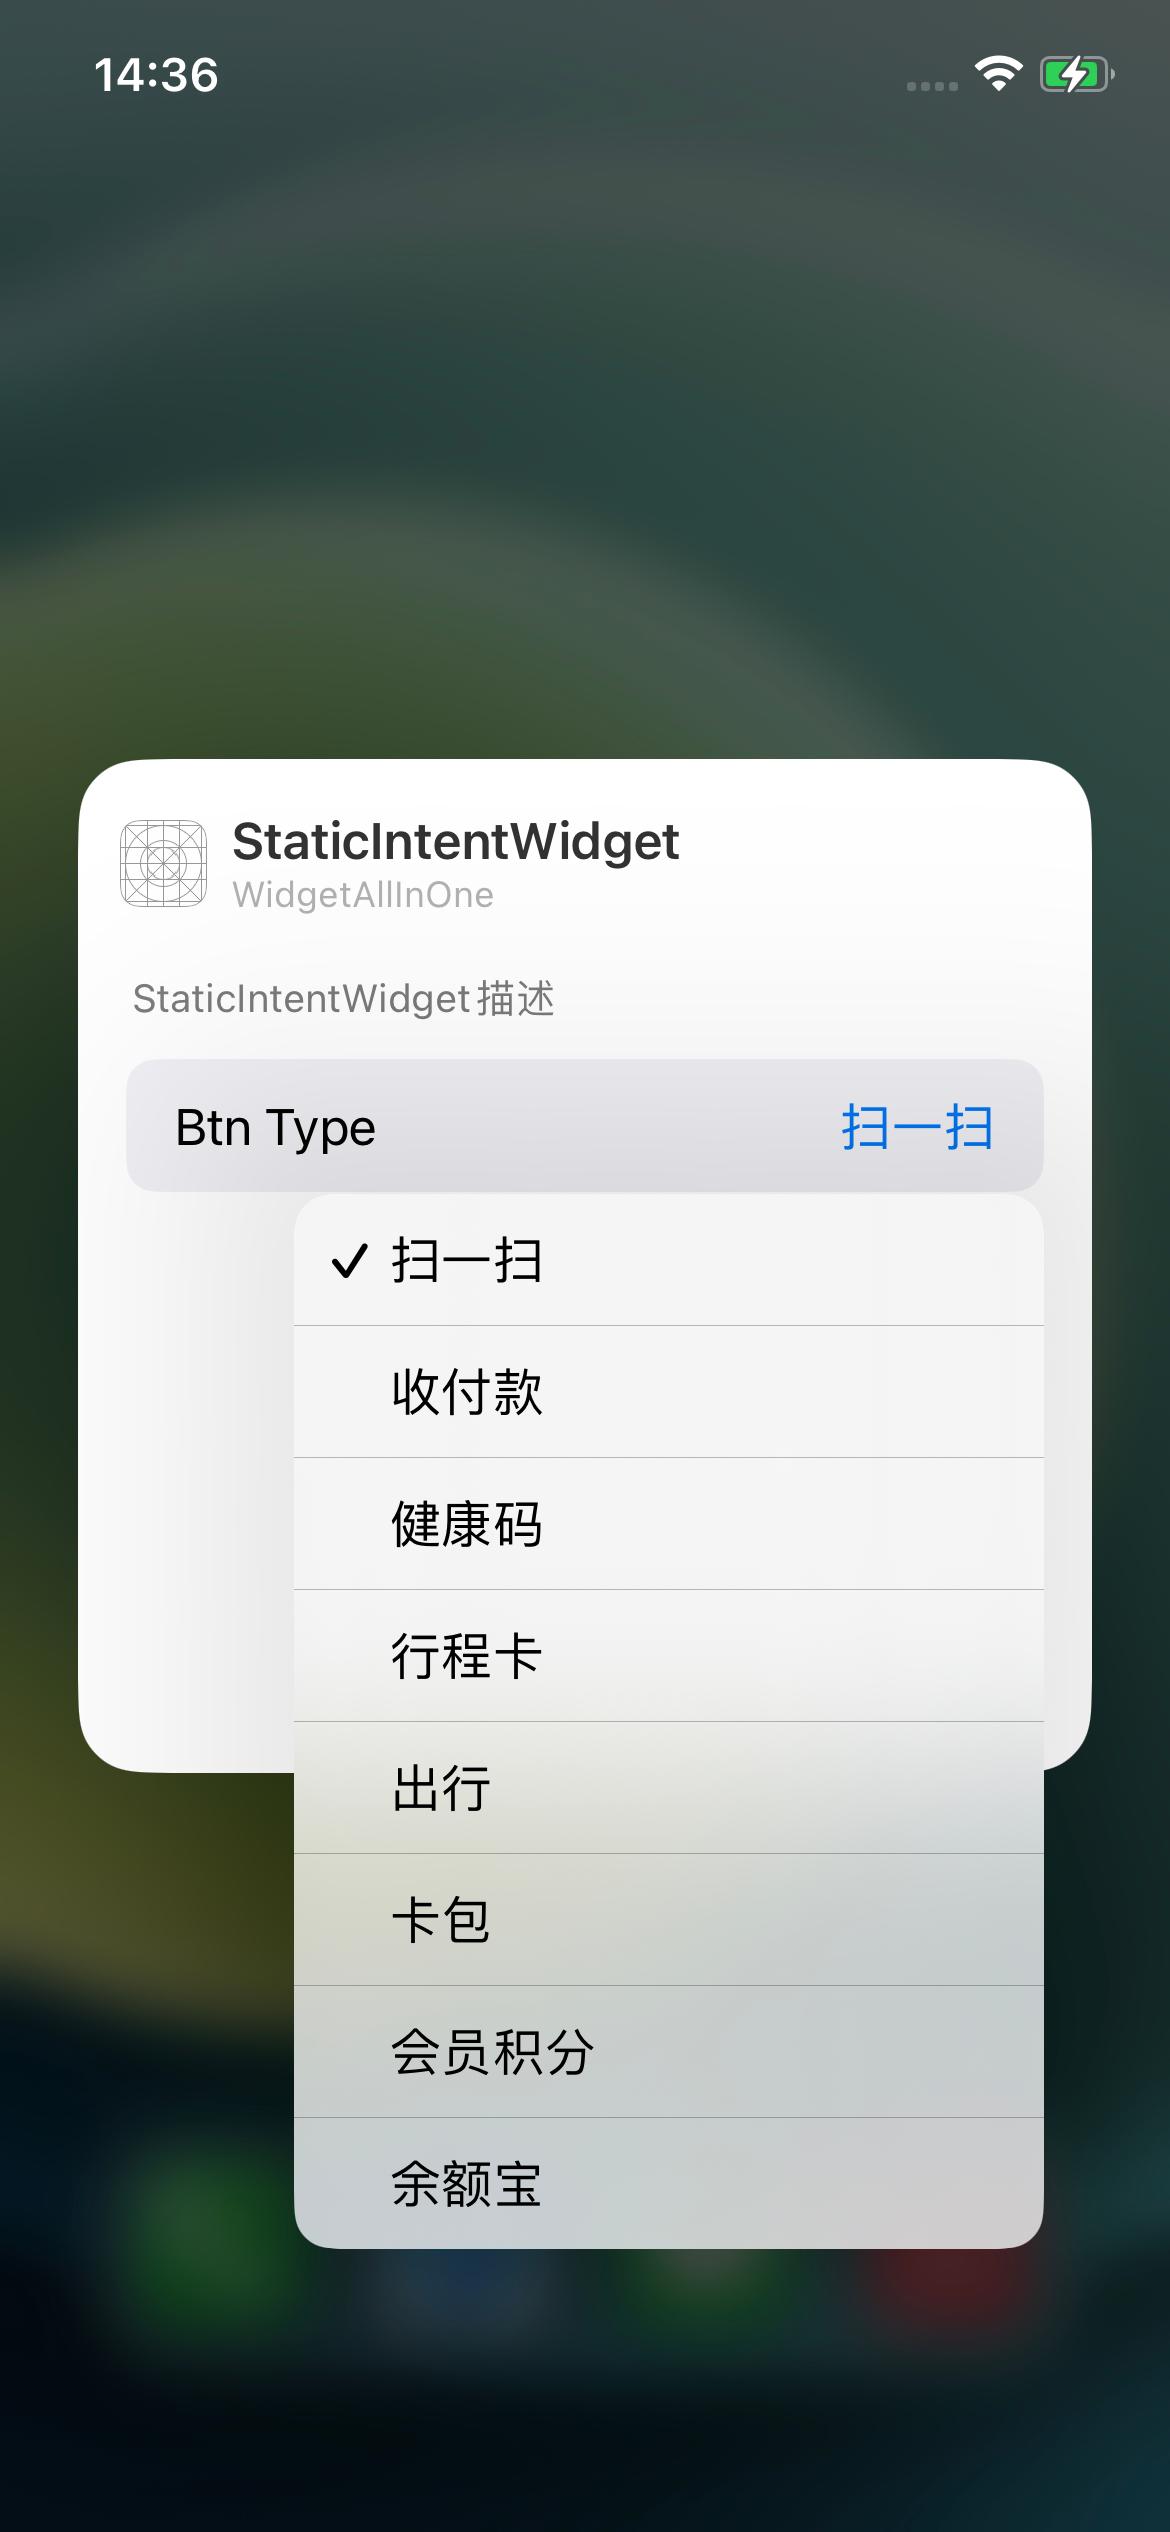
備考:
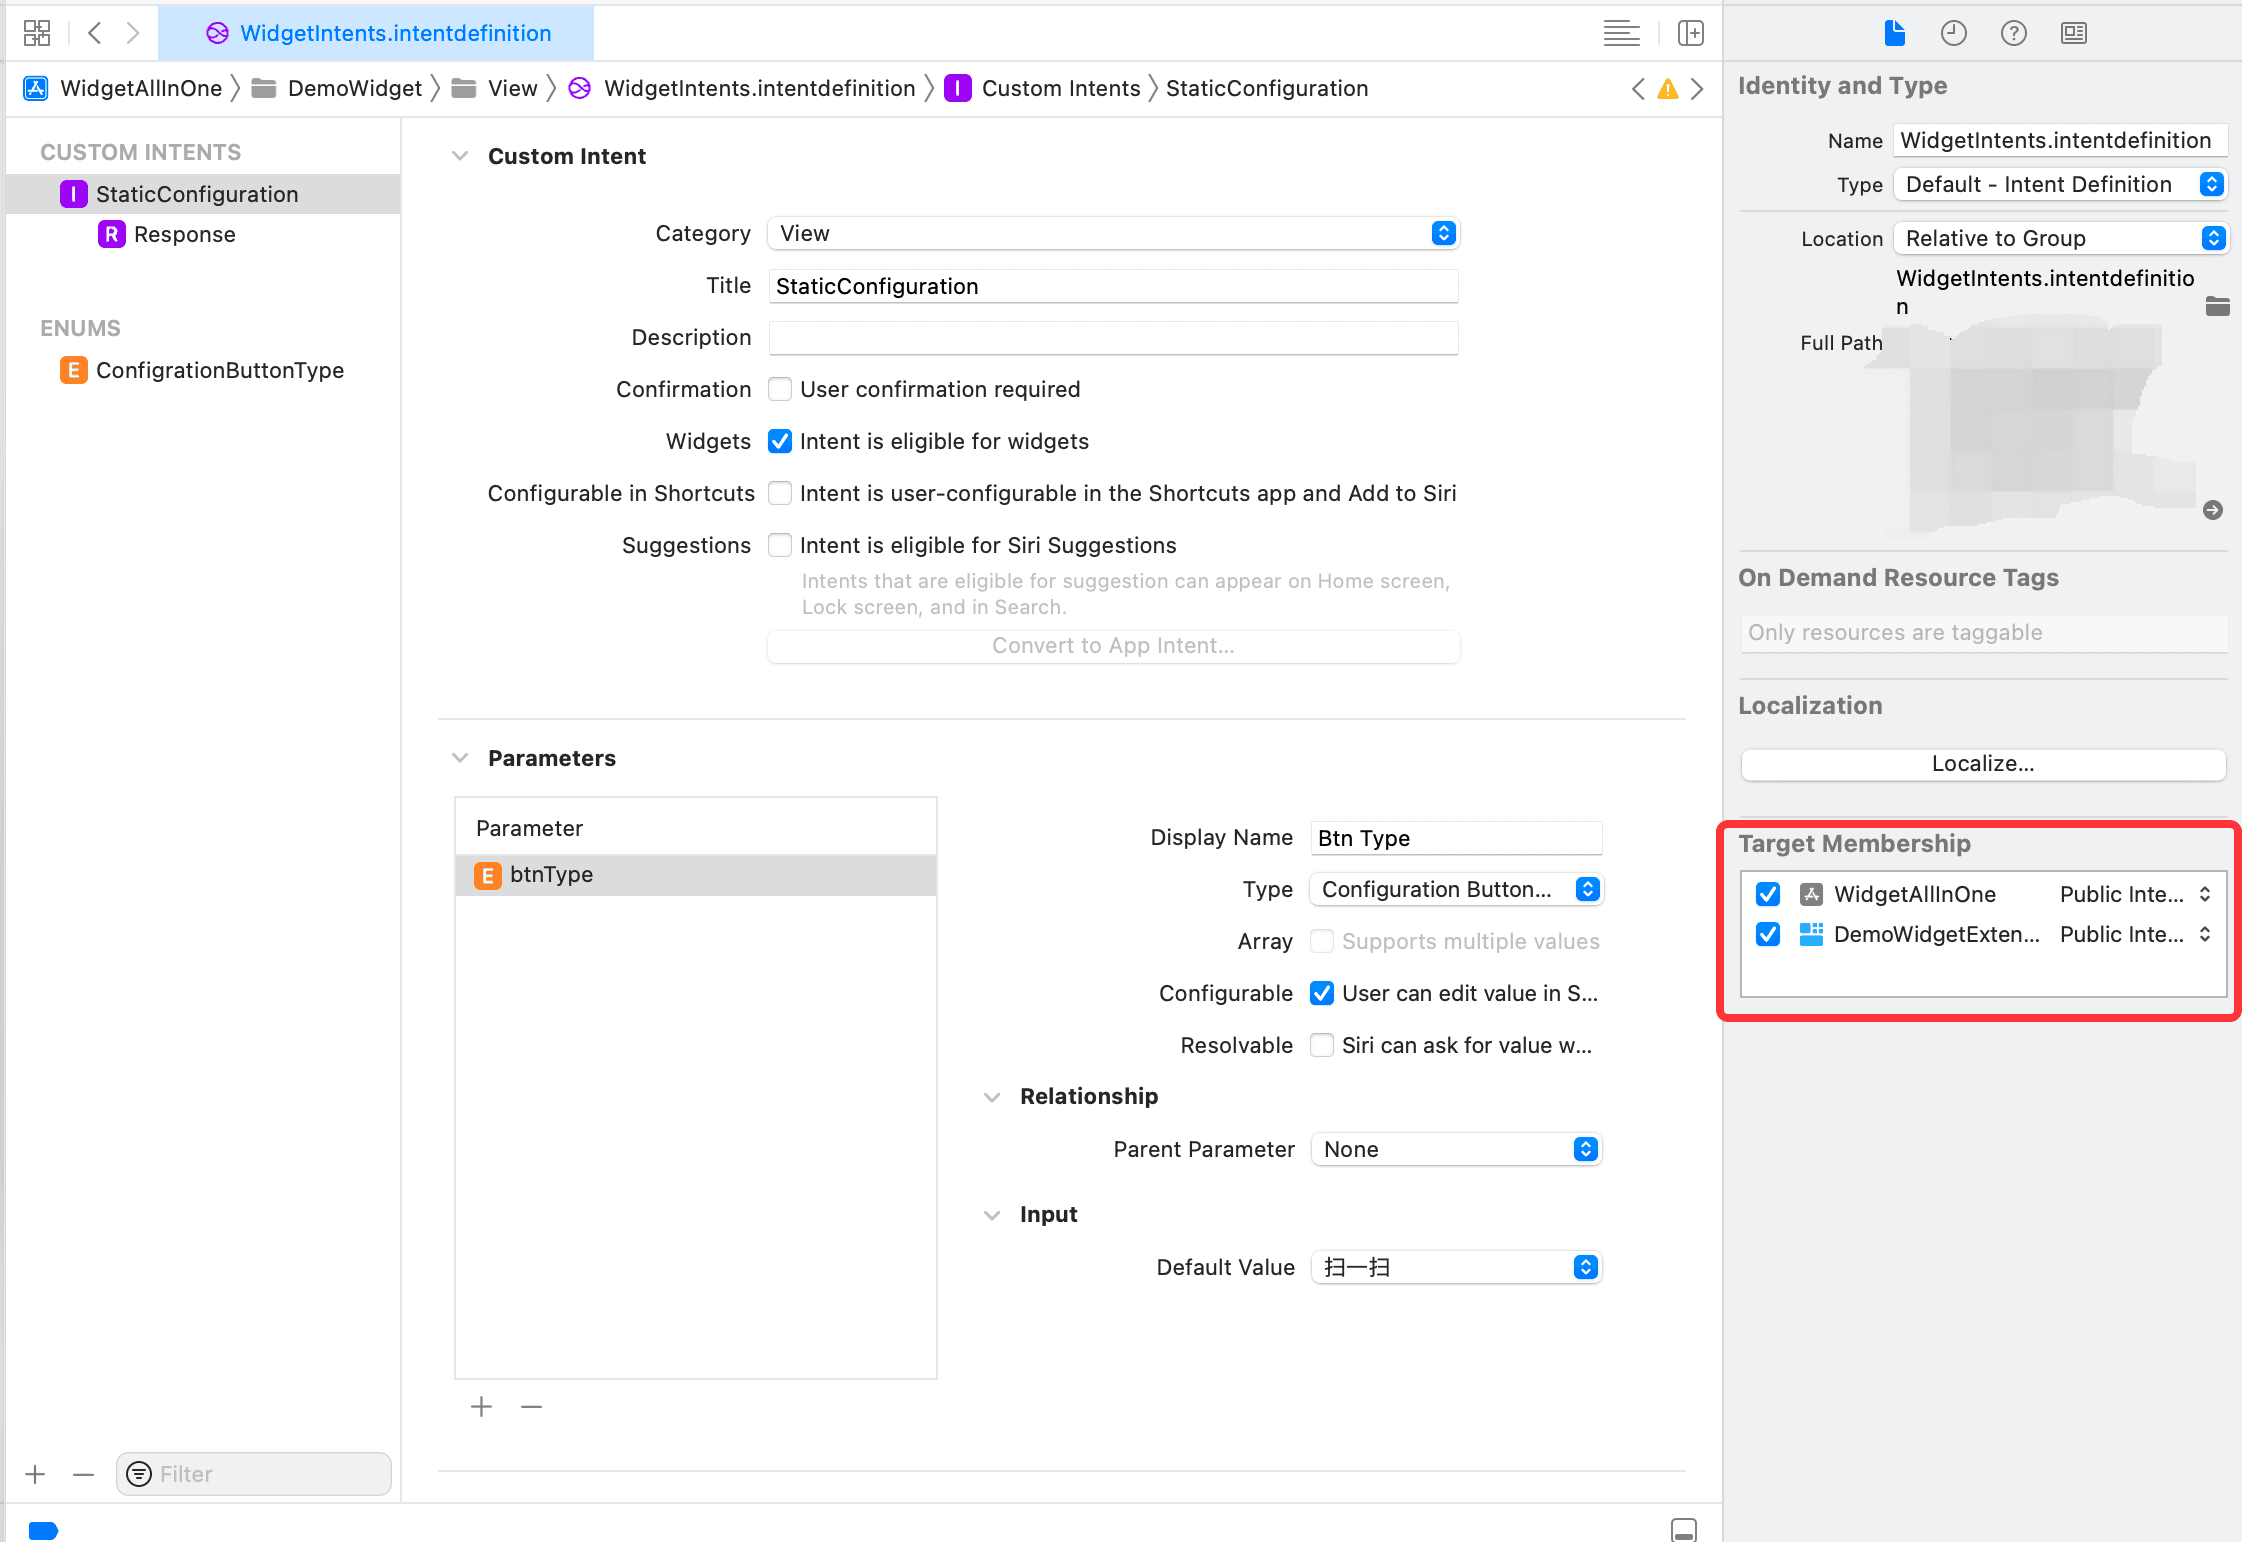
もし実行後に小コンポーネントを編集が表示されても、編集画面が空で、上記のステップ 2 と 3 の画像が表示されない場合は、Intent が主プロジェクトにチェックされているか確認してください。以下のように:
Dynamic Intent Configuration#
支付宝のウィジェットと比較すると、上記のStatic Intent Configurationスタイルは支付宝のものとは異なります。支付宝のウィジェットは複数のボタンを表示し、各ボタンをクリックしたときの選択スタイルも異なります。これはどう実現されているのでしょうか?
答えはDynamic Intent Configurationです。次に進みましょう:
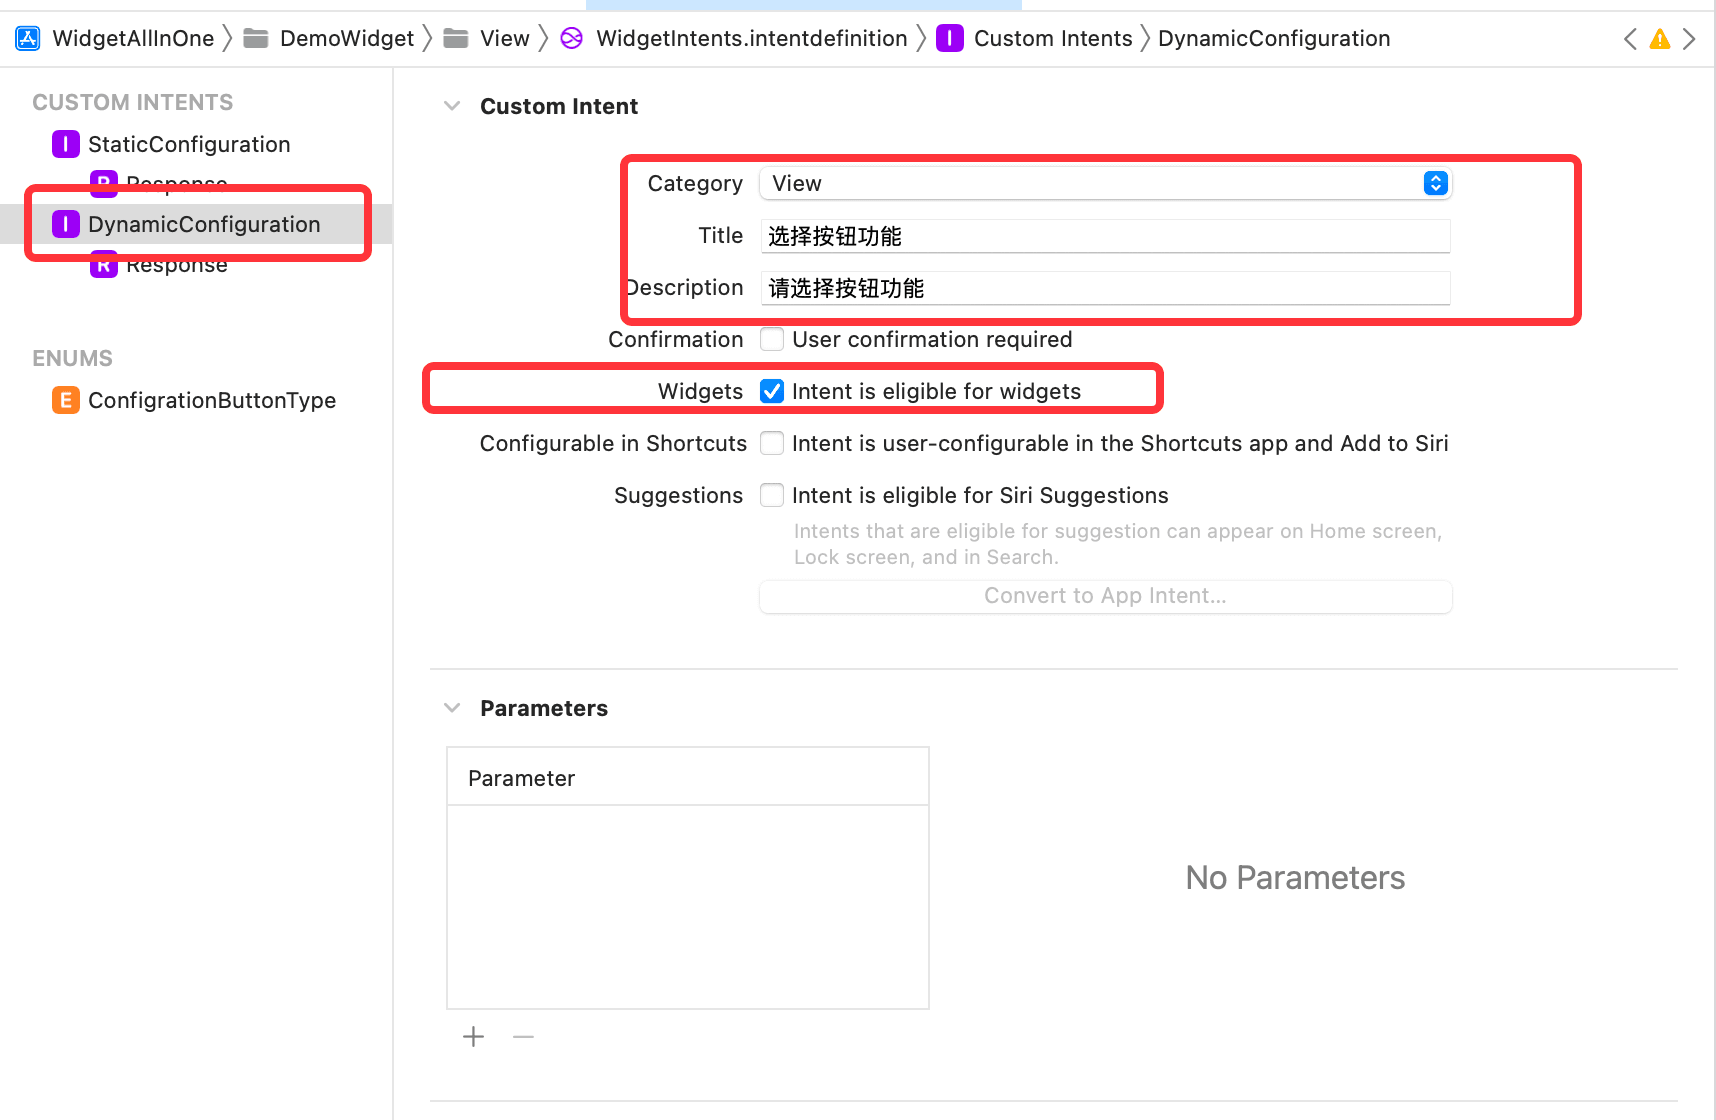
Intent を選択し、新しいIntentを追加します。名前をDynamicConfigurationに変更し、カテゴリをViewに変更し、ウィジェットにチェックを入れ、ショートカットで設定可能と提案のチェックを外します。以下のように:
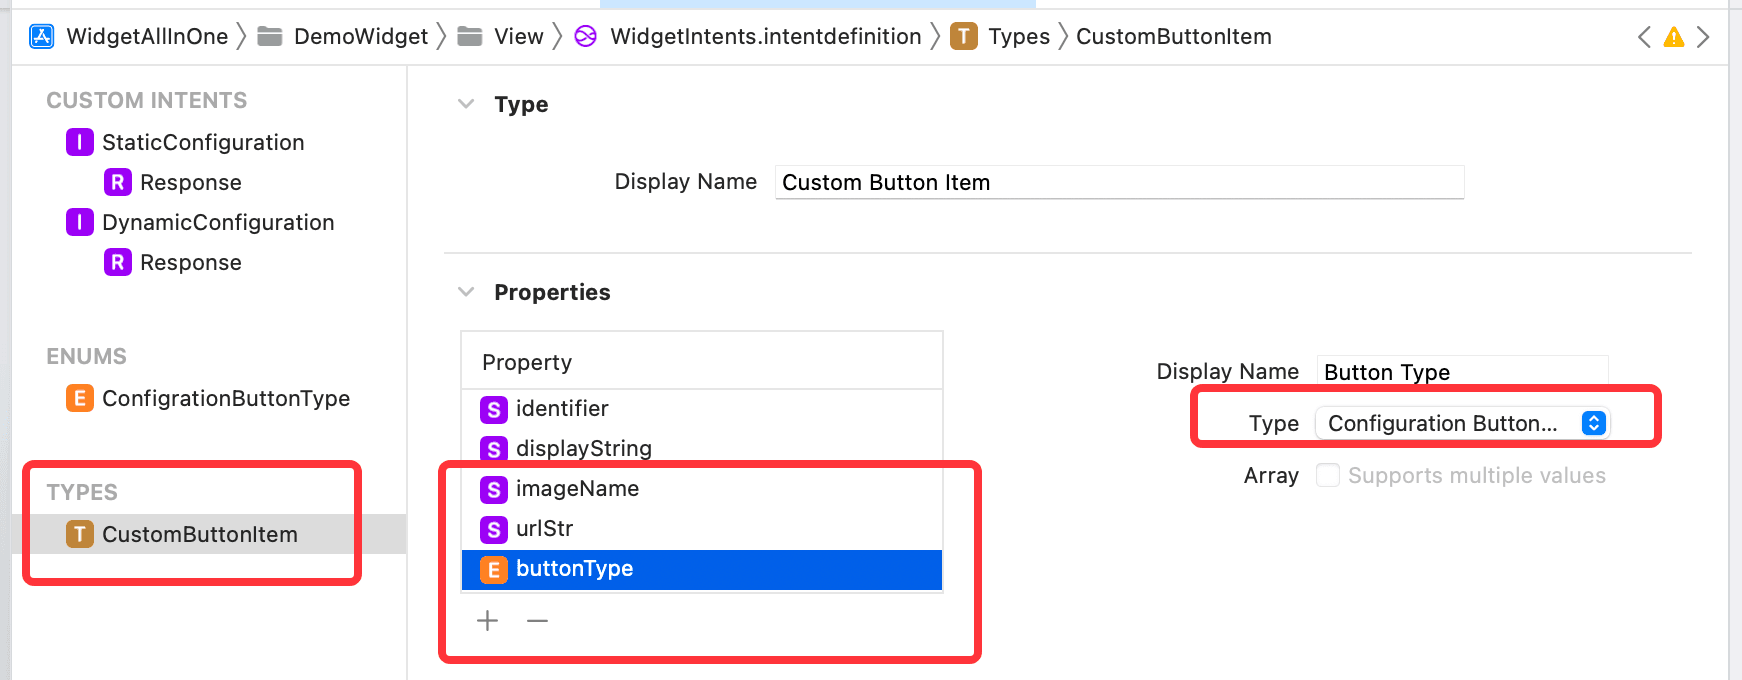
続けて、新しいタイプを追加し、名前をCustomButtonItemにします。これはDynamicConfigurationでパラメータを追加する際に使用します。プロパティにurlStrとimageNameの属性を String 型で追加し、buttonType属性は定義した Enum 型にします。以下のように:
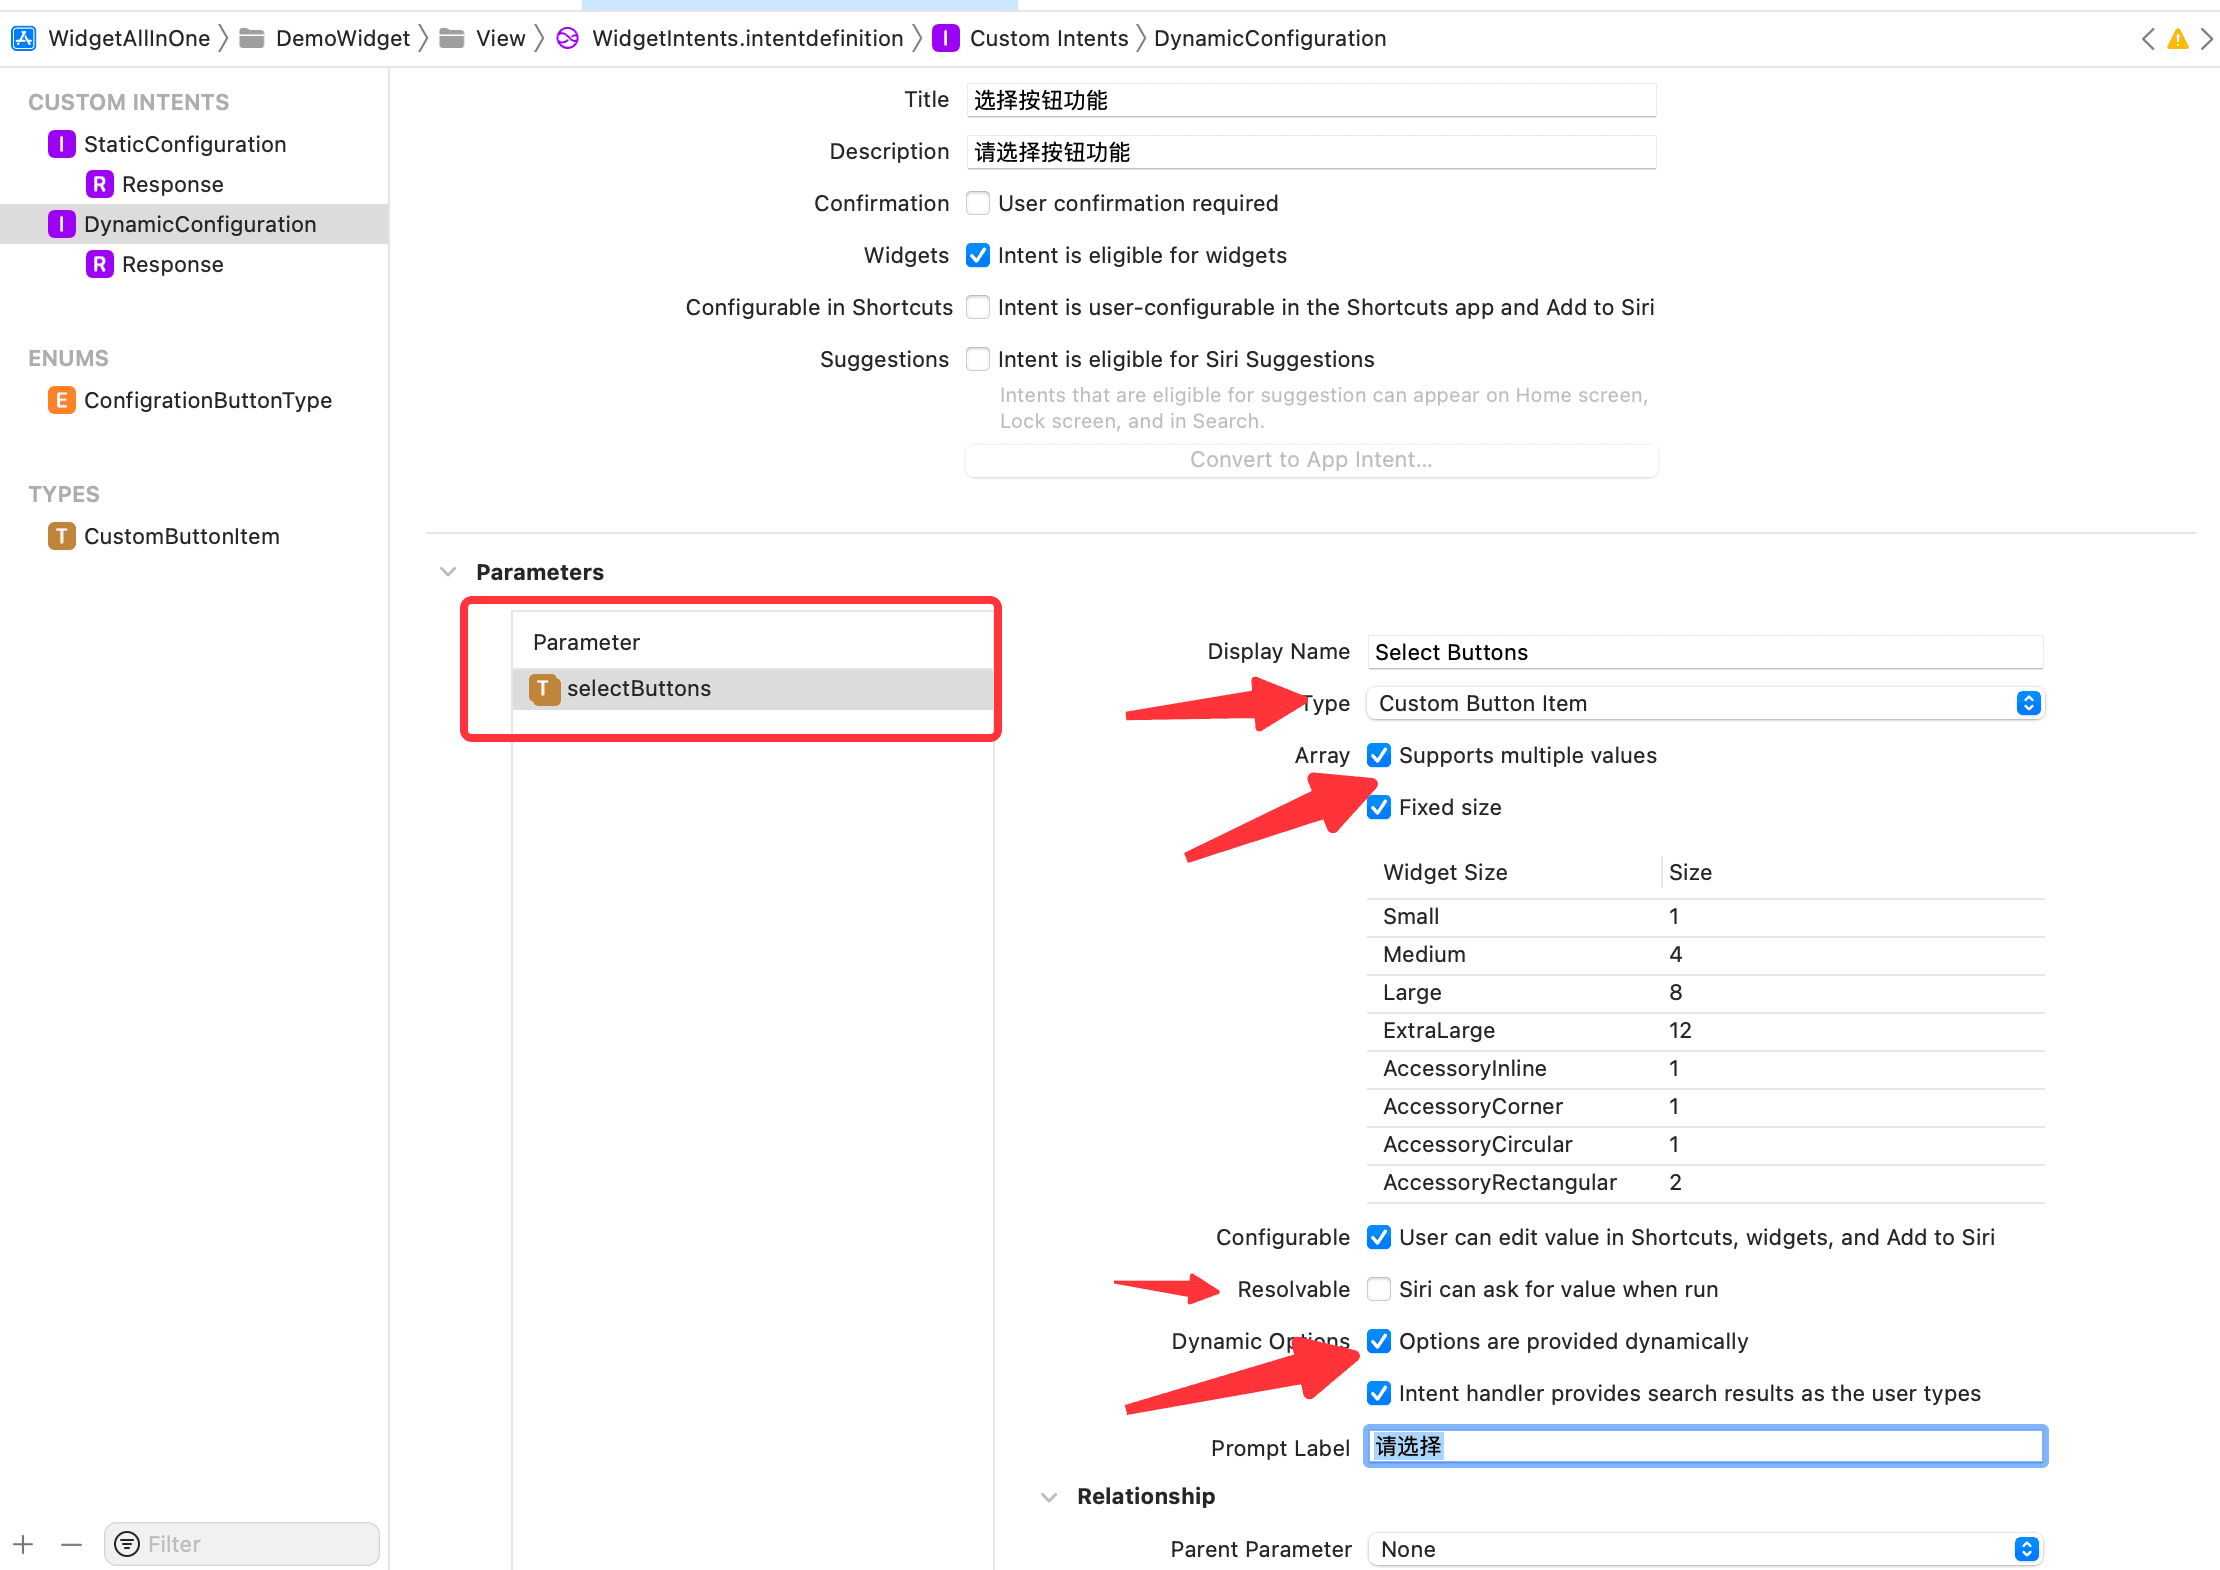
次に、DynamicConfigurationにパラメータを追加します。タイプをCustomButtonItemに選択し、複数の値をサポート、固定サイズ、動的オプションにチェックを入れ、解決可能のチェックを外します。動的オプションの下のプロンプトラベルに選択してくださいと入力します。固定サイズの異なるスタイルのサイズは変更できます。以下のように:
これで Intent の設定は完了しましたが、もう 1 つの問題があります。Intent で複数の値をサポートにチェックを入れましたが、データはどこから来るのでしょうか?小コンポーネントを編集したときにデフォルトで表示されるいくつかのデータはどこから来るのでしょうか?単一のボタンをクリックしたときに表示されるすべてのデータはどこから来るのでしょうか?
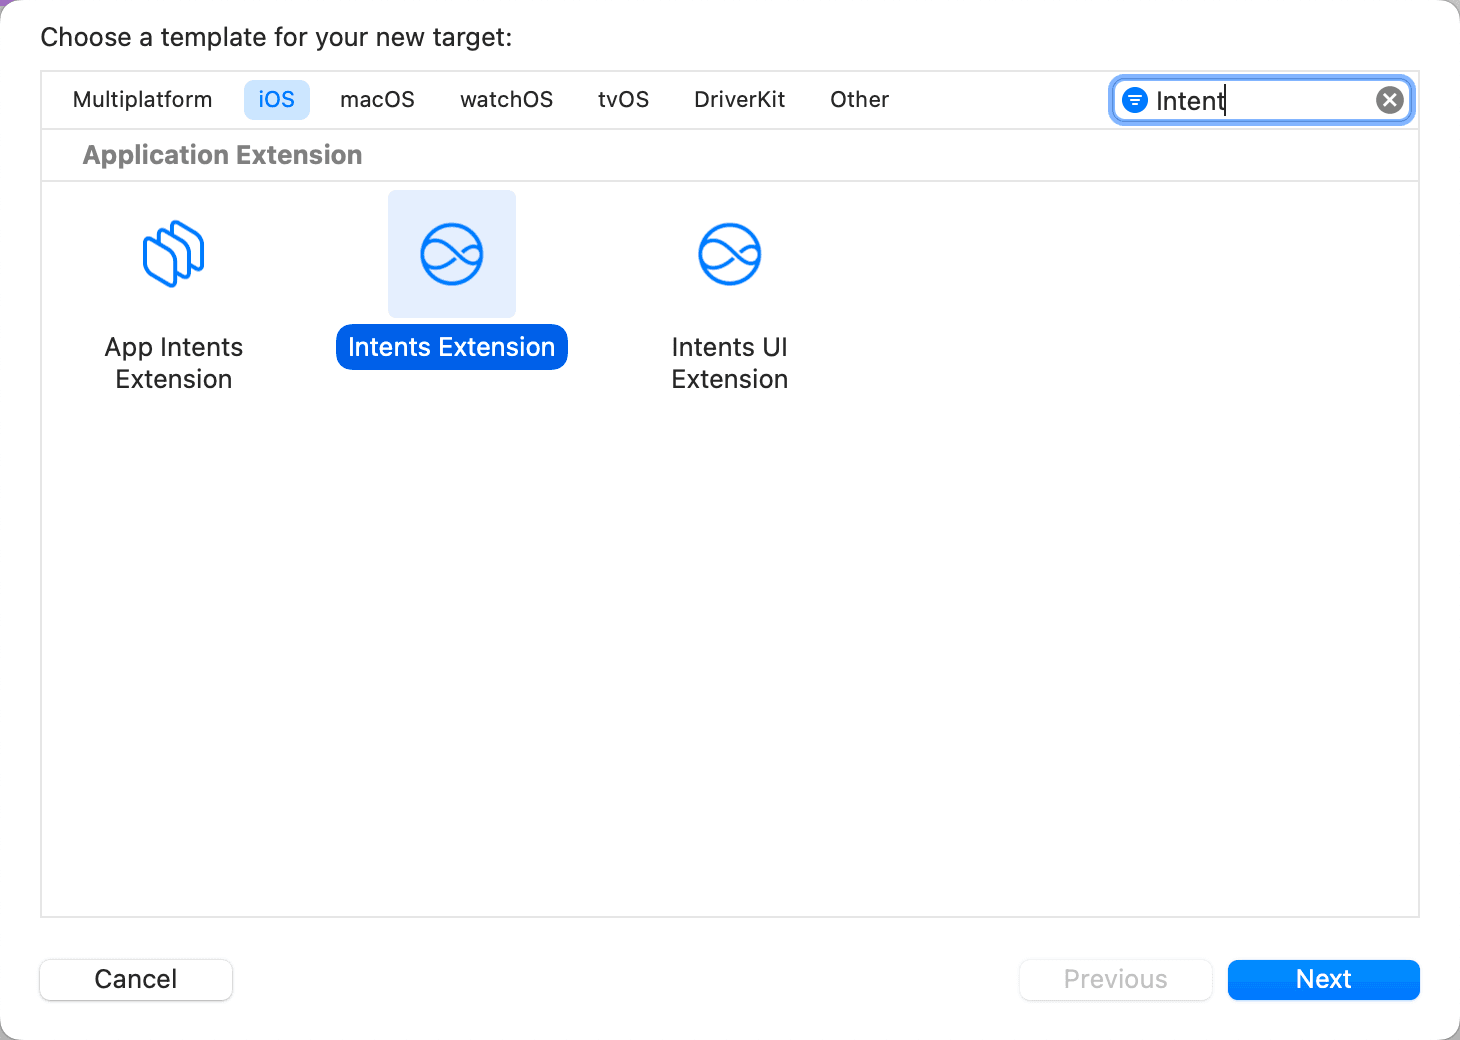
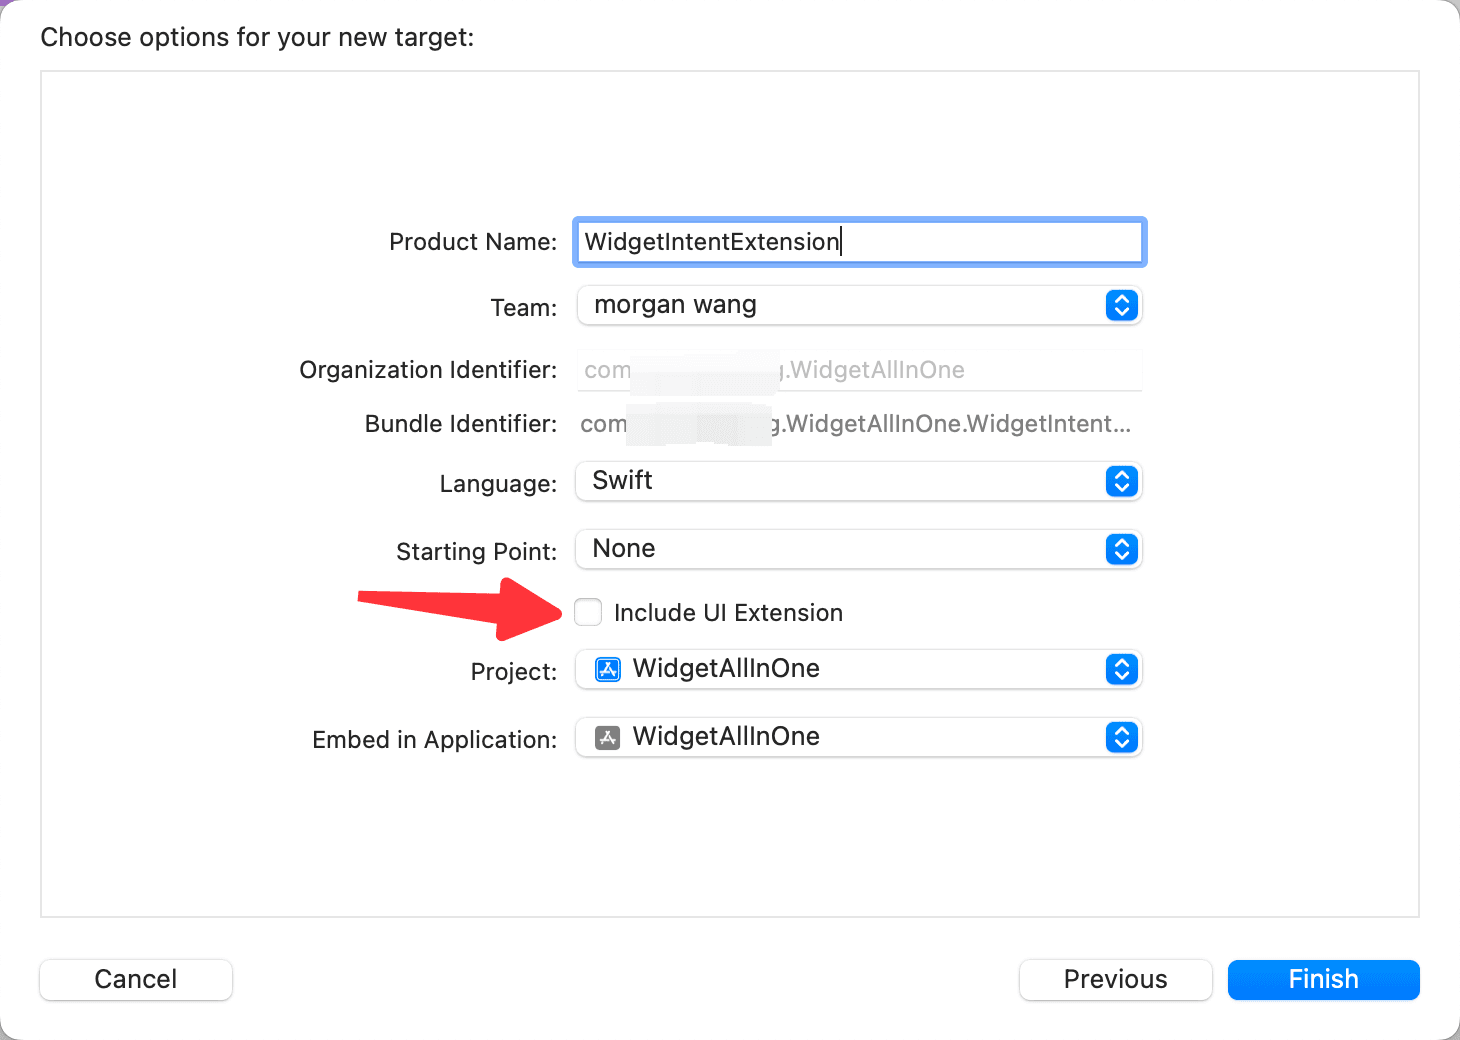
答えはIntent Extensionです。ファイル -> 新規 -> ターゲットをクリックします。ここで注意が必要なのは、これはターゲットであり、Intentを検索し、Intent Extensionを選択します。以下のように、次へをクリックし、UI拡張を含めないのチェックを外し、完了をクリックします。
次に、.intentdefinitionファイルを選択し、ターゲットメンバーシップで先ほど作成したターゲットにもチェックを入れます。以下のように:
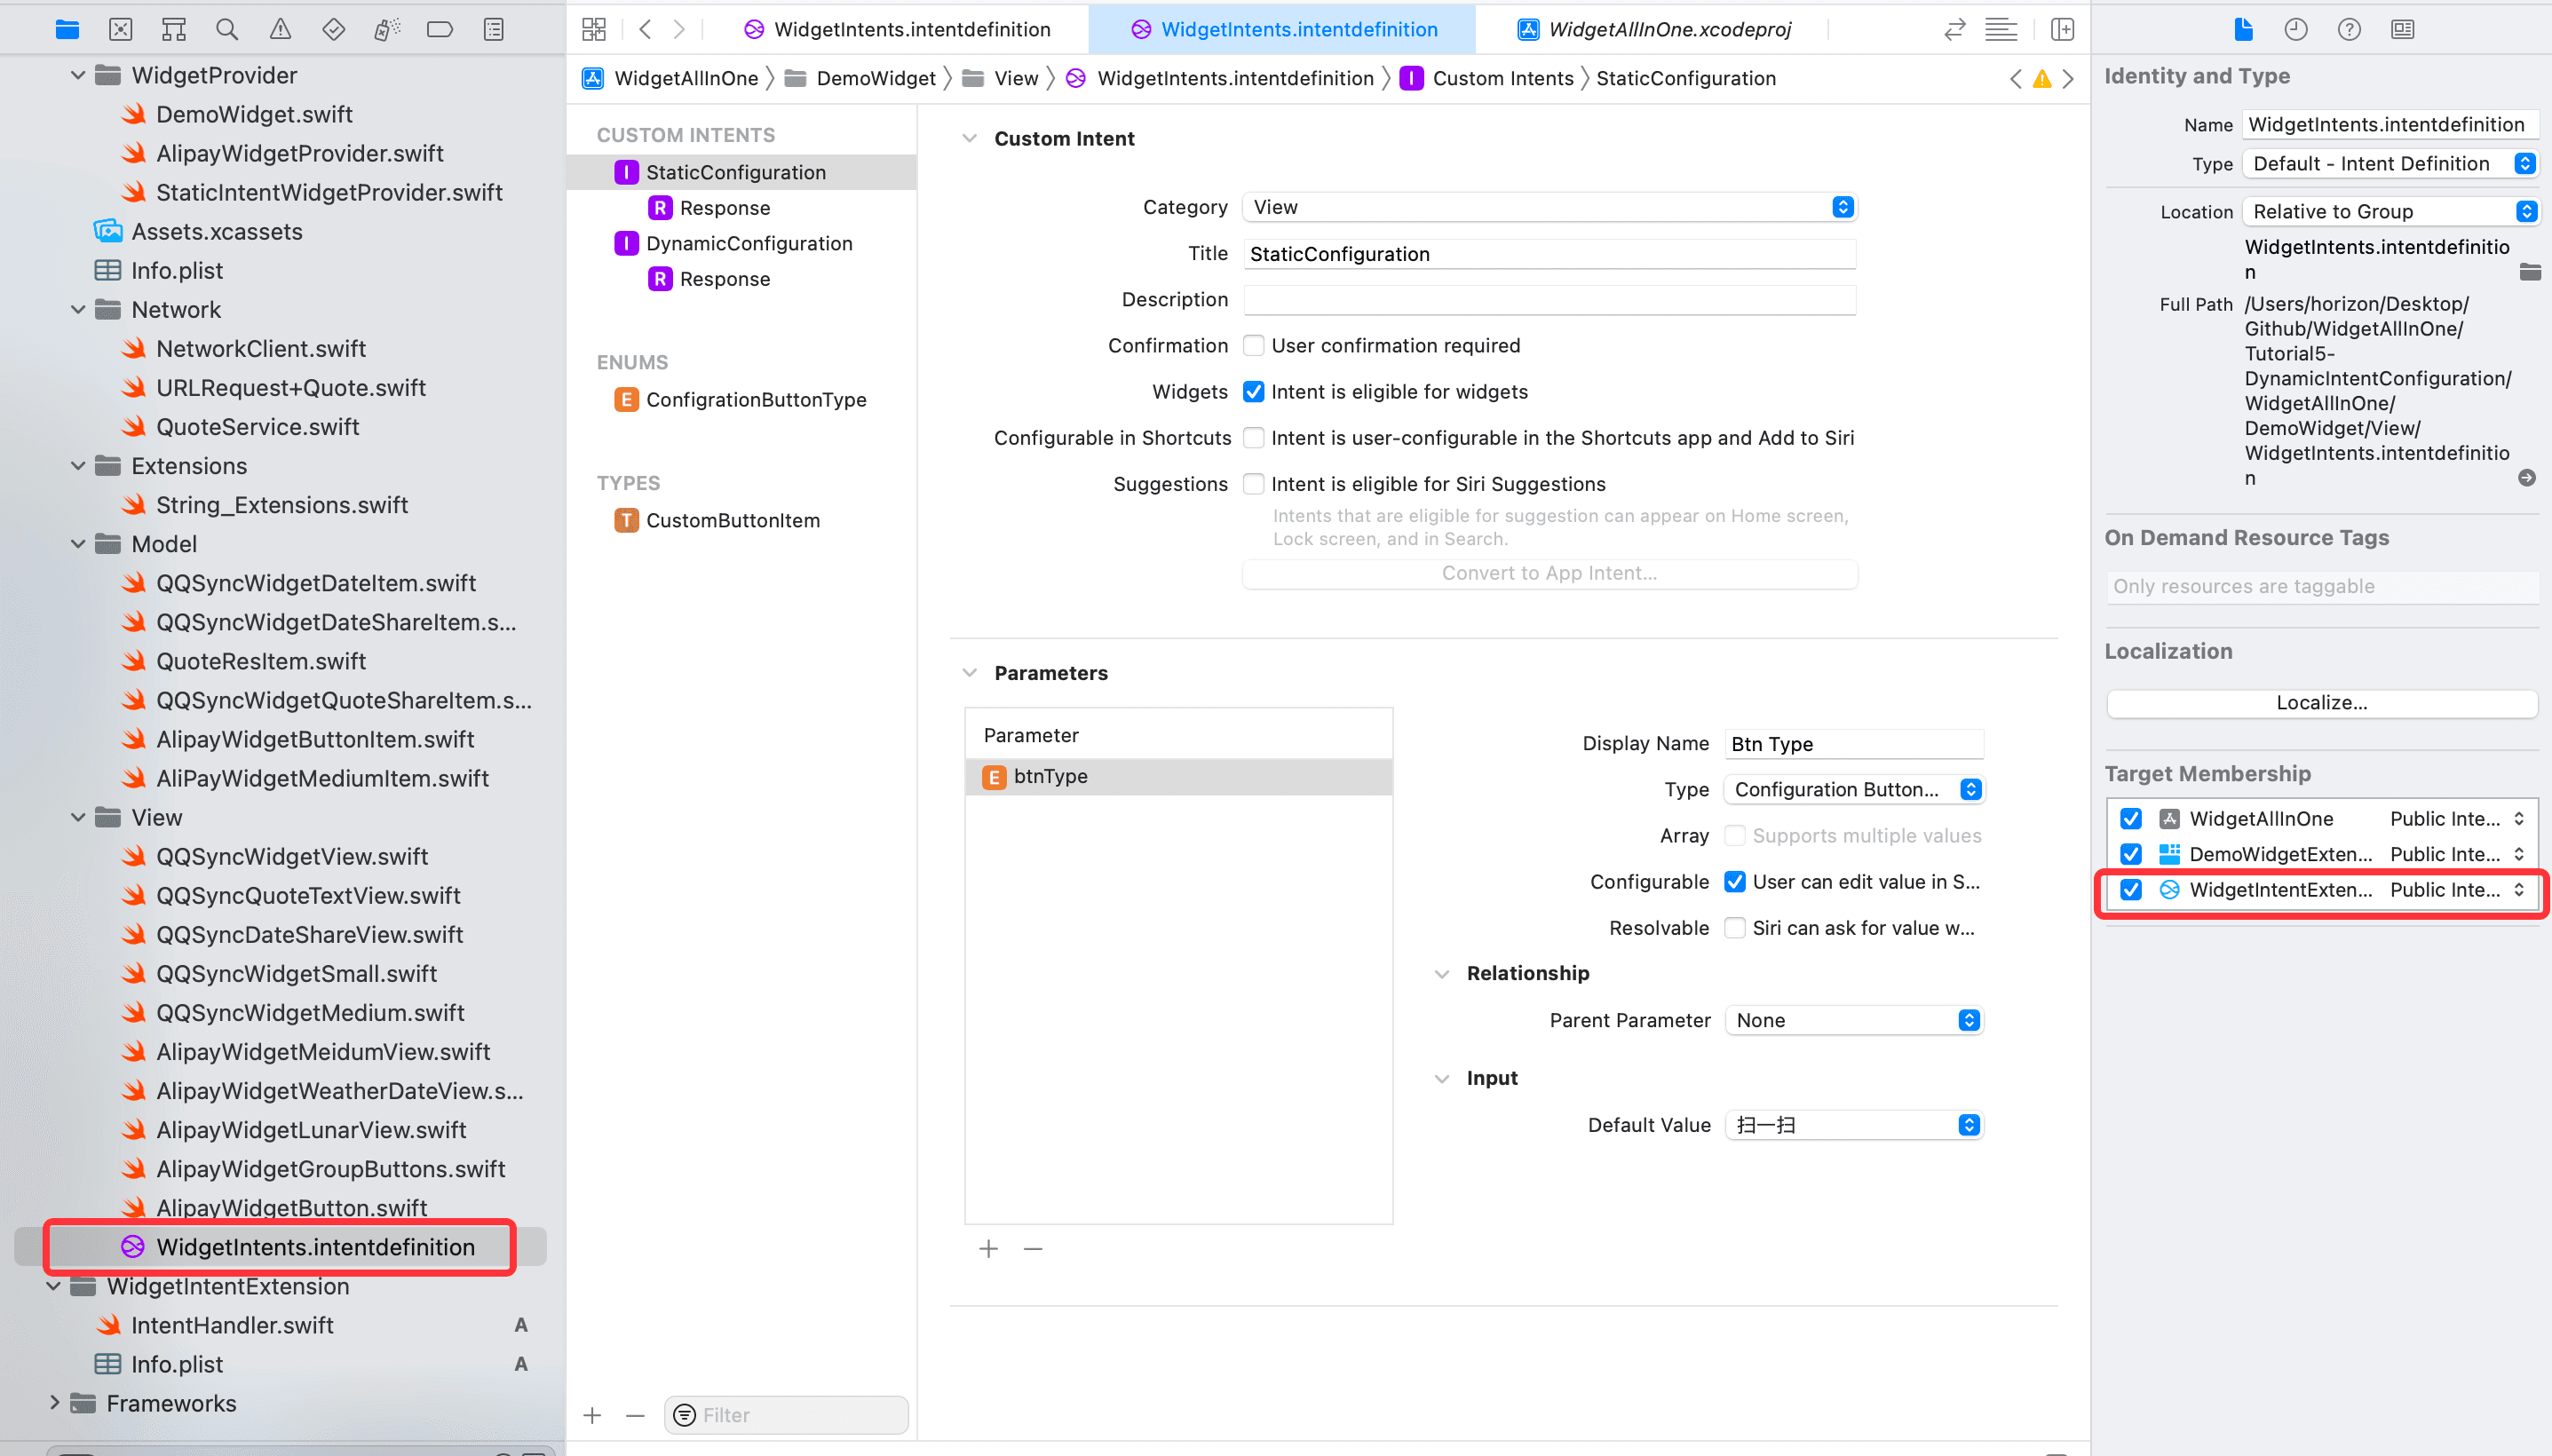
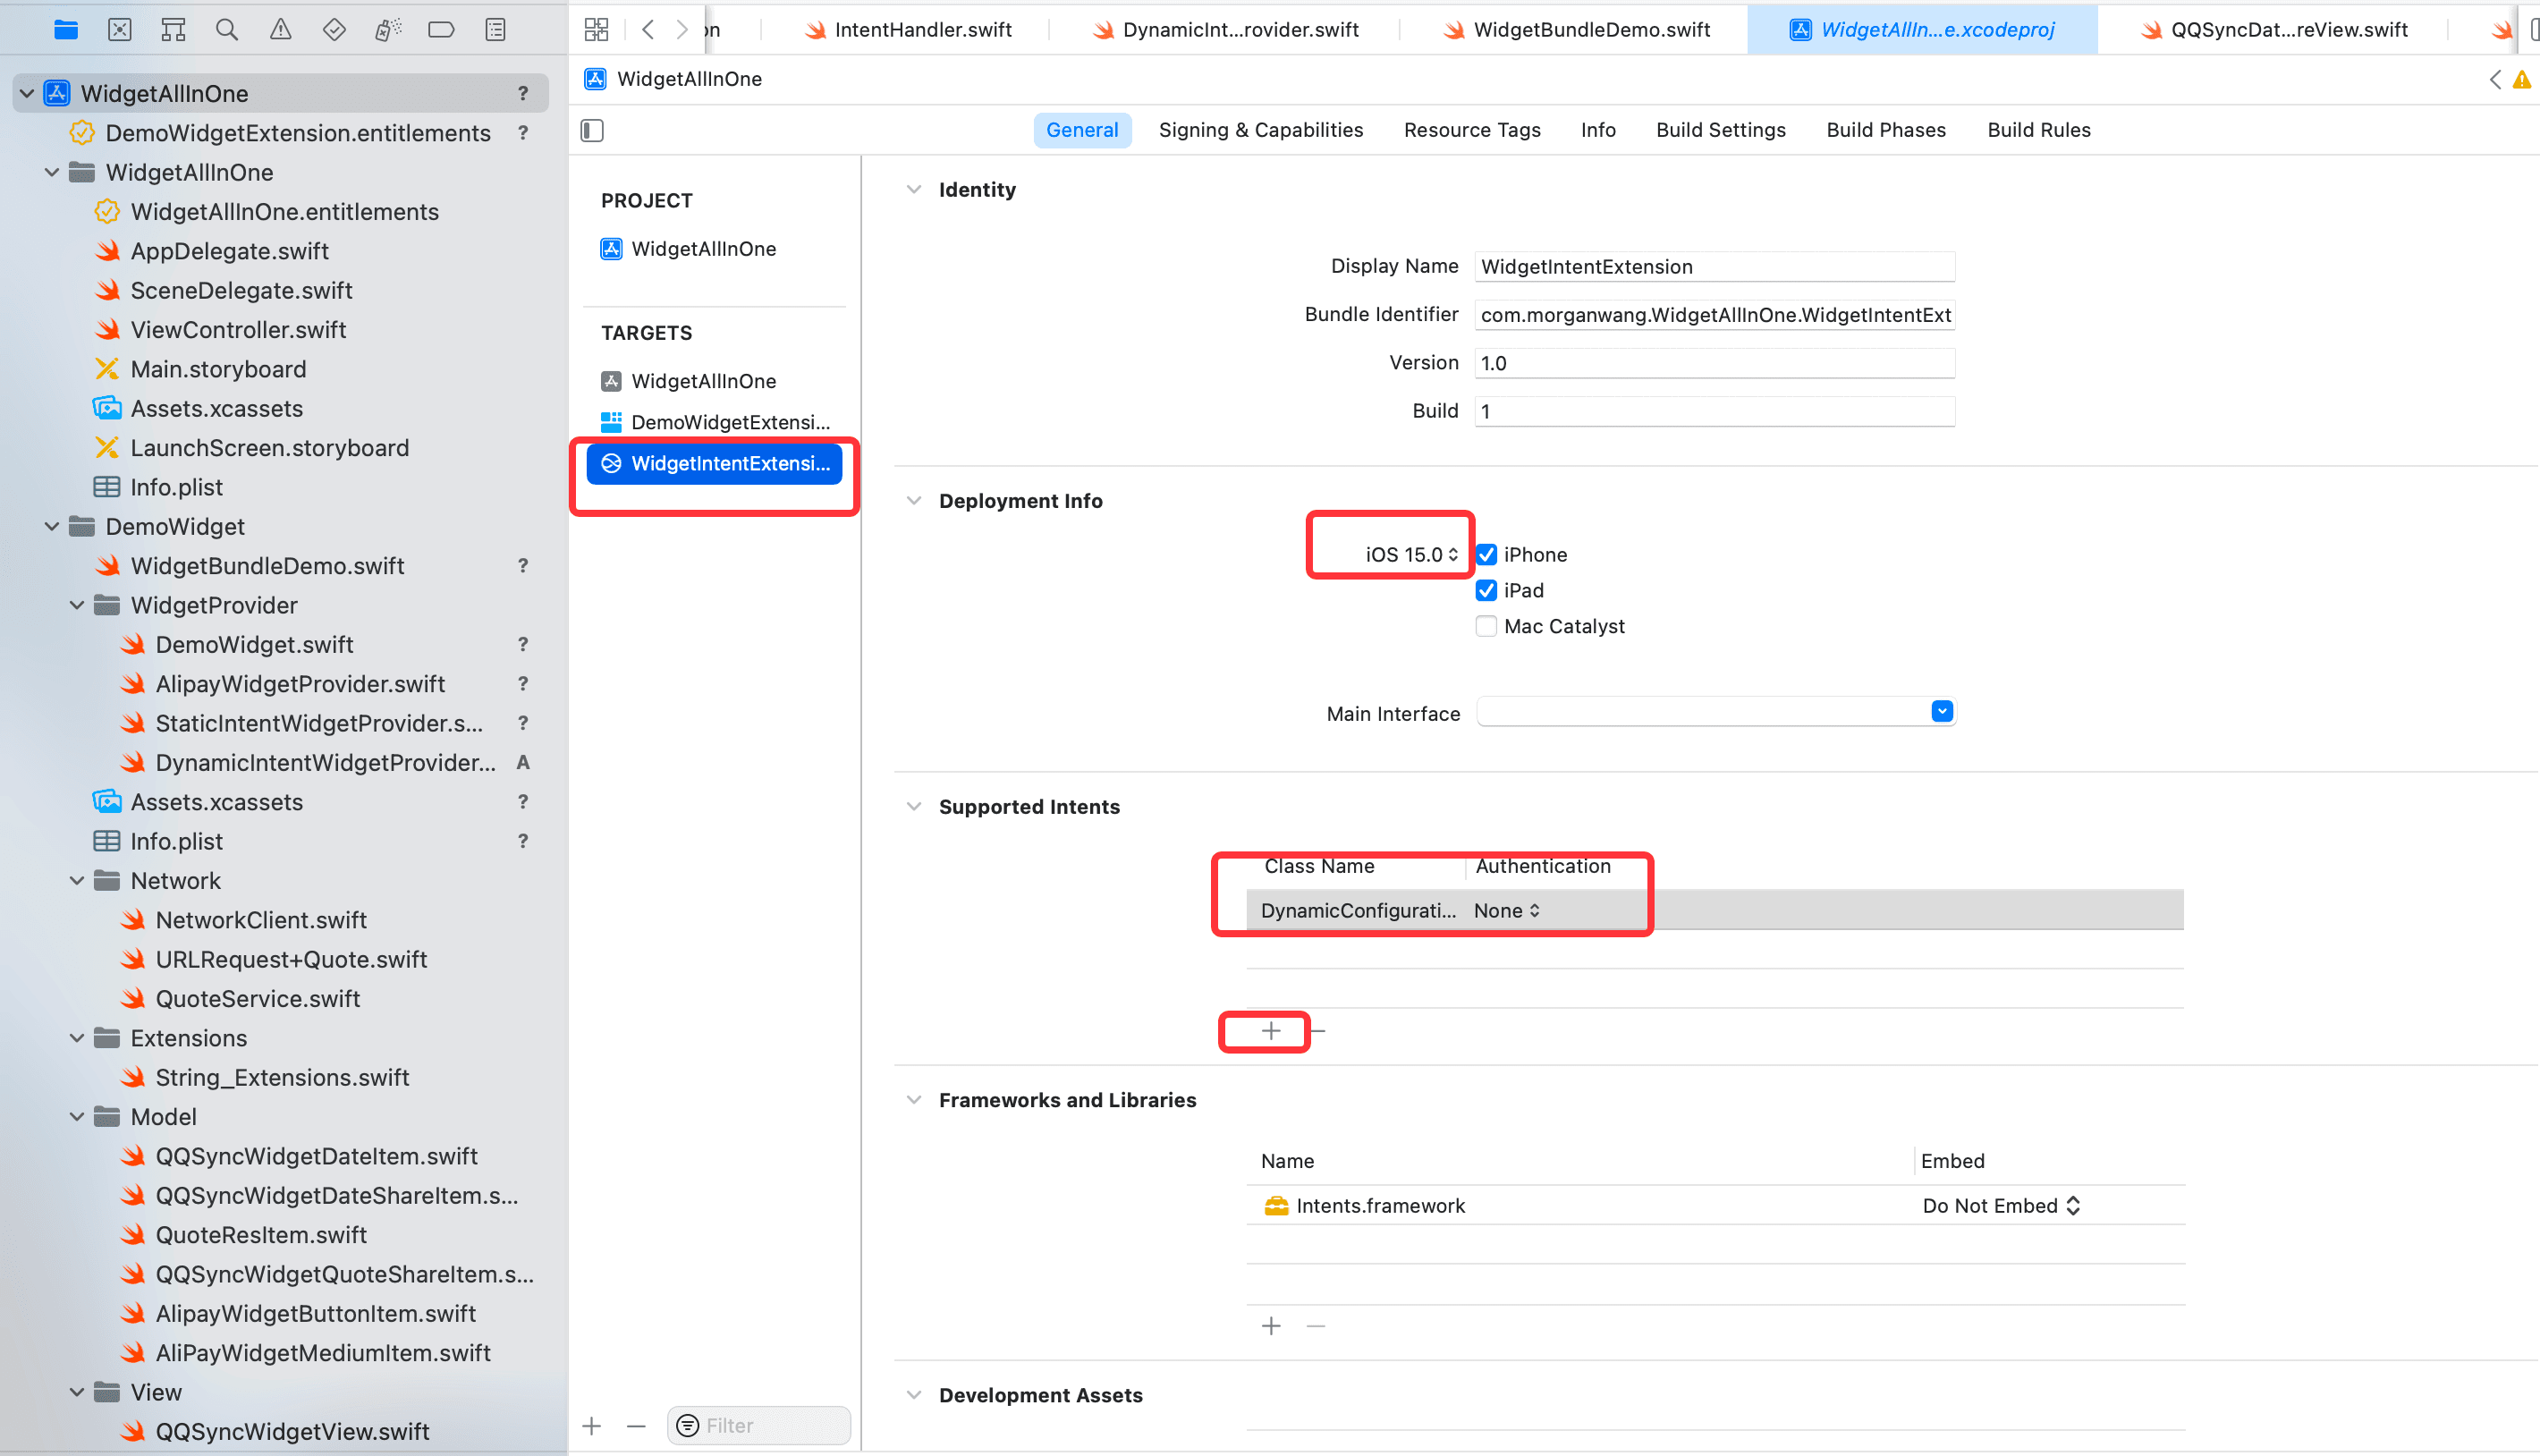
次に、プロジェクトを選択し、WidgetIntentExtensionターゲットを選択し、展開情報を15.0に変更し、サポートされるIntentで+をクリックし、DynamicConfigurationIntentを入力します。以下のように:
Intent ExtensionでButtonTypeを使用する必要があるため、ButtonTypeが含まれているクラスを選択し、ターゲットメンバーシップでIntent Extensionのターゲットにチェックを入れます。以下のように:
次に、IntentHandlerを選択します。ここがデータの供給元です。内容を以下のように変更します:
import Intents

class IntentHandler: INExtension {

    override func handler(for intent: INIntent) -> Any {
        // これはデフォルトの実装です。異なるオブジェクトが異なるインテントを処理する場合は、
        // これをオーバーライドして、その特定のインテントに対して返したいハンドラーを返すことができます。

        return self
    }

}

extension IntentHandler: DynamicConfigurationIntentHandling {
    func provideSelectButtonsOptionsCollection(for intent: DynamicConfigurationIntent, searchTerm: String?, with completion: @escaping (INObjectCollection<CustomButtonItem>?, Error?) -> Void) {
        let typeList: [ConfigrationButtonType] = [.scan, .pay, .healthCode, .trip, .travelCode, .stuck, .memberpoints, .yuebao]
        let itemList = generateItemList(from: typeList)
        completion(INObjectCollection(items: itemList), nil)
    }

    func defaultSelectButtons(for intent: DynamicConfigurationIntent) -> [CustomButtonItem]? {
        let defaultBtnTypeList: [ConfigrationButtonType] = [.scan, .pay, .healthCode, .trip]
        let defaultItemList = generateItemList(from: defaultBtnTypeList)
        return defaultItemList
    }

    fileprivate func generateItemList(from typeList: [ConfigrationButtonType]) -> [CustomButtonItem] {
        let defaultItemList = typeList.map({
            let formatBtnType = buttonType(from: $0)
            let item = CustomButtonItem(identifier: formatBtnType.id,
                                        display: formatBtnType.displayName)
            item.buttonType = $0
            item.urlStr = formatBtnType.urlStr
            item.imageName = formatBtnType.imageName
            return item
        })
        return defaultItemList
    }

    // Intentで定義されたボタンタイプをウィジェットで使用するボタンタイプに変換します
    func buttonType(from configurationType: ConfigrationButtonType) -> ButtonType {
        switch configurationType {
        case .scan:
            return .scan
        case .pay:
            return .pay
        case .healthCode:
            return .healthCode
        case .travelCode:
            return .travelCode
        case .trip:
            return .trip
        case .stuck:
            return .stuck
        case .memberpoints:
            return .memberpoints
        case .yuebao:
            return .yuebao
        case .unknown:
            return .unknown
        }
    }
}
最後に新しいIntentTimelineProviderを作成し、この効果を表示します。コードは以下の通りです:
import Foundation
import WidgetKit
import SwiftUI

struct DynamicIntentWidgetProvider: IntentTimelineProvider {
    typealias Entry = DynamicIntentWidgetEntry
    typealias Intent = DynamicConfigurationIntent

    func placeholder(in context: Context) -> DynamicIntentWidgetEntry {
        DynamicIntentWidgetEntry(date: Date())
    }

    func getSnapshot(for configuration: DynamicConfigurationIntent, in context: Context, completion: @escaping (DynamicIntentWidgetEntry) -> Void) {
        let entry = DynamicIntentWidgetEntry(date: Date(), groupBtns: configuration.selectButtons)
        completion(entry)
    }

    func getTimeline(for configuration: DynamicConfigurationIntent, in context: Context, completion: @escaping (Timeline<DynamicIntentWidgetEntry>) -> Void) {
        let entry = DynamicIntentWidgetEntry(date: Date(), groupBtns: configuration.selectButtons)
        let expireDate = Calendar.current.date(byAdding: .hour, value: 1, to: Date()) ?? Date()
        let timeline = Timeline(entries: [entry], policy: .after(expireDate))
        completion(timeline)
    }
}


struct DynamicIntentWidgetEntry: TimelineEntry {
    let date: Date
    var groupBtns: [CustomButtonItem]?
}

struct DynamicIntentWidgetEntryView: View {
    var entry: DynamicIntentWidgetProvider.Entry

    var body: some View {
        AlipayWidgetMeidumView(mediumItem: AliPayWidgetMediumItem(with: entry.groupBtns))
    }
}

struct DynamicIntentWidget: Widget {

    let kind: String = "DynamicIntentWidget"

    var title: String = "DynamicIntentWidget"
    var desc: String = "DynamicIntentWidgetの説明"

    var body: some WidgetConfiguration {
        IntentConfiguration(kind: kind,
                            intent: DynamicConfigurationIntent.self,
                            provider: DynamicIntentWidgetProvider()) { entry in
            DynamicIntentWidgetEntryView(entry: entry)
        }
        .configurationDisplayName(title)
        .description(desc)
        .supportedFamilies([.systemMedium])
    }
}
効果は以下の通りです:
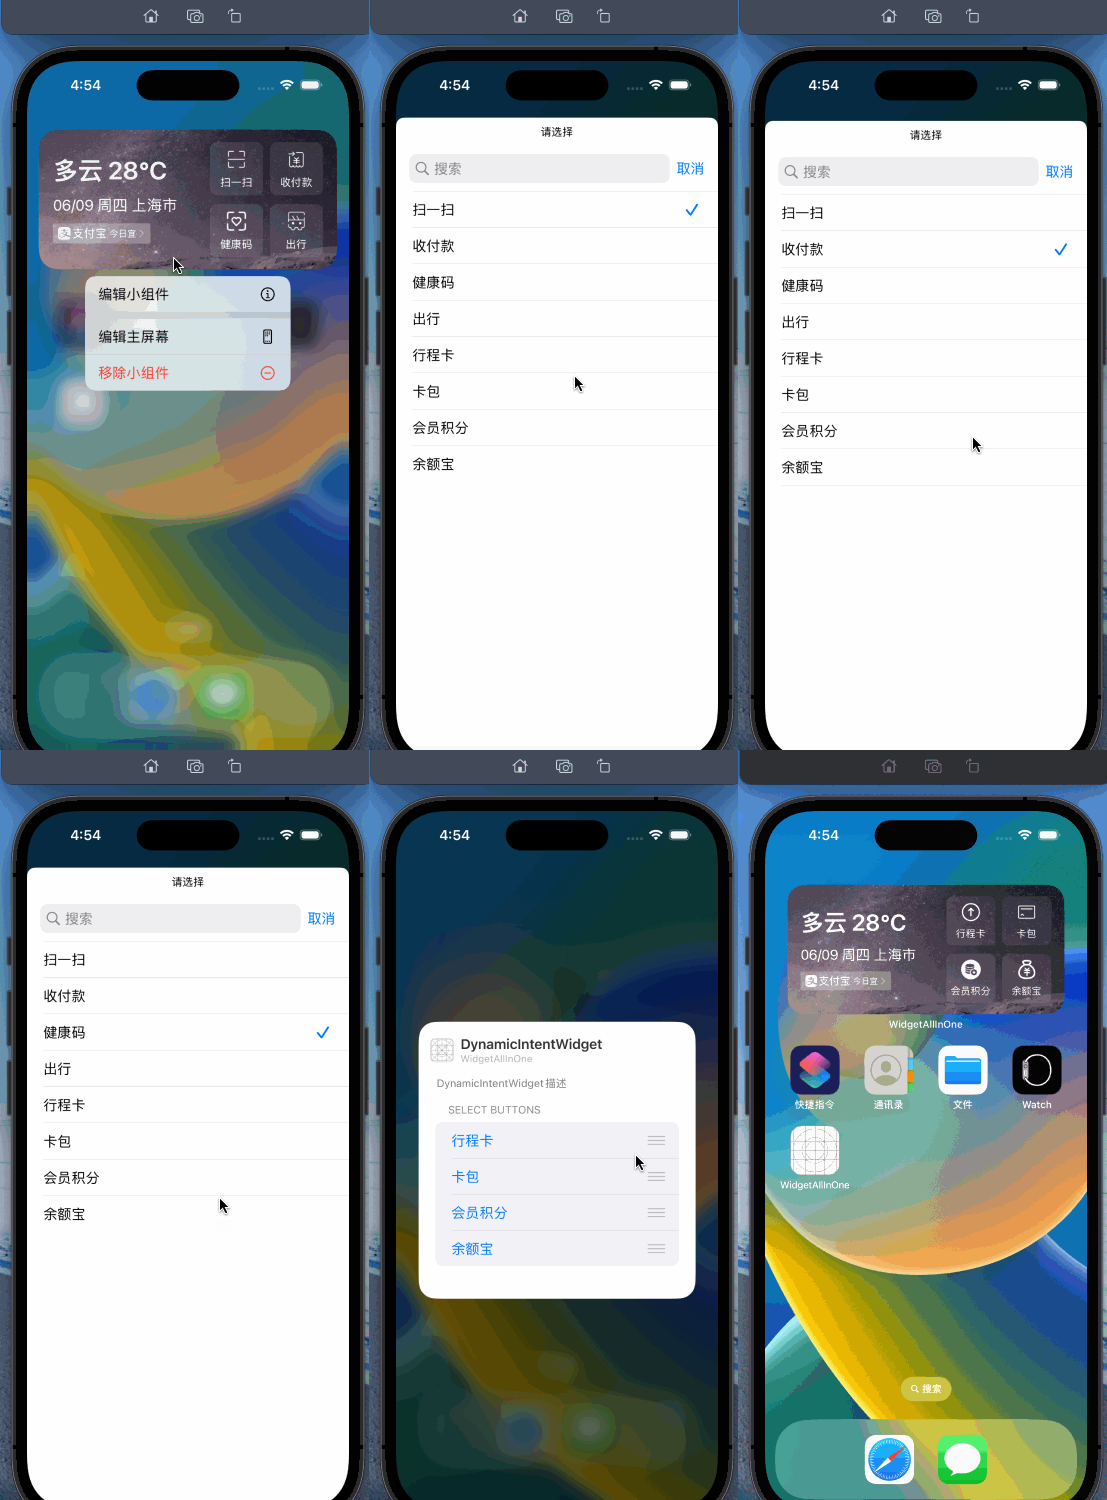
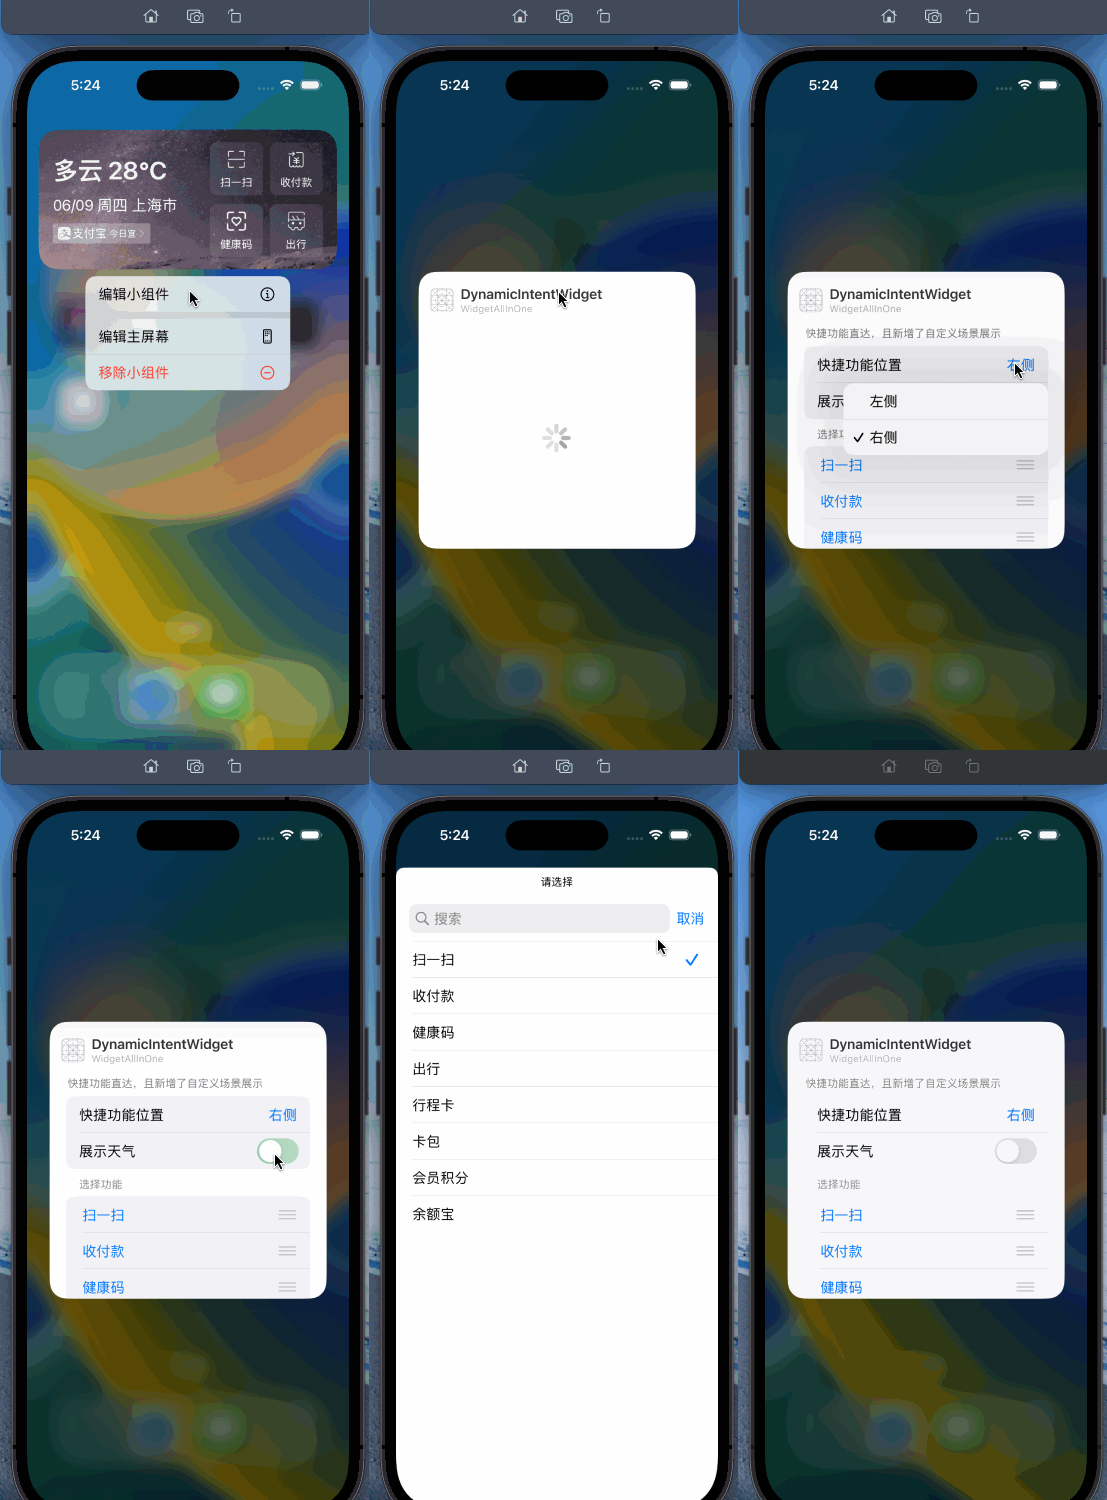
これでほぼ完成です。支付宝ウィジェットと比較すると、天気の表示と機能の位置選択のスタイルがまだ残っています。DynamicConfigurationのパラメータに、機能の位置選択をEnum型、天気の表示をBool型として直接追加し、位置を調整し、selectButtons属性を最下部に移動します。詳細な手順は皆さん自身で試してみてください。
最終的な効果は以下の通りです:
まとめ:#

完全なプロジェクトコードはgithubにアップロードされています:https://github.com/mokong/WidgetAllInOne
補足:
ウィジェットを更新したい場合、ウィジェットのデフォルトの更新タイミングはタイムライン設定に基づいていますが、強制的に更新したい場合、例えばアプリ内で操作を行い、状態が変化した場合、ウィジェットを更新するには以下のコードを使用し、更新をトリガーする場所で呼び出すことができます:
import WidgetKit

@objc
class WPSWidgetCenter: NSObject {
    @available(iOS 14, *)
    static func reloadTimelines(_ kind: String) {
        WidgetCenter.shared.reloadTimelines(ofKind: kind)
    }

    @available(iOS 14, *)
    @objc static func reloadAllTimelines() {
        WidgetCenter.shared.reloadAllTimelines()
    }
}